EasyManua.ls Logo

on stage GS7141 - User Manual

on stage GS7141
3 pages
Print Icon
To Next Page IconTo Next Page
Loading...
REVIEW THE MATERIALS
Remove item from box. Compare the contents against the Parts List below. If any parts are missing, do not attempt to assemble
this guitar system. Instead, contact the Customer Service Department at cs@MusicPeopleInc.com or call us at (800) 289-8889.
A. Leg Assembly
B. Spring Loaded Lower Shaft
C. Lower Yoke
D. Upper Shaft
E. Upper Yoke w/nut
F. Washer
G. Screw
H. Hex Wrench
A. B.
1. + 2.
D. E.C.
4.
F. G. H.
For more detailed instructions, visit our site: On-Stage.com
Push Down-Spring-Up Guitar stand
Assembly Instructions
GS7141
STANDS
ASSEMBLING THE GS7141
1. Open the three legs on the Leg Assembly and
place it on a at surface. The short leg provides
backward tilt and represents the back of the
stand.
2. Holding the Lower Shaft steady, screw the
Lower Yoke onto the Lower Shaft by turning the
yoke clockwise until it is tight. Now
position the Lower Yoke evenly over the
two front legs.
3. Turn the Leg Housing with the Lower Shaft
upside down and place the washer between the
3 legs, then insert the hex bolt and tighten the
bolt with the Hex Wrench.
4. Place the Leg Assembly with Lower Shaft upright
on a at surface. Place the Upper Shaft over the
Lower Shaft, with the knob on the backside lined
up with the short leg. Loosely tighten the knob
at the highest position.
5. Remove nut from back of upper yoke. Insert
the upper yoke into the lower hole and
completely through the tubing. (Use the upper
hole if you have a large acoustic guitar or bass
that will exceed the lower position of the yoke by
½" or more.) Thread the nut onto the threading
at the back side of the yoke.
Short Leg
(Back of stand)
Front of stand
3.
Question and Answer IconNeed help?

Do you have a question about the on stage GS7141 and is the answer not in the manual?

Summary

Review the Materials

Assembling the GS7141

Leg Assembly and Initial Placement

Open the three legs and place the assembly on a flat surface. Position the short leg backward.

Lower Yoke Attachment

Screw the Lower Yoke onto the Lower Shaft until it is tight, ensuring it faces the front.

Leg Housing and Washer Placement

Turn the Leg Housing upside down and place the washer between the three legs.

Upper Yoke and Shaft Setup

Place the Upper Yoke over the Lower Shaft upright on a flat surface, then tighten the locking knob.

Fitting Your Guitar for the First Time

Positioning the Upper Yoke

Adjust the Upper Yoke height to rest within 1/4" of the guitar body's neck section.

Securing the Guitar

Loosen knob, adjust upper shaft height, and tighten knob to secure the guitar.

Using Your GS7141

Removing Your Guitar

Press down on the neck to clear the upper yoke, then pull the guitar forward and remove.

Placing Your Guitar

Rest the guitar body on the lower yoke, press down to clear the upper yoke, then place and secure.

A Word From The Designer

Overview

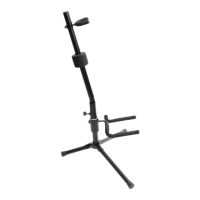
The On-Stage GS7141 is a Push Down-Spring-Up Guitar Stand designed to securely hold guitars, primarily acoustic and hollow-body instruments. Its innovative design focuses on a locking mechanism that provides stability and ease of use.

Function Description:

The primary function of the GS7141 is to provide a stable and secure resting place for a guitar. Unlike many smaller stands, it incorporates a unique locking device that holds the guitar firmly in place. This mechanism allows the guitar and stand to be moved as one unit once the instrument is secured, enhancing portability and reducing the risk of accidental falls. The stand is designed to accommodate various guitar sizes, with adjustable components to ensure an optimal fit.

Important Technical Specifications:

The stand consists of several key components:

  • Leg Assembly (A): Features three legs, with one designated as a "short leg" to provide backward tilt, indicating the back of the stand.
  • Spring Loaded Lower Shaft (B): A crucial component of the "Push Down-Spring-Up" mechanism, allowing for the locking action.
  • Lower Yoke (C): The primary resting point for the guitar's body.
  • Upper Shaft (D): An adjustable shaft that supports the upper yoke.
  • Upper Yoke with Nut (E): The upper support for the guitar's neck, featuring two positioning holes for flexibility.
  • Washer (F), Screw (G), Hex Wrench (H): Hardware for assembly and adjustment.

The stand's design allows for two different positioning holes for the upper yoke on the upper shaft, along with a height adjustment knob. This adjustability ensures an ideal fit that holds the guitar firmly. The ideal fit positions the upper yoke resting on or within 1/4" of the top of the guitar body at the neck section when the guitar is resting on the lower yoke.

Usage Features:

Assembly:

  1. Leg Assembly Setup: Open the three legs of the Leg Assembly (A) and place it on a flat surface. The short leg should be positioned at the back to provide backward tilt.
  2. Lower Yoke Attachment: Screw the Lower Yoke (C) onto the Lower Shaft (B) clockwise until tight. Position the Lower Yoke evenly over the two front legs.
  3. Securing the Leg Housing: Turn the Leg Housing with the Lower Shaft upside down. Place the Washer (F) between the three legs, then insert the Hex Bolt (G) and tighten it with the Hex Wrench (H).
  4. Upper Shaft Placement: Place the Leg Assembly with the Lower Shaft upright. Position the Upper Shaft (D) over the Lower Shaft, aligning the knob on the backside with the short leg. Loosely tighten the knob at the highest position initially.
  5. Upper Yoke Installation: Remove the nut from the back of the Upper Yoke (E). Insert the Upper Yoke into the lower hole and completely through the tubing. (The upper hole can be used for larger acoustic guitars or basses that might exceed the lower yoke position by 1/2" or more). Thread the nut back onto the threading at the back of the yoke.

Fitting Your Guitar for the First Time:

  1. Initial Placement: While holding the guitar's neck, rest its body on the Lower Yoke (C). The neck should rest back on the round bumper, but do not depress the Spring Loaded Lower Shaft (B) at this stage.
  2. Upper Yoke Positioning: Determine the most suitable position for the Upper Yoke (E). It should rest on or within 1/4" of the top of the guitar body at the neck section. If adjustment is needed, remove the nut from the back of the Upper Yoke, take the yoke out of the tubing, reinsert it into the other positioning hole, and secure it with the nut.
  3. Securing the Guitar: Loosen the locking knob on the back of the stand. Allow the Upper Shaft (D) to go down until the Upper Yoke (E) rests tightly against the guitar's neck. Tighten the knob on the upper shaft. The guitar is now safely secured.

Note: The GS7141 is designed for most acoustic and hollow-body guitars. It is not recommended for use with 3/4 or smaller instruments. The stand is designed for right-handed players.

Using Your GS7141 (Routine Use):

To Set Your Guitar in Place:

  1. Rest the guitar's body on the Lower Yoke (C).
  2. Press downwards until the guitar clears the Upper Yoke (E).
  3. Place the guitar under the Upper Yoke and allow the spring clamp to hold it in place.
  4. Once secured, the guitar and stand can be moved together as one piece.

To Remove Your Guitar:

  1. While holding the guitar's neck, press downwards until the guitar clears the Upper Yoke (E).
  2. Pull the guitar forward and remove it.

Maintenance Features:

The manual does not explicitly detail maintenance features. However, given the mechanical nature of the stand, general best practices for maintaining guitar accessories would apply:

  • Regular Inspection: Periodically check all screws, nuts, and connections for tightness to ensure stability.
  • Cleaning: Wipe down the stand with a soft cloth to remove dust and grime.
  • Lubrication (if needed): If the adjustable shafts or spring mechanism become stiff over time, a light application of a suitable lubricant might be considered, though this is not specified in the manual.
  • Storage: Store the stand in a dry environment to prevent rust or material degradation.

The GS7141 is a robust and thoughtfully designed guitar stand, offering a secure and convenient solution for guitar storage and transport. Its "Push Down-Spring-Up" mechanism provides a unique locking feature that enhances the safety of the instrument.

on stage GS7141 Specifications

General IconGeneral
Brandon stage
ModelGS7141
CategoryAccessories For Music Instruments
LanguageEnglish

Related product manuals