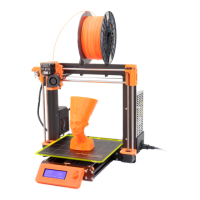
This manual describes the operation, usage, and maintenance of Prusa MK3S and MINI 3D printers, which are capable of creating custom objects from 3D models using PLA plastic filament. The printing process is not instantaneous, and print times are limited to the library's operating hours.
Function Description
The Prusa MK3S and MINI 3D printers convert 3D models into physical objects by extruding layers of PLA plastic. The core function involves taking a 3D model file (preferably .STL or .OBJ) and processing it through specialized software called PrusaSlicer. This software "slices" the 3D model into thin layers, generating G-CODE instructions that the printer then follows to build the object layer by layer.
Usage Features
1. Finding and Designing Models:
Users can obtain 3D models from various online repositories or design them from scratch.
- Online Repositories:
- Thingiverse.com: A large repository for 3D models.
- Printables.com: A newer repository by Prusa, with a broad range of designs.
- MyMiniFactory.com: Offers a selection of accessibility aids and niche designs.
- Cults3D.com: Features high-detail and high-quality models, some requiring payment.
- Design Software:
- Tinkercad.com: A free, browser-based tool ideal for beginners, used in 3D design classes.
- Fusion 360: Available on Maker Studio computers, suitable for mechanical parts, with a slight learning curve.
- Blender: An advanced, free program for sculptural and organic works, with a steep learning curve.
- HeroForge: A browser-based platform for tabletop miniature creation, allowing scaling for larger figures.
- SketchUp: A free, browser-based CAD program, though less commonly used for 3D design.
- SculptGL: A free, browser-based sculpting program capable of high-quality sculpted models.
2. PrusaSlicer Software:
PrusaSlicer is essential for preparing models for printing.
- Modes: Simple, Advanced, and Expert modes offer varying levels of tool and setting access. The guide uses Expert mode for comprehensive coverage.
- Top Bar Tools:
- Add: Imports an .STL file into the project.
- Delete/Delete all: Removes selected objects or all objects from the design.
- Arrange: Spaces out multiple parts on the print bed.
- Copy and paste: Creates an independent copy of a model.
- Add and remove instances: Creates linked copies where changes to one apply to all instances.
- Split into objects/parts: Separates a model into individual components or whole sections.
- Undo/Redo: Reverts or reapplies actions.
- Left Sidebar Tools:
- Move: Allows free-form or axis-specific movement of the model.
- Scale: Adjusts model size proportionally or along individual axes (by unlocking proportions).
- Rotate: Rotates the model along an axis.
- Put on a face: Quickly rotates a model to sit flat on the print bed.
- Cut: Divides a model into two parts, useful for oversized prints.
- Object Manipulation (Right Sidebar): Provides precise control over position, rotation, and scale using numerical units. Users can toggle size units between millimeters and inches.
- Settings:
- Print settings (Layer Height): Determines print detail and time. Smaller numbers yield more detail but longer print times.
- Filament: Defaults to PLA. Can be adjusted if using custom filament.
- Printer Selection: Ensures the correct printer model (MK3S or MINI) is selected.
- Supports: Required for overhangs. "Everywhere" option automatically generates supports where needed.
- Infill: Adjusts the solidity of the print, affecting print time, weight, and structure.
- Brim: Adds rings of filament around the model's base for increased adhesion, especially for skinny objects.
- View Toggle: Switches between 3D model view and sliced view for making changes or reviewing the sliced output.
3. Slicing Process:
- Open an .STL file in PrusaSlicer.
- Adjust placement and size using sidebar tools.
- Set print settings (printer, supports, layer height, etc.).
- Click "slice now" to generate the sliced view.
- Review the info pane for filament usage (grams) and estimated print time. Print times exceeding 10 hours may require adjustments.
- Export the G-CODE to flash media.
4. Starting a Print (Prusa MK3S):
- Transfer the G-CODE file to an SD card.
- Turn on the 3D printer using the back-right switch.
- Insert the SD card (label facing down) into the front slot.
- Scroll through the displayed files using the click wheel and press the knob to select the desired print.
- The printer will calibrate and begin printing.
5. Starting a Print (Prusa MINI):
- Transfer the G-CODE file to a USB flash drive.
- Turn on the 3D printer using the back-right switch.
- Insert the flash drive into the slot next to the power switch.
- Scroll to the "Print" option using the click wheel and press the knob to confirm.
- The printer will calibrate and begin printing.
6. Filament Management (Loading):
- MK3S Loading:
- Snip the filament tip to a sharp angle.
- From the menu, select "Load Filament."
- Select the appropriate filament type (PLA is common).
- Insert filament into the extruder hole and press the knob.
- The printer heats up and extrudes. Confirm color; if incorrect, continue extruding until desired color appears, then select "Yes."
- MINI Loading:
- From the menu, find "Filament," then "Load Filament."
- Select the appropriate filament type.
- Insert filament into the PTFE tube end near the power switch, push to the extruder, and press the control knob.
- The printer heats up and extrudes. Confirm color; if incorrect, continue extruding until desired color appears, then select "Yes."
7. Filament Management (Unloading):
- MK3S Unloading:
- From the menu, select "Unload Filament."
- Select the current filament type. The printer heats up.
- Once it beeps, press the control knob to remove the filament.
- MINI Unloading:
- From the menu, select "Unload Filament." The printer heats up automatically.
- Once it beeps, press the control knob and fully pull the filament out of the PTFE tube.
8. Filament Management (Mid-Print Run-Out):
- MK3S/MINI:
- The printer stops and beeps. Press the knob to eject remaining filament.
- Insert a new roll into the extruder (MK3S) or PTFE tube (MINI) and press the knob.
- If using the same filament, confirm color to resume. If using a different filament, press "no" a few times to flush out the old color before confirming.
Maintenance Features
1. Removing a Print:
- Lift the corners of the magnetic steel sheet from the print bed.
- Gently bend the plate in multiple directions to release the print.
- Remove any remaining filament from the plate.
- Replace the steel sheet using the back posts as guides.
2. Cleaning the Print Bed:
- Frequency: Weekly or after extensive use.
- Procedure: Remove the cool steel sheet. Apply 90%+ isopropyl alcohol to a paper towel and clean the surface until fingerprints are gone. Return the sheet.
3. Cleaning the Nozzle:
- Purpose: To remove filament buildup from failed prints or curling.
- Procedure (MK3S/MINI):
- Raise the Z-axis a few inches above the build plate via "Settings > Move axis > Move Z."
- Navigate to "Temperature" in the settings menu and set the nozzle temperature to 250.
- Once fully heated, gently brush the nozzle with a brass bristle brush until clean.
- Press the reset button to end the heating process.