10
To point the telescope to the east or west, or in other direc-
tions, you rotate the telescope on its R.A. and Dec. axes.
Depending on the altitude of the object you want to observe,
the counterweight shaft will be oriented somewhere between
vertical and horizontal.
Figure 10 illustrates how the telescope will look pointed at the
four cardinal directions—north, south, east, and west
The key things to remember when pointing the telescope is
that a) you only move it in R.A. and Dec., not in azimuth or
latitude (altitude), and b) the counterweight and shaft will not
always appear as it does in Figure 1a. In fact, it almost never
will!
6. Collimating the Optics
Collimating is the process of adjusting the mirrors so they are
aligned with one another. Your telescope’s optics were aligned
at the factory, and should not need much adjustment unless
the telescope is handled roughly. Accurate mirror alignment is
important to ensure peak performance of your telescope, so
it should be checked regularly. Collimating is relatively easy to
do and can be done in daylight.
To check optical alignment, remove the eyepiece and look
down the focuser drawtube. You should see the secondary
mirror centered in the drawtube, as well as the reection of
the primary mirror centered in the secondary mirror, and the
reection of the secondary mirror (and your eye) centered in
the reection of the primary mirror, as in Figure 11a. If any-
thing is off-center, proceed with the following collimating pro-
cedure.
The Collimating Cap and Primary
Mirror Center Mark
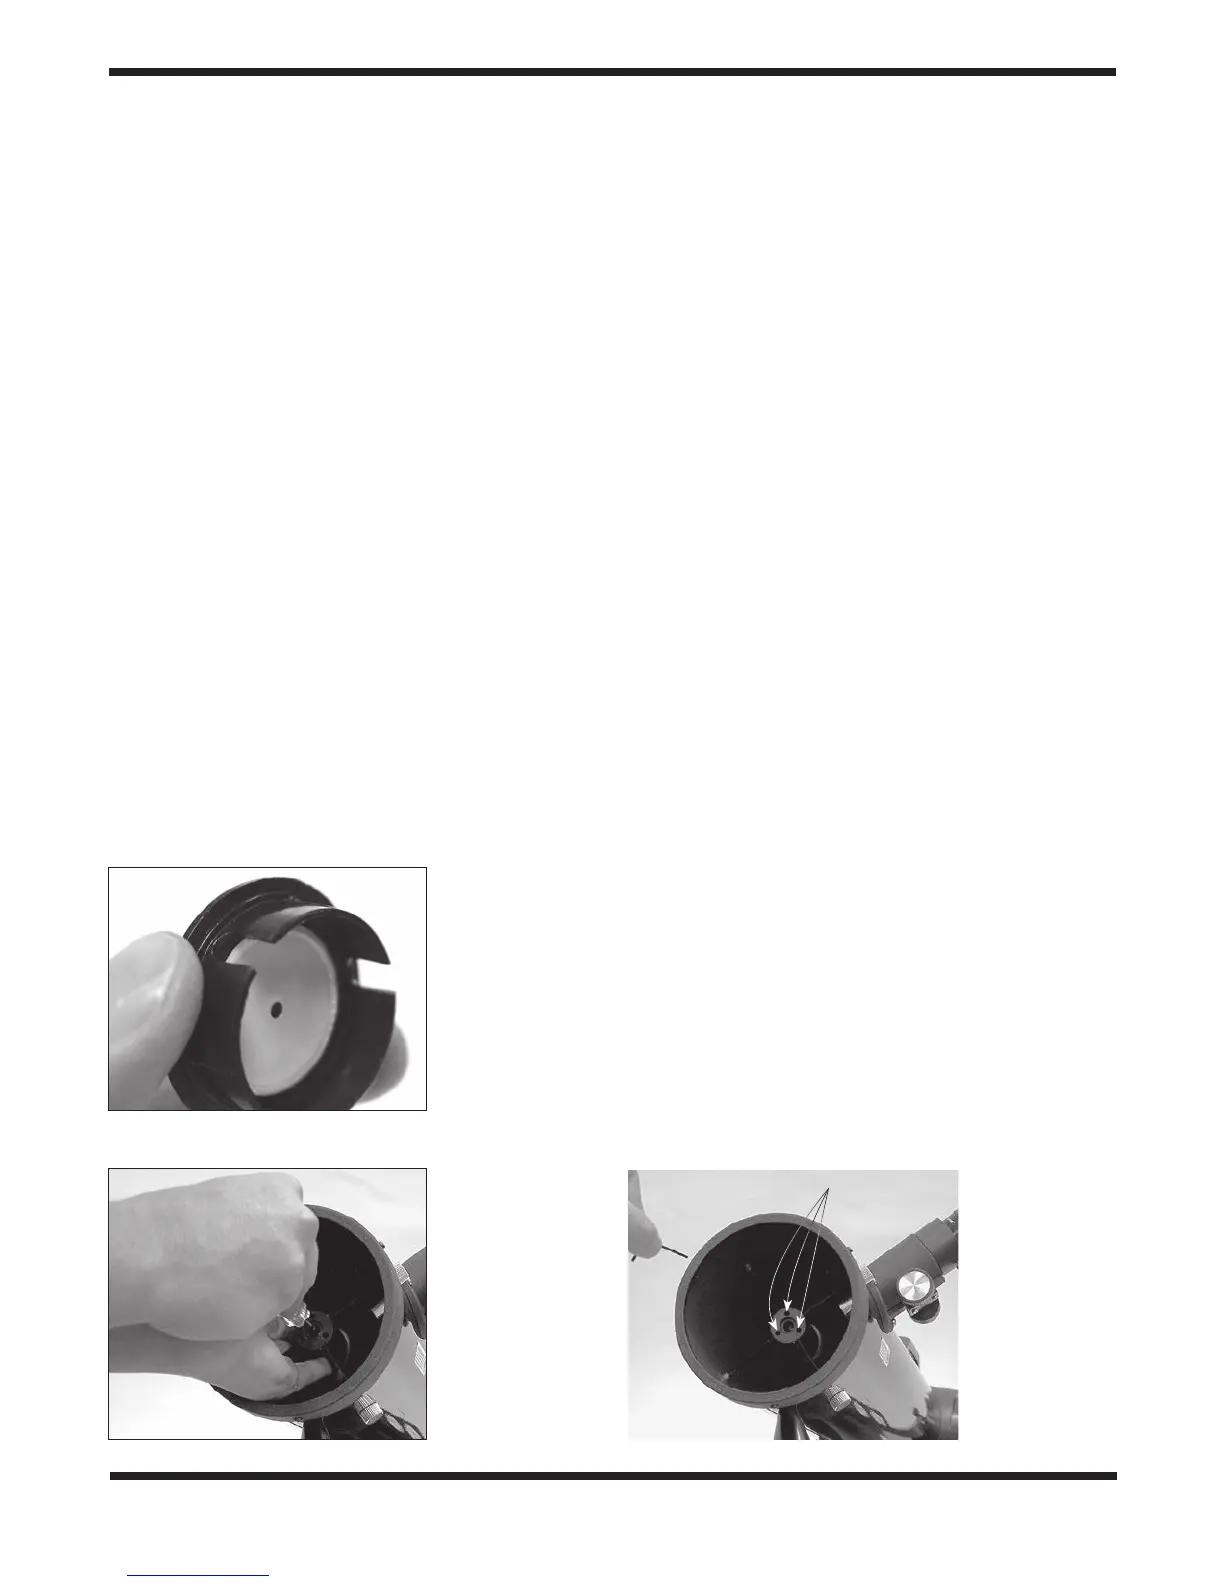
Your StarBlast II 4.5 EQ comes with a collimating cap (Figure
12).This is a simple cap that ts on the focuser drawtube like a
dust cap, but has a hole in the center and a light, reective sur-
face on the underside. This helps center your eye so collimating
is easy to perform. Figures 11b through 11e assume you have
the collimating cap in place.
In addition to the collimating cap, you’ll notice a small ring label
on the exact center of the primary mirror. This “center mark”
allows you to achieve a very precise alignment of the primary
mirror; you don’t have to guess where the center of the mirror is.
Aligning the Secondary Mirror
It helps to adjust the secondary mirror in a brightly lit room with
the telescope pointed toward a bright surface, such as white
paper or wall. Placing a piece of white paper in the telescope
tube opposite the focuser (i.e. behind the secondary mirror) will
also be helpful in collimating the secondary mirror.
With the collimating cap in place, look through the hole in the cap
at the secondary (diagonal) mirror. Ignore the reections for the
time being. The secondary mirror itself should be centered in the
focuser drawtube,. If it isn’t, as in Figure 11b, it must be adjust-
ed. Typically, this adjustment will rarely, if ever, need to be done.
Note: When making adjustments to the secondary mirror posi-
tion, be careful not to stress the spider vanes, or they may bend.
To adjust the secondary mirror left-to-right in the focuser draw-
tube, use a 2.5mm hex key to loosen the three small alignment
setscrews in the center hub of the 4-vaned spider several turns.
Now hold the mirror holder stationary (be careful not to touch
the surface of the mirror), while turning the center screw with a
Phillips head screwdriver (Figure 13). Turning the screw clock-
wise will move the secondary mirror toward the front opening of
the optical tube, while turning the screw counter-clockwise will
move the secondary mirror toward the primary mirror. When the
secondary mirror is centered left-to-right in the focuser drawtube,
rotate the secondary mirror holder until the reection of the pri-
mary mirror is as centered in the secondary mirror as possible. It
may not be perfectly centered, but that is OK for now. Tighten the
three small alignment setscrews equally to secure the secondary
mirror in that position.
If the entire primary mirror reection is not visible in the second-
ary mirror, as in Figure 11c, you will need to adjust the tilt of the
secondary mirror. This is done by alternately loosening one of
Figure 14.
Adjust the tilt of
the secondary
mirror by
loosening one
of the three
alignment set
screws then
tightening the
other two.
Alignment set screws (3)
Figure 12. The
quick collimation
cap, which features
a reective inner
surface, helps in
centering reections
of the optics in the
focuser during the
collimation process.
Figure 13.
To center the
secondary mirror
under the focuser,
hold the secondary
mirror holder in
place with your
ngers while
adjusting the
center screw with
the Phillips head
screwdriver. Do not
touch the mirror’s
surface.
 Loading...