5
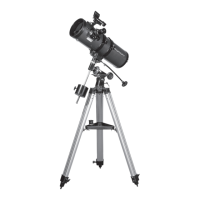
1. Keeping one hand on the telescope optical tube, loosen
the R.A. lock knob. Make sure the Dec. lock knob is locked,
for now. The telescope should now be able to rotate freely
about the R.A. axis. Rotate it until the counterweight shaft
is parallel to the ground (i.e., horizontal).
2. Now loosen the counterweight lock knob and slide the
weight along the shaft until it exactly counterbalances the
telescope (Figure 4a). That’s the point at which the shaft
remains horizontal even when you let go of the telescope
with both hands.
3. Retighten the counterweight lock knob. The telescope is
now balanced on the R.A. axis.
4. To balance the telescope on the Dec. axis, rst tighten
the R.A. lock knob, with the counterweight shaft still in the
horizontal position.
5. With one hand on the telescope optical tube, loosen the
Dec. lock knob. The telescope should now be able to rotate
freely about the Dec. axis (Figure 4b). Loosen the knurled
tube ring clamps a few turns, until you can slide the tele-
scope tube forward and back inside the rings Using a
slight twisting motion on the optical tube can help move
the tube within the rings.
6. Position the telescope so it remains horizontal when you
carefully let go with both hands. This is the balance point.
Before clamping the tube rings tight again, rotate the tele-
scope so the eyepiece is at a convenient angle for view-
ing. When you are actually observing with the telescope,
you can adjust the eyepiece position by loosening the tube
rings and rotating the optical tube.
7. Retighten the tube ring clamps.
The telescope is now balanced on both axes. Now when you
loosen the lock knob on one or both axes and manually point the
telescope, it should move without resistance and should not drift
from where you point it.
Focusing the Telescope
With the 25mm eyepiece in the focuser, move the telescope
so the front (open) end is pointing in the general direction of an
object at least 1/4-mile away. Now with your ngers, slowly rotate
one of the focusing knobs until the object comes into sharp
focus. Go a little bit beyond sharp focus until the image starts
to blur again, then reverse the rotation of the knob, just to make
sure you’ve hit the exact focus point.
Do You Wear Eyeglasses?
If you wear eyeglasses, you may be able to keep them on while
you observe. In order to do this, your eyepiece must have enough
“eye relief” to allow you to see the entire eld of view with glasses
on. You can try this by looking through the eyepiece rst with your
glasses on and then with them off, and see if the glasses restrict
the view to only a portion of the full eld. If the glasses do restrict
the eld of view, you may be able to observe with your glasses
off by just refocusing the telescope.
If your eyes are astigmatic, however, images will probably appear
better with glasses on. This is because a telescope’s focuser can
accommodate for nearsightedness or farsightedness, but not
astigmatism. If you have to wear your glasses while observing
and cannot see the entire eld of view, you may want to consider
purchasing special eyepieces that have extra-long eye relief.
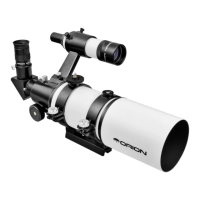
Operating the EZ Finder II Reflex Sight
The EZ Finder II reex sight (Figure 5) makes pointing your
telescope almost as easy as pointing your nger! It’s a non-
magnifying aiming device that superimposes a tiny red dot on
the sky, showing exactly where the telescope is pointed.
Installing the Battery in the EZ Finder II
Before installing the EZ Finder II on the telescope, you will
need to insert the included CR2032 3V lithium button cell bat-
tery in the EZ Finder II. If there is a small plastic tab sticking
out from the battery compartment cover, you must remove it
for the battery to make contact with the EZ Finder’s electronic
circuitry. The tab can then be discarded.
1. Turn the EZ Finder II upside down as shown in Figure 6a.
2. Insert a small, at-blade screwdriver into the notch in the bat-
tery compartment cover and gently pry it off.
Figure 4.
Proper usage of the equatorial mount requires the telescope tube to be balanced on both the R.A. and Dec. axes. (a) With the
R.A. lock knob released, slide the counterweight along the counterweight shaft until it just counterbalances the tube. When you let go with
both hands, the tube should not drift up or down. (b) With the Dec. lock knob released, loosen the tube ring lock clamps a few turns and
slide the telescope forward or back in the tube rings. When the tube is balanced about the Dec. axis, it will not move when you let go.
b.
a.
RA lock knob
Dec. lock knob
Tube ring clamps
 Loading...