INSTALLING THE OUTBACKER
OB8 / OB8-500 / SPLIT / TRI - SPLIT / OB8JR
INTRODUCTION
Thank you for purchasing the OB8. Please take a few moments to carefully read these instructions before installing
your antenna. This will ensure that your mobile set-up works and works well!
Like all OUTBACKER® antenna, the OB8 is constructed of a very tough, yet flexible, fiberglass core. This core is
then helically wound with copper wire, which is hand-tuned to the various "tap" points. A coating of clear epoxy resin
is then applied. Finally a layer of coloured polyurethane is applied as a protection against the elements. All fittings on
the antenna are solid brass and nickel-plated. The 3/8" x 24tpi stud is made of tough, high-strength, stainless steel.
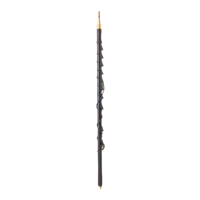
DESCRIPTION OF COMPONENTS
1. FIBERGLASS MAIN SHAFT - Location of helical coils. Base mounting stud is stainless steel with
standard 3/8" x 24 threads.
2. BAND SOCKETS - Non-corrosive and silver-plated sockets are clearly engraved with band markings.
These sockets are used for selecting a band of operation,
3. WANDER LEAD - Insulated 51" length of stranded wire with banana plug on each end. Used for 75m
through to 10 m operation (80m to 10m if antenna is fitted with 160m). One end should be plugged into the
WL socket and the other into the desired band socket. Must be wound (counter- clockwise) from the bottom
up. with coils evenly spaced and neither taut, nor hanging loosely. Remove completely from antenna for 80m
operation (applicable to 160m if fitted).
4. STINGER/ TIP/ TUNING ROD - Steel rod which extends up to 6" out of antenna shaft. Used for fine
tuning SWR.
5. KNURLED LOCKING NUT - Located at the top of the antenna shaft. Used for holding STINGER
in place -finger tighten only!
MOUNTING YOUR OB8
Correct mounting of your OB8 is of utmost importance to obtain successful antenna performance.
Trunk Lip and Hatch Mounting
When mounting in either of these types of configurations, please mount the antenna as far from the roof line of your
vehicle as possible. Be sure that the surface of the trunk lip and underneath the lip is clean and that there is solid
electrical contact from the mount to the trunk lip. Here is an easy way to do that.
Fit the mount in place and tighten its set-screws, then "back out" set-screws and remove mount. Look at
indentation points left by set-screws. Use your pocket knife to scrape off pain! at those points, exposing shiny metal.
Reinstall mount, ensuring set-screws fit into scraped-clean-of-paint points and are in contact with shiny metal. Check
your mount and antenna occasionally to ensure everything remains snug. OUTBACKER® assumes no liability for
antennas lost as a result of loose mounts, or luirchvure.
Luggage compartment / Trunk lip mounting arc not recommended for antenna over 4ft in length.
INSTALLATION
The OB8 can be installed on cars, trucks, RVs. and for fixed operation (condos, apartments, etc.). As with any
antenna system, there are no specific rules to follow. However, here are some helpful suggestions.
1 Mount as high as possible, and as far away from other vertical metal areas as possible. If mounting in a condo,
use a melal balcony rail where possible, or three-inch wide copper foil (minimum 20 ft. length) for counterpoise.
2. The optimum mounting location for any mobile, is dead centre of the vehicle roof. However, since this is not
usually practical for most HF antennas, mount your antenna on the drivers side trunk of the vehicle to avoid tree
limbs, etc. (see Trunk Mounting section).
3. Use high grade 52-ohm RG-58cu coax, or similar, with at least 95% shield. Marine grade coax is the best. Do not use foam
coax as il will deform in heat and absorb moisture. Avoid solid centre conductor-type coax as il breaks easily.