EasyManua.ls Logo

Outsunny 840-222 - User Manual

Outsunny 840-222
12 pages
Print Icon
To Next Page IconTo Next Page
Loading...
EN_IMPORTANT, RETAIN FOR FUTURE REFERENCE: READ CAREFULLY.
FR_IMPORTANT:A LIRE ATTENTIVEMENT ET À CONSERVER POUR CONSULTATION
ULTÉRIEURE.
ES_IMPORTANTE, LEA Y GUARDE PARA FUTURAS REFERENCIAS.
PT_IMPORTANTE, RETER PARA REFERÊNCIA FUTURA: LEIA ATENTAMENTE.
DE_WICHTIG! SORGFÄLTIG LESEN UND FÜR SPÄTER NACHSCHLAGEN AUFBEWAHREN.
IT _ IMPORTANTE! CONSERVARE IL PRESENTE MANUALE PER FUTURO RIFERIMENTO E
LEGGERLO ATTENTAMENTE.
US_CAUS_CA
Tools Recommended
EN_Tips:Please do not use in Severe weather to avoid damage.
FR_Conseils : Ne pas utiliser dans des conditions méorologiques difciles an d'éviter tout dommage.
ES_Consejos:Por favor, no utilice en tiempo severo para evitar daños.
PT_Dicas:Por favor não utilizar em tempo severo para evitar danos.
DE_Tipps:Bitte nicht bei schlechtem Wetter verwenden, um Schäden zu vermeiden.
IT_Suggerimenti: si prega di non utilizzare in condizioni climatiche avverse per
evitare danni.
840-222_840-222V01
IN231000712V01_UK
(3x2.5m, 3.5x3m)
LED
Question and Answer IconNeed help?

Do you have a question about the Outsunny 840-222 and is the answer not in the manual?

Overview

This document is an instruction manual for an Outsunny motorized cassette awning, model numbers 840-222 and 840-222V01, available in sizes 3x2.5m and 3.5x3m, and featuring LED lighting. It provides essential information for assembly, operation, and maintenance of the awning.

Function Description:

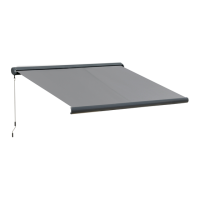
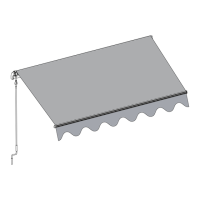
The Outsunny motorized cassette awning is designed to provide shade and protection from the sun. It features a full cassette design, meaning the fabric and arms are fully enclosed when retracted, offering protection from the elements and a sleek appearance. The awning is motorized, allowing for easy opening and closing via a remote control. It also includes LED lighting, enhancing its usability during evening hours. The awning's tilt angle is adjustable, allowing users to customize the shade coverage.

Important Technical Specifications:

  • Model Numbers: 840-222, 840-222V01
  • Sizes: 3x2.5m, 3.5x3m
  • Features: Motorized operation, full cassette design, LED lighting
  • Recommended Installation Height: 2.5m - 3.5m from the ground.
  • Required Headroom: 20cm above any door frame to ensure clearance when the door is open.
  • Awning Drop (Guideline): 30cm (for 2m projection) to 45cm (for 2.5m projection) at a 15-degree slope below horizontal.
  • Adjustable Slope: Approximately 15-30 degrees.
  • Wall Bracket Fixing: Must be directly into brick or concrete; mortar joints are not secure enough.
  • Drill Bit Size for Wall Mounting: 14mm for hammer-action electric drill.
  • Hole Depth for Wall Mounting: 90mm.
  • Tools Recommended: Electric drill (Φ14mm bit), wrenches (M10, M5, 14mm, 17mm, 19mm), ladder, measuring tape (5m), pencil.

Usage Features:

  • Motorized Operation: The awning is operated using a remote control ([06] x 1). The remote has buttons for "Lights on / off," "Close the awning," "Stop the opening/closing of the awning," and "Open the awning."
  • Manual Override: A manual winder ([02] x 1) is provided, likely for emergency use or if the motor is not functioning.
  • Angle Adjustment: The tilt angle of the awning can be adjusted using a jack bolt on each wall bracket. This involves loosening 17mm locking nuts, turning the jack bolt (middle screw, sometimes covered by a rubber cap) with an Allen key, and then tightening the locking nuts. It is crucial to ensure all angles are adjusted to the same level to prevent misalignment and ensure proper retraction and projection.
  • Opening/Closing Range Setting: The manual provides instructions for setting the awning's opening (extension) and closing (retraction) limits using adjustment screws on the motor (hidden inside the roller). The white screw controls the Max Retraction Point, and the red screw controls the Max Extension Point. Rotating towards the negative reduces the amount the awning retracts or extends.
  • Safety Precautions:
    • Do not use in severe weather (rainy, windy, frosty conditions) to avoid damage.
    • Always close the awning when not in use or during strong winds/heavy rain.
    • Do not install in high and windy places where it could drop and cause injury.
    • Do not hang anything on the frame or folding arms.
    • Do not barbecue or ignite a fire near the awning.
    • Do not use in places with vibrations, impulsions, or high temperatures (e.g., near furnaces).
    • Do not open the awning during nearby maintenance (e.g., window cleaning).
    • Ensure sufficient free space around the awning during rolling/unrolling.
    • The folding arms are under tension; do not attempt to disassemble or repair the awning yourself. Consult a competent technician.
    • Improper installation can lead to serious personal injury or property damage.
  • Installation: Requires at least two persons (three or more for larger models like 3.5m - 6.0m full cassette awnings) due to the weight. Scaffold towers may be required for larger installations. Ensure the wall is strong enough and suitable for installation. The fabric should feed from the top, not the bottom, for correct installation.

Maintenance Features:

  • Regular Checks:
    • Check all fixing bolts and security devices are properly installed and tightened before opening the awning.
    • Check the awning every 3 months to ensure all fixings are tightened and no damage to the product.
    • Check the overall installation and fasteners regularly, especially at the beginning of a new season.
  • Gear Box Maintenance: The gear box is a vulnerable part and requires regular maintenance. It should be checked and lubricated with oil once every three months.
  • Fabric Care: Do not unpick or wash the fabric. If fabric replacement is needed, consult experts.
  • Repairs: Do not attempt to repair the product yourself. Contact a qualified person for repairs.
  • Modifications: No modifications to the awning's construction or design are allowed.
  • Remote Control Resetting: Instructions are provided for canceling emitters (remote controls) and programming the first transmitter. This involves specific sequences of switching the power on/off and pressing buttons on the remote within a 6-second interval. When resetting, ensure other awnings are switched off to avoid unintended programming.

Outsunny 840-222 Specifications

General IconGeneral
BrandOutsunny
Model840-222
CategoryLawn and Garden Equipment
LanguageEnglish

Related product manuals