EasyManua.ls Logo

Outsunny 840-264V10 User Manual

Outsunny 840-264V10
20 pages
To Next Page IconTo Next Page
Page #1 background imageLoading...
Page #1 background image
IN231100474V01_US
IN231100474V01_US_840-264V10
EN_IMPORTANT, RETAIN FOR FUTURE REFERENCE: READ CAREFULLY.
FR_IMPORTANT:A LIRE ATTENTIVEMENT ET À CONSERVER POUR CONSULTATION ULTÉRIEURE.
ES_IMPORTANTE, LEA Y GUARDE PARA FUTURAS REFERENCIAS.
PT_IMPORTANTE, RETER PARA REFENCIA FUTURA: LEIA ATENTAMENTE.
DE_WICHTIG! SORGFÄLTIG LESEN UND FÜR SPÄTER NACHSCHLAGEN AUFBEWAHREN.
IT _ IMPORTANTE! CONSERVARE IL PRESENTE MANUALE PER FUTURO RIFERIMENTO E LEGGERLO ATTENTAMENTE.
US_CA
Question and Answer IconNeed help?

Do you have a question about the Outsunny 840-264V10 and is the answer not in the manual?

Outsunny 840-264V10 Specifications

General IconGeneral
Product TypeGazebo
ColorBeige
UV ProtectionYes
WaterproofYes
Assembly RequiredYes
Dimensions10' x 10' x 8'
MaterialSteel, Polyester

Summary

Safety and Operation Guidelines

General Warnings

Key safety warnings for product installation and use.

Pre-Installation Safety Precautions

Essential safety steps to follow before beginning assembly.

Safe Operation Rules

Guidelines for safe usage and handling of the awning.

Parts and Hardware Identification

Hardware Components List

Identification of all hardware pieces included in the package.

Awning Component List

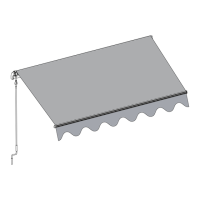
Identification of all main parts of the retractable awning.

Awning Assembly - Roller Tube

Assemble Roller Tube A

Connects roller tubes A-1, A-2, and A-3 using screws S.

Awning Assembly - Front Bar

Assemble Front Bar C

Connects front bars C-1, C-2, and C-3 using screws S.

Awning Assembly - Arm Brackets

Connect Arm Brackets B-1 and B-2

Connects parts B-1 and B-2, checking and adjusting length.

Awning Assembly - Support Structure

Connect Steel Square Tubes

Connects parts B-1, B-2, and B-3 using screws S.

Awning Assembly - Fabric Installation

Install Awning Fabric and Flap

Threads fabric E into roller tube A and front bar C, attaches flap F.

Awning Assembly - Roller Tube Ends

Install Roller Tube End Caps

Installs part P into roller tube grooves and secures it.

Awning Assembly - Front Tube Connectors

Attach Front Tube Connectors

Installs parts J and P into the front tube grooves, then adds plugs K-1/K-2.

Awning Assembly - Gearbox and Mounting

Mount Gearbox and End Cap

Attaches arm brackets (B-1, B-3, B-2) and inserts roller tube A into gearbox.

Awning Assembly - Final Bracket Securing

Secure Mounting Brackets

Ensures square tube B-2 is aligned and tightens screws on D-1 and D-2.

Awning Assembly - Arm Attachment

Attach Arms to Square Tube

Inserts part J into the arm and connects it to the square tube.

Product Specifications and Mounting

Material and Dimension Details

Details materials, surface treatment, and dimensions.

Wall Mounting Requirements

Specifies wall types, installation height, and weather suitability.

Wall Mounting Procedure

Marking and Drilling Walls

Guides on measuring, marking, and drilling holes for brackets.

Securing Wall Brackets

Details on installing expansion screws to fix brackets to the wall.

Wall Mounting Procedure

Attaching Awning to Brackets

Process of mounting the assembled awning onto the wall brackets.

Final Assembly and Connections

Attach Support Brackets

Connects part Q to the awning assembly.

Awning Operation

Opening and Closing Mechanism

Illustrates the process of extending and retracting the awning.

Awning Adjustment and Maintenance

Arm Angle Adjustment

Details on adjusting the front bar angle using adjustment bolts.

Related product manuals