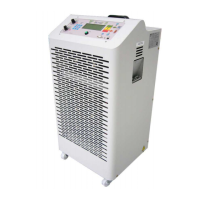
"BLT 160” ユーザーマニュアル/ / USER MANUAL 改訂版. n° 5 - 19/07/2011
P.B.M. S.r.l via Barella, Z.I. - VIGNOLA ( MO ) ITALIA
Tel. + 39 059 770 53 11 - Fax + 39 059 770 53 00
http://www.gruppopbm.it e-mail: pbm@gruppopbm.itファイル: MU001033GJ_BLT160_GB_JAP rev5_190711.doc
P. 6
SWITCH-ON SEQUENCE
After moving the main switch to POSITION 1, the LED’s on the front panel start to blink sequentially every 0.3
seconds.
At the end of the initial test, the control panel displays the START configuration.
The current battery capacity is made equal to the programmed rated capacity.
The battery presence is detected beginning from a voltage >1.4V and it is indicated by the lighting up of at
least one of the 5 LED’s on the battery bar.
NOTE:
As for the technical terminology you will find in the sections below,
please refer to the GLOSSARY at the end of the document.
START SEQUENCE
Before proceeding with the START sequence, check the programming of the operation parameters set, by
pressing the PRG key:
1) Select the rated voltage (RatV) by moving the SW4 switch to AUTO.
2) Select the discharge current (DiscI) by changing the SW3 switch position from 10 to 160A.
The battery rated Ahs (RatAh) are automatically recalculated (DiscI* 5) and the discharge time (DT) is
set to 5 h 00 minutes.
3) Set the number of test cycles (Cycl. No) to 3. (A sequence of 3 discharges and 3 recharges is
performed). If the number is set to 0, only is a single discharge performed.
4) Set the STOP voltage during discharge (STV) to 1.70 V/cell.
5) Set the time pause after discharge (PTaD) to 30 minutes.
6) Set the minimum charge time to 10 h 00 minutes.
(if, after this period of time, the battery Ahs are >=RatAhs the system switches to the following
stage)
7) Set the maximum charge time to 20 h 00 minutes.
(if, after this period of time, the battery Ahs are <RatAhs the system stops for a timeout charge
fault)
8) Set the time pause after charge (PTaC) to 1 hour.
After all connections have been performed, the battery discharge (or charge) can be started by pressing the P1
button.
If the battery is already charged (all LED’s lit) the system starts in the DISCHARGE mode.
Otherwise the CHARGE mode is activated.
When pressing P1 or disconnecting mains, all system functions are disabled. To enable them again, it is
necessary either to press P1 again or to restore mains connection (In this case, the system process is
automatically resumed from where it was interrupted.)
When disconnecting battery, all calculations are reset and the system returns to the START mode.
Likewise, when holding the C button down for more than 5 seconds while in the STOP mode, the system resets
as happens on battery disconnection.
 Loading...