EasyManua.ls Logo

PALI Crib - User Manual

PALI Crib
6 pages
Print Icon
To Next Page IconTo Next Page
Loading...
PALI spa
via Palmarina 115
33048 San Giovanni al Natisone
Udine Italy
tel. +39.432.756074
fax +39.432.757623
e-mail info@paliitaly.com
www.paliitaly.com
Assembly
instructions
ref: stationary side
Version 2004
A B D E
F G
H
4x 4x
I
4x
J
4x
4x 4x
Z
2x (left + right)
4x 4x
1x
C
4x
1 mattress base (K)
1 dropside (L)
1 stationary side (M)
2 ends (N)
2 rails (P)
1 drawer front (R)
1 drawer center partition (S)
2 drawer ends (T)
2 drawer bottoms (U)
1 drawer back (V)
Crib and drawer parts list
Tools needed
for assembly
INSTRUCTION
LEAFLET
Important, keep
for future reference.
Read carefully
IMPORTANT: In order to properly assemble the cot, carry out the operations in
the order specified. Failure to assemble the crib in the manner recommended
could make the crib hazardous.
Carefully remove and lay out all parts. Familiarize yourself with all diagrams to
facilitate the assembly of your crib. Check parts enclosed in hardware bag with
the HARDWARE PARTS LIST to be sure all are included and quantities are correct.
This crib has been designed for your child's
comfort and your convenience. Quality
material and workmanship have gone into
this crib which will provide a sound and
comfortable bed for your baby if properly
assembled and maintained. For the security of
your child and your own peace of mind be
sure to follow the assembly instructions
exactly. A periodic check should be made of
all bolts and screws, which should be
tightened if needed. Moisture and heat are
harmful to the finish; for this reason use
extreme caution when a vaporizer is in use.
The vapor steam should always be aimed
away from the crib as well as away from any
other wood furniture. Some types of soft
plastic toys could damage the finish when
placed against it.
(not available
on Renee crib)
Question and Answer IconNeed help?

Do you have a question about the PALI Crib and is the answer not in the manual?

Summary

Assembly Instructions

Crib and Drawer Parts List

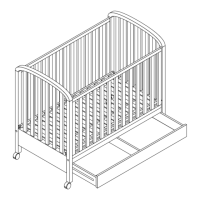
Lists all parts included with the crib and drawer for identification and assembly.

Instruction Leaflet Guidance

Important to keep for future reference and read carefully for proper assembly.

Important Assembly Precautions

Emphasizes following order, checking parts, and familiarizing with diagrams for safe assembly.

Step 1: Apply Metal Tracks to Ends

Attaching metal tracks (Z) to the head and foot boards (ends N) correctly.

Step 2: Attach Casters

Placing casters and inserts (G) into the bottom of each leg.

Step 3 a: Mattress Base Assembly (Lower Position)

Assembling the crib and positioning the mattress base in the lower position.

Step 3 b: Mattress Base Assembly (Higher Position)

Positioning the mattress base in the higher position.

Step 4: Attach Stationary Side

Attaching the stationary side (M) to the crib structure.

Step 5: Assemble Drawer

Assembling the drawer components including sides, ends, partition, and bottom panels.

Step 6: Apply Dropside

Detailed steps for applying the dropside (L) to the crib.

Step 7: Insert Drawer

Inserting the assembled drawer into the crib.

Critical Safety Warnings

Essential warnings regarding assembly and use to prevent serious injury or death.

Mattress Specifications

Required dimensions for any mattress used in the crib for safety compliance.

PALI Crib Specifications

General IconGeneral
MaterialWood
Mattress SupportAdjustable
Mattress IncludedNo
ConversionConverts to toddler bed
Safety StandardsMeets all CPSC and ASTM safety standards
Weight Limit50 lbs

Related product manuals