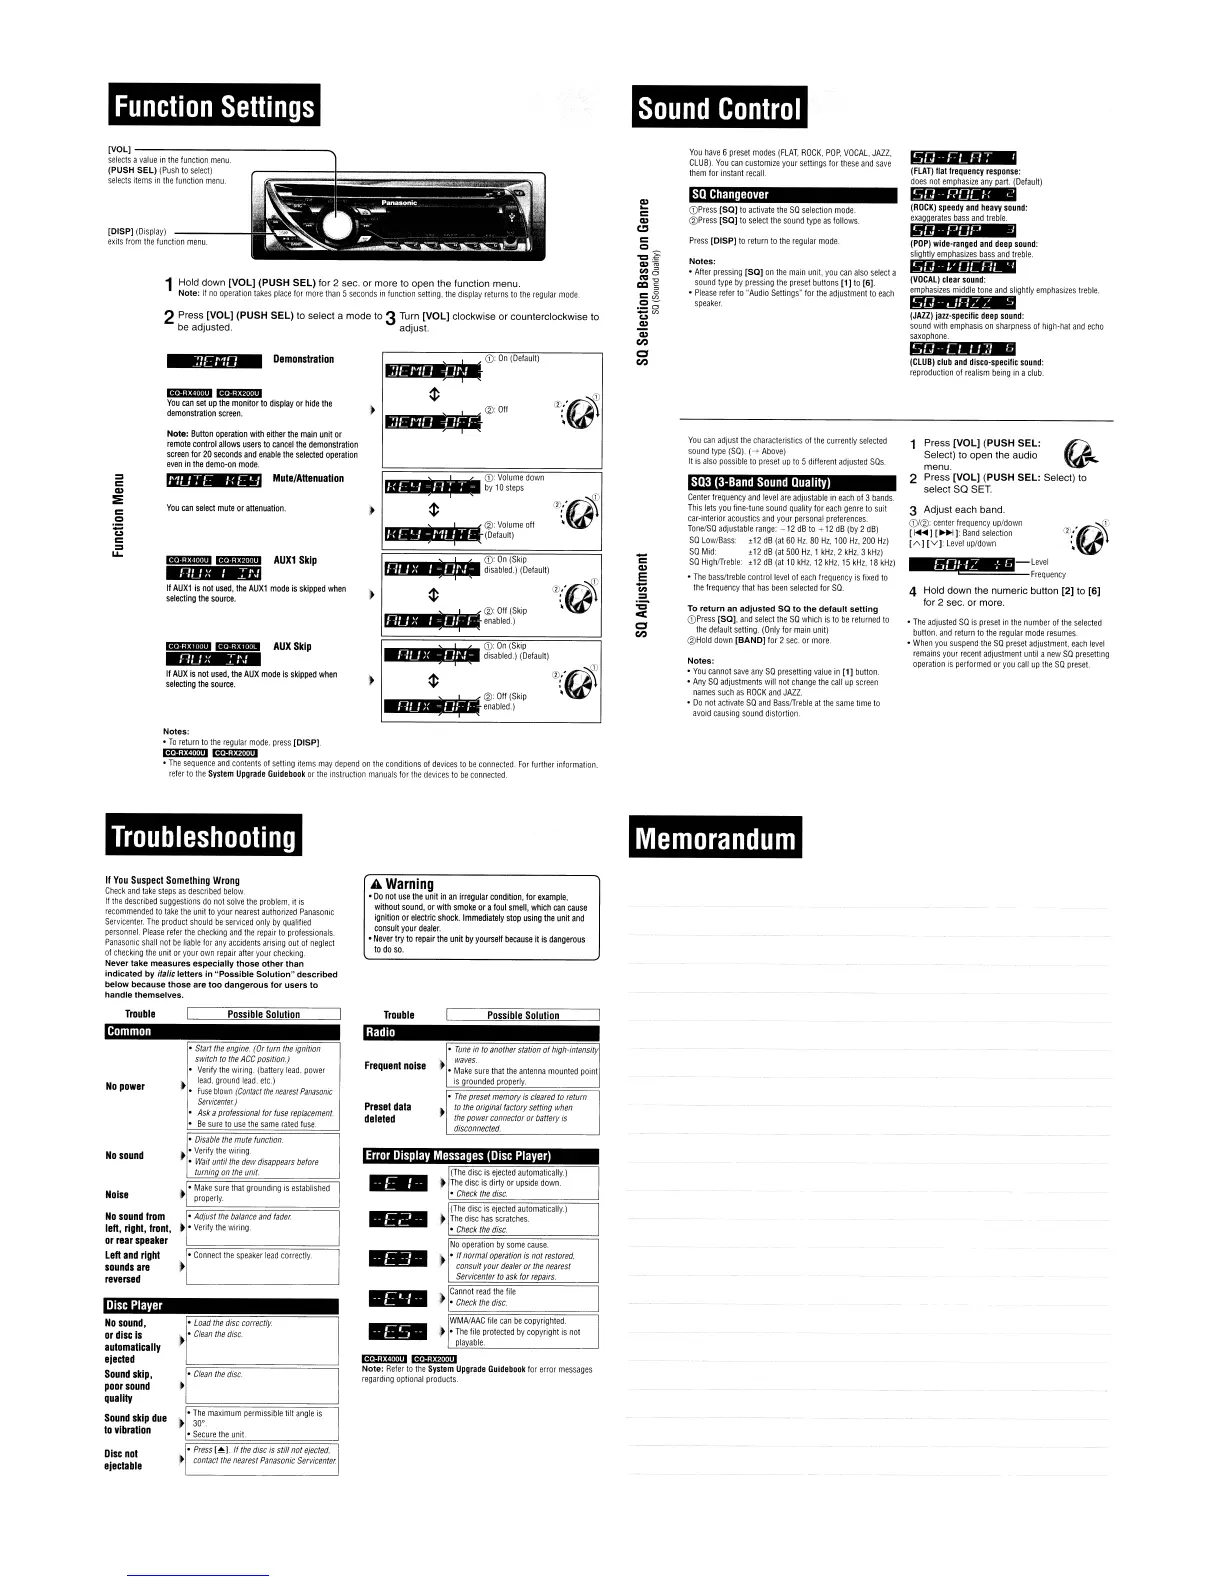
Function
Settings
Sound
Control
(CLUB)
club
and
disco-specific
sound:
reproduction
of
realism
being
in
a
club.
(POP)
wide-ranged
and
deep
sound:
slightly
emphasizes
bass
and
treble.
Sf]
--:/ OCF1L
'1
(FLAT)
flat
frequency
response:
does
not
emphasize
any
part.
(Default)
SQ--LLLIJ1
L
(JAZZ)
iazz-specific
deep
sound:
sound
with
emphasis
on
sharpness
of
high-hat
and
echo
saxophone.
(ROCK)
speedy
and
heavy
sound:
exaggerates
bass
and
treble.
SQ--L:flZZ
'-,
(VOCAL)
clear
sound:
emphasizes
middle
tone
and
slightly
emphasizes
treble.
SQ
Changeover
Notes:
•
After
pressing
[SO)
on
the
main
unit,
you
can
also
select
a
sound
type
by
pressing
the
preset
buttons
[1)
to
[6].
•
Please
refer
to
"Audio
Settings"
for
the
adjustment
to
each
speaker.
Press
[DISP)
to
return
to
the
regular
mode.
CDPress
[SO)
to
activate
the
SO
selection
mode.
@Press
[SO)
to
select
the
sound
type
as
follows.
You
have
6
preset
modes
(FLAT,
ROCK,
POP,
VOCAL,
JAZZ,
CLUB).
You
can
customize
your
settings
for
these
and
save
them
for
instant
recall.
..
CD:
On
(Default)
If'."'·
Demonstration
]]£1"10
[VOL)--------------
.......
selects
a
value
in
the
function
menu.
(PUSH
SELl
(Push
to
select)
selects
items
in
the
function
menu.
2 Press [VOL] (PUSH SEL) to select a mode to 3Turn [VOL] clockwise
or
counterclockwise to
be adjusted adjust.
1 Hold down [VOL] (PUSH SEL) for 2 sec. or more to open the function menu.
Note:
If
no
operation
takes
place
for
more
than
5
seconds
In
function
setting,
the
display
returns
to
the
regular
mode.
[DISP)
(Display)
exits
from
the
function
menu.
You
can
select
mute
or
attenuation.
1-
-I
L:
)(
J..
1\:
1 Press [VOL] (PUSH SEL: 0
Select) to open the audio . i ~
menu.
2 Press [VOL] (PUSH SEL: Select) to
select SO
SET.
3 Adjust each band.
(j)/@:
center
frequency
up/down
[f<l"']
[
..
~):
Band
selection
[A)
[V):
Level
up/down
•
The
adjusted
SO
is
preset
in
the
number
of
the
selected
button,
and
return
to
the
regular
mode
resumes.
•
When
you
suspend
the
SO
preset
adjustment,
each
level
remains
your
recent
adjustment
until
a
new
SO
presetting
operation
is
performed
or
you
call
up
the
SO
preset.
1
••
IifI!·~"I-II~·~t=Level
Frequency
4 Hold down the numeric button [2] to [6]
for 2 sec. or more.
SQ3
(3-Band
Sound
Quality)
To
return an adjusted
SO
to
the default setting
CDPress
[SO),
and
select
the
SO
which
is
to
be
returned
to
the
default
setting.
(Only
for
main
unit)
@Hold
down
[BAND]
for
2
sec.
or
more.
Notes:
•
You
cannot
save
any
SO
presetting
value
in
[1)
button.
•
Any
SO
adjustments
will
not
change
the
call
up
screen
names
such
as
ROCK
and
JAZZ.
• 00
not
activate
SO
and
BasslTreble
at
the
same
time
to
avoid
causing
sound
distortion.
Center
frequency
and
level
are
adjustable
in
each
of
3
bands.
This
lets
you
fine-tune
sound
quality
for
each
genre
to
suit
car-interior
acoustics
and
your
personal
preferences.
TonefSO
adjustable
range:
-12
dB
to
-'-12
dB
(by
2
dB)
SO
Low/Bass:
.12
dB
(at
60
Hz.
80
Hz,
100
Hz,
200
Hz)
SO
Mid:
.12
dB
(at
500
Hz,
1
kHz,
2
kHz,
3
kHz)
SO
HighlTreble:
.12
dB
(at
10kHz,
12
kHz.
15
kHz,
18
kHz)
•
The
bass/treble
control
level
of
each
frequency
is
fixed
to
the
frequency
that
has
been
selected
for
SO
You
can
adjust
the
characteristics
of
the
currently
selected
sound
type
(SO).
(.-;.
Above)
It
is
also
possible
to
preset
up
to
5
different
adjusted
SOs.
-
c
Q)
E
-
en
::::l
:c
ce
o
(;)
CD:
Volume
down
by
10
steps
@:Off(Skip
enabled.)
CD:
On
(Skip
disabled.)
(Default)
~
CftQ\
CD:
On
(Skip
disabled.)
(Default)
~
<V(Q\
@:Off(Skip
enabled.)
F1Ll
g 01\:-
':J'
'\;
-
"'~'--:
"LII\
LII.
(I'
"
...
•
_.rl"
,
IL'
1',
• -
'-"
\,
'":"J
••
\1
,
",-::,-:-:-
•
'u"
• -
L"
,
'_1'-"
_",,_
"L._'
II
• • -
¢
..
@:Off
If'.'"''
; ¢
•
~
@:
Volume
oft
fa_
"'H
(Default)
Mute/Attenuation
,\""
,T,-
'1'-"
"'-"L
"C~,
,-" ,,, ,
",
,
"L'"
,
...!..",
If
AUX1
is
not
used,
the
AUX1
mode
is
skipped
when
selecting
the
source.
If
AUX
is
not
used,
the
AUX
mode
is
skipped
when
selecting
the
source.
Note:
Button
operation
with
either
the
main
unit
or
remote
control
allows
users
to
cancel
the
demonstration
screen
for
20
seconds
and
enable
the
selected
operation
even
in
the
demo-on
mode.
g.I;£¥IU.'i1
ijI.lj':t4n,P'
You
can
set
up
the
monitor
to
display
or
hide
the
demonstration
screen.
IB.'iQlitiii'
«NiDnWW
AUX
Skip
e.tiE''''''''
g.'i@
'Iii'
AUX1
Skip
::::l
C
Q)
==
C
Cl
;:
U
C
::::l
LL.
Notes:
•
To
return
to
the
regular
mode.
press
[DISP).
la.liEGumil
("tWiEf.utHil
•
The
sequence
and
contents
of
setting
items
may
depend
on
the
conditions
of
devices
to
be
connected.
For
further
information.
refer
to
the
System
Upgrade
Guidebook
or
the
instruction
manuals
for
the
devices
to
be
connecfed.
Troubleshooting
Memorandum
"
You
Suspect
Something
Wrong
Check
and
take
steps
as
described
below.
If
the
described
suggestions
do
not
solve
the
problem,
it
is
recommended
to
take
the
unit
to
your
nearest
authorized
Panasonic
Servicenter
The
product
should
be
serviced
only
by
Qualified
personnel.
Please
refer
the
checking
and
the
repair
to
professionals.
Panasonic
shall
not
be
liable
for
any
accidents
arising
out
of
neglect
of
checking
the
unit
or
your
own
repair
after
your
checking.
Never take measures especiatty those other than
indicated by italic letters in "Possible Solution" described
below because those are
too
dangerous for users
to
handle themselves.
A
Warning
•
Do
not
use
the
unit
in
an
irregular
condition,
for
example,
without
sound,
or
with
smoke
or
a
foul
smell,
which
can
cause
ignition
or
electric
shock.
Immediately
SfOp
using
the
unit
and
consult
your
dealer.
•
Never
try
to
repair
the
unit
by
yourself
because
it
is
dangerous
to
do
so,
Trouble
Possible
Solution
Trouble
Possible
Solution
Common
Radio
No
sound
;
No
sound
from
left,
right,
fronl,
•
or
rear
speaker
Left
and
right
sounds
are
~
reversed
Error
Display
Messages
(Disc
Player)
•
The
preset
memory
is
cleared
to
return
)
to
the
original
factory
setting
when
the
power
connector
or
battery
is
disconnected.
•
Tune
in
to
another
station
of
high-intensity
-
waves.
• •
Make
sure
that
the
antenna
mounted
point
is
grounded
properly.
(The
disc
is
ejected
automatically.)
•
The
disc
is
dirty
or
upside
down.
•
Check
the
disc.
(The
disc
is
ejected
automatically.)
•
The
disc
has
scratches.
•
Check
the
disc.
No
operation
by
some
cause.
.~
•
If
normal
operation
is
not
restored,
consult
your
dealer
or
the
nearest
Servicenter
to
ask
for
repairs.
)
Cannot
read
the
file
•
Check
the
disc.
)
WMAlAAC
file
can
be
copyrighted.
•
The
file
protected
by
copyright
is
not
playable.
'ij·gitf,uulil
-
--
--
.-
-
Preset
data
deleted
Frequent
noise
Note:
Reter
to
the
System
Upgrade
GUidebook
for
error
messages
regarding
optional
products
.
•
Start
the
engine.
(Or
turn
the
ignition
switch
to
the
ACC
position.)
•
Verity
the
wiring.
(battery
lead.
power
lead.
ground
lead.
efc.)
•
Fuse
blown
(Contact
the
nearest
Panasonic
Servicenter)
•
Ask
a
professional
for
fuse
replacement.
·
Be
sure
to
use
the
same
rated
fuse.
•
Disable
the
mute
function.
•
Verify
the
wiring.
•
Wait
until
the
dew
disappears
before
turning
on
the
unit.
•
Make
sure
that
grounding
is
established
properly.
•
Adjust
the
balance
and
fader
•
Verify
the
wiring.
•
Connect
the
speaker
lead
correctly.
•
Load
the
disc
correctly.
) •
Clean
the
disc.
,
•
Clean
the
diSC.
•
•
The
maximum
permissible
tilt
angle
is
,.
30°
•
Secure
the
unit.
Disc
Player
No
power
No
sound,
or
disc
Is
automatically
ejected
Sound
skip,
poor
sound
quality
Sound
skip
due
to
vibration
Noise
Disc
not
ejectable
•
Press
[~}.
If
the
disc
is
still
not
ejected,
~
contact
the
nearest
Panasonic
Servicenter
 Loading...