Slide #47
Board Result
SU OK
SD OK
SC OK
Board Result
SU Bad
SD OK
SC OK
Board Result
SU OK
SD Bad
SC OK
Board Result
SU OK
SD OK
SC Bad
Board Result
SU Bad
SD Bad
SC OK
Board Result
SU Bad
SD OK
SC Bad
Board Result
SU OK
SD Bad
SC Bad
Board Result
SU Bad
SD Bad
SC Bad
A B C D
A B C D
Follow this procedure if the SU
board and/or the SD board are
bad while the SC board measures
OK
Follow this procedure if the SU
board and/or the SD board are
bad while the SC board is also
bad
Follow this
procedure if
only the SC
board is bad
Follow this
procedure
when all 3
boards check
OK
Replace the
SU, SD, and
SC boards
Replace the SC
board.
Go to the
next slide
Go to the
Slide #16
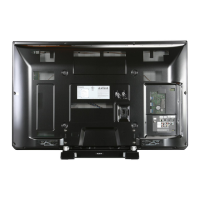
1. Remove the front cabinet and check for cracks and blown pixels. (For front cabinet removal procedure go to slide 24).
2. Check the ICs on the SU and SD boards for blown hole on the surface. (Go to slide 25 to see pictures)
3. Perform the SU, SD, and SC boards resistance test procedure shown on slides 26~31. Match the result with one of the
following boxes (A~D) and follow the instructions at the bottom of the page.
Start Here
7 Blinks Error Code (2 of 4)
If the power LED continues to blink even after the TV is unplugged, press and hold the power
switch on the TV for a few seconds until the LED turns off.

 Loading...