Adding a Remote to Your System (Use your keypad)
Step Action Details
1
[] + [
MASTER CODE]
The [ ] key will flash. Light/key on = user already programmed.
2 [
USER NUMBER] Enter a user number: 01 to 32
3 [
CODE] Enter 4- or 6-digit code
4 [
CONFIRM CODE] Re-enter 4- or 6-digit code
5 [
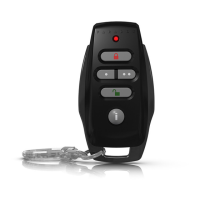
LEARN REMOTE] Press the information key [i] on the designated remote to assign it to the system.
Important: For partitioned systems, go to step 6. For non-partitioned systems, go to step 2 to
add another remote or press [
CLEAR] to exit.
6 [1] and/or [2] + [
ENTER] Assign the user to one or both partitions, then press [ENTER].
Go to step 2 or press [
CLEAR] to exit.
Remote Control Feedback
Replacing Your Battery
System / Remote Status Visual Feedback (Lights) Audible Feedback
System in alarm [i]: Red flash (arm light also flashing) “beeeep...” (two-tone & continuous)
Remote unlocked [i]: Yellow on
Remote waiting for code entry [i]: Green on
Remote transmitting information to your system [i]: Yellow blink
Remote failing to communicate with your system [i]: Red flash fast “beeeep” (3.sec.)
Remote low battery indicator [i]: Red flash
Action Visual Feedback (Lights) Audible Feedback
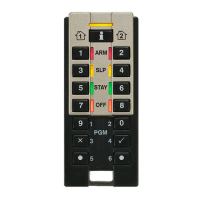
Arming:
Press [ARM]
Press [
SLP]
Press [STAY]
Arm / Sleep / Stay: On “beep-beep-beep-beep”
Disarming:
Press [OFF]
Off: On “beep-beep”
Triggering an Exit Delay:
Press [ARM]
Press [SLP]
Press [STAY]
Press [
OFF] (only in Stayd mode)
Arm / Sleep / Stay: Flash “beep-beep-beep-beep”
Warranty
For complete warranty information on this product please refer to the Limited Warranty Statement found on the website www.paradox.com/terms. Your use of the Paradox product signifies your acceptance
of all warranty terms and conditions.
REM3 is a trademark or registered trademark of Paradox Security Systems Ltd. or its affiliates in Canada, the United States and/or other countries. For the latest information on products approvals, such as
UL and CE, please visit www.paradox.com.
© 2008 Paradox Security Systems Ltd. All rights reserved. Specifications may change without prior notice. One or more of the following US patents may apply: 7046142, 6215399, 6111256, 6104319, 5920259,
5886632, 5721542, 5287111, 5119069, 5077549 and RE39406 and other pending patents may apply. Canadian and international patents may also apply.
1. Remove the screws from the back of the remote control. Carefully remove the back cover to avoid losing the two rubber cylindrical
buffers.
2. Pull the tab to remove the battery.
3. Insert the new battery by placing it in the battery holder. Make sure the positive side of the battery is inserted face up.
4. Set the back cover in place, and fasten it with the screws.
Your REM3 provides visual and audible feedback to acknowledge your actions (e.g., arming or disarming), and to inform you of the status
of your system or remote. Refer to both tables below to understand what your remote is telling you.
If not already done so by the installer, your remote needs to be added to your system. To assign the remote to your system, follow the
steps below, using your keypad.
 Loading...