REM3-EI07
REM3
Hand-Held 2-Way Remote Keypad
V1.0
Instructions
Introduction
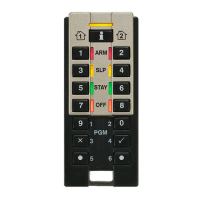
The REM3 combines the flexibility of a keypad with the convenience
and mobility of a remote control. Its 15 buttons allow for a greater level
of interaction with the system than regular remote controls, and the two-
way transceiver allows for accurate feedback for up to 2 partitions.
Assigning the REM3 to the Panel
One-touch Arm Keys
The REM3 offers the use of one-touch arm keys. The use of one-touch
arm keys must be enabled in section [703], options [1] to [3] in the
panel.
Technical Specifications
RF frequency 433MHz or 868MHz
Battery type One 3V lithium battery (2032)
Battery life Battery life expectancy is a minimum of 1 year.
“Low Battery Signal” is sent to the control panel when
battery is below 2.2Vdc. Upon power-up, a “Low
Battery Restore Signal” is sent to the control panel
when the battery voltage level has reached 2.7Vdc or
higher.
Range (typical in a
residential environment)
45m (150ft)
Compatibility MG5000 / MG5050 V3.0 and higher /
Spectra SP Series V3.0 and higher in conjunction
with a RTX3 V1.31 and higher.
IMPORTANT: The REM3 is not compatible with the
RPT1 and will not benefit from the additional range.
Dimensions 8cm x 3.4cm x 1.5cm (3.1in x 1.3in x 0.6in)
Standards EN 50131-3 Grade 2 Class II
Step Action on Keypad Details
1
[] + [
MASTER CODE]
The [] key will flash.
LED/key on = programmed user.
[
PARTITION MASTER CODE] may also be used.
2 [
USER NUMBER] 2 digits: 01 to 32
3 [
CODE] Enter 4- or 6-digit code
4 [
CONFIRM CODE] Re-enter 4- or 6-digit code
5 [
LEARN REMOTE] Press and hold the Information key ([i]) on
the designated remote. Important: For parti-
tioned systems, go to step 6. For non-parti-
tioned systems, go to step 2 to add another
remote or press [
CLEAR] to exit.
6 [1] and/or [2] + [
ENTER] Assign the user to one or both partitions, then
press [
ENTER].
Go to step 2 or press [
CLEAR] to exit.
[703] Arming/Disarming Options 1
Option
OFF ON
[1] One-touch regular arming Disabled Enabled
[2] One-touch stay arming Disabled Enabled
[3] One-touch sleep arming Disabled Enabled
PGM Key Assignment
The REM3 provides six PGM keys. See sections [610] to [642] in the panel to
define the six PGM keys and two combo keys:
One-Touch Programming
Program the REM3 to enable one-touch mode to disarm your system and/or
trigger PGMs. By default, the REM3 is set to require code entry. Section [360]
is used to configure all odd and even-numbered REM3s, while sections [361]
to [376] are used to configure REM3s by pairs.
PGM1
[9]
PGM2
[0]
PGM3
[x]
PGM4
[]
PGM5
[ ]
PGM6
[]
PGM
[x] + []
PGM
[] + []
Default:
[B] [C] [D] [E] [5] [6]
[SLEEP][SLEEP]
[610]
ALL RCS
___ ___ ___ ___ ___ ___ ___ ___
IMPORTANT: When section [610] is accessed, the panel will copy the saved value of that
section to all remotes.
[611]
RC#1
___ ___ ___ ___ ___ ___ ___ ___
___ ___ ___ ___ ___ ___ ___ ___
[642]
RC#32
___ ___ ___ ___ ___ ___ ___ ___
[360] Odd-Numbered REM3s
[1] PGM activate/deactivate
[2] Disarm
OFF = Code entry
OFF = Code entry
ON = One-touch
ON = One-touch
[3] & [4] N/A N/A
Even-Numbered REM3s
[5] PGM activate/deactivate
[6] Disarm
OFF = Code entry
OFF = Code entry
ON = One-touch
ON = One-touch
[361]
REM3 #1
[1] PGM activate/deactivate
[2] Disarm
OFF = Code entry
OFF = Code entry
ON = One-touch
ON = One-touch
[3] & [4] N/A N/A
REM3 #2
[5] PGM activate/deactivate
[6] Disarm
OFF = Code entry
OFF = Code entry
ON = One-touch
ON = One-touch
[376]
REM3 #31
[1] PGM activate/deactivate
[2] Disarm
OFF = Code entry
OFF = Code entry
ON = One-touch
ON = One-touch
[3] & [4] N/A N/A
REM3 #32
[5] PGM activate/deactivate
[6] Disarm
OFF = Code entry
OFF = Code entry
ON = One-touch
ON = One-touch
[SLEEP] - Empty / Button disabled
[1] - Regular / Regular Force arming
[2] - Stay / Stay Force arming
[3] - N/A
[4] - Sleep / Sleep Force arming
[5] - PGM Activation (Event Group #22)
[6] - PGM Activation (Event Group #23)
[7] - N/A
[8] - Panic 1
[9] - Panic 2
[A] - Panic 3
[B] - PGM Activation (Event Group #8)
[C] - PGM Activation (Event Group #9)
[D] - PGM Activation (Event Group #10)
[E] - PGM Activation (Event Group #11)
[F] - Paramedic alarm
PGM Key Definitions Table
Printed in Canada 01/2012
See reverse for REM3 Diagnostic Mode instructions.