EasyManua.ls Logo

Paramount Fitness SwingJet - User Manual

Paramount Fitness SwingJet
2 pages
Print Icon
To Next Page IconTo Next Page
Loading...
1. NEW SWING JET
The swing jet comes packed with the cover off.
Push the nozzle up and look and feel for the raised area on the side
of the colored nozzle that is in the center of the cream colored Cam.
(Fig 1). The nozzle jet opening is 180 degrees opposite that raised
area. Push the nozzle shaft up and down until the nozzle jet is either
all the way right or all the way left so when you are doing the next two
steps you are aware of which direction it is going to travel when rotat-
ing.
There are three notches in the cream colored cam above the raised
area (Fig 2). These cam notches are in a straight line with the cam
notches on the opposite side of the raised area. The jet opening of
the nozzle goes back and forth covering the 90 degree arc formed
by the three ratchet positions as the nozzle extends and retracts
when cycled.
Put one wrap minimum of Teflon tape on the threads to make the
nozzle threads not seize up over time, and thread the swing jet in the
return fitting tight, using the swing jet installation and removal tool. It
should be tight enough so it can not be turned by hand. Hand tighten
only, NEVER USE A WRENCH DIRECTLY ON THE SWING JET. AL-
WAYS REMOVE THE COVER AND USE THE TOOL (Fig. 4) (AVAIL-
ABLE FROM PARAMOUNT 005-720-4508-00) TO COVER THE
SWING JET RETAINER BEFORE USING A WRENCH TO REMOVE
THE SWINGJET.
www.1Paramount.com 1.800.621.5886
INSTALLATION GUIDE:
SWINGJET
FIG. 1
CREAM COLORED CAM
RAISED
AREA
CLIP ON
RETAINER
FIG. 3
HOLE ON COVER
CLIP ON NOZZLE
RETAINER
FIG. 2
NOTCHES
Question and Answer IconNeed help?

Do you have a question about the Paramount Fitness SwingJet and is the answer not in the manual?

Summary

New Swing Jet Installation

Nozzle Orientation and Cam Features

Identify nozzle raised area and 180-degree opening. Note cam notches for 90-degree arc movement.

Thread Preparation and Installation

Apply Teflon tape to threads and tighten using the installation tool until snug. Do not use a wrench directly.

Adjusting a SwingJet When Threaded

Aiming the Nozzle Jet

Grasp the cam and turn to aim the nozzle jet to the desired area.

Attaching the Cover

Align cover notches with retainer clips and push/rotate clockwise until it snaps into place.

Using the SwingJet Key for Adjustment

Insert key, push down, rotate cover counter-clockwise to adjust nozzle. Re-lock cover clockwise.

Overview

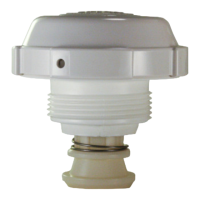
The provided manual describes the SwingJet, a wall return with sweep technology designed to clean a pool. It is manufactured by Paramount, a company that specializes in "Pool Life. Simplified."

Function Description

The SwingJet is a pool cleaning device that uses a rotating nozzle to create a sweeping action, helping to circulate water and dislodge debris from the pool walls and floor. The nozzle's movement is controlled by a cream-colored cam, which allows the user to direct the jet's sweep to specific areas of the pool. The device is designed to be threaded into a standard return fitting in the pool wall.

The core mechanism involves a nozzle with a jet opening that moves back and forth, covering a 90-degree arc. This arc is formed by three ratchet positions as the nozzle extends and retracts during its cycle. The device operates by utilizing the pool's pump system; when the pump is on, the SwingJet activates, and if it's on a water valve circuit, it will come on when the valve is open.

Important Technical Specifications

  • Nozzle Jet Opening: The jet opening is positioned 180 degrees opposite a raised area on the side of the colored nozzle.
  • Sweep Arc: The nozzle jet covers a 90-degree arc, determined by three ratchet positions.
  • Cam Notches: There are three notches in the cream-colored cam, which are in a straight line with cam notches on the opposite side of the raised area. These notches are crucial for setting the sweep direction.
  • Installation: The SwingJet threads into a return fitting. It requires Teflon tape on the threads to prevent seizing and should be hand-tightened using a specialized tool.
  • Patents: The device is covered by U.S. Patents 7,578,010, 7,481,377, and 6,899,285.
  • Part Numbers:
    • SwingJet Installation and Removal Tool: Paramount part # 005-720-4508-00.
    • SwingJet Key: Paramount part # 005-721-4512-00.

Usage Features

1. Initial Setup (New SwingJet):

  • Identifying Components: The SwingJet comes with the cover off. Users need to identify a "raised area" on the side of the colored nozzle, which is in the center of the cream-colored cam. The nozzle jet opening is 180 degrees opposite this raised area.
  • Determining Travel Direction: Before installation, users should push the nozzle shaft up and down to move the nozzle jet either all the way right or all the way left. This helps in understanding the direction of travel when rotating the cam.
  • Installation: Apply at least one wrap of Teflon tape to the threads of the SwingJet. Thread the SwingJet into the return fitting and tighten it securely by hand using the SwingJet installation and removal tool (part # 005-720-4508-00). It should be tight enough that it cannot be turned by hand, but a wrench should never be used directly on the SwingJet itself. The cover must be removed before using the tool to remove the SwingJet.
  • Setting Sweep Direction: Grasp the cream-colored cam and turn it to aim the nozzle jet towards the desired cleaning area. The direction of the sweep (right or left) depends on which of the two side notches the pins are placed in.
  • Attaching the Cover: Locate the clip on the outside ring of the nozzle retainer. Align the hole in the cover with the counter-clockwise side of this retainer clip. Line up the notches on the cover with the locking cams on the nozzle retainer. Push the cover onto the retainer and rotate it clockwise until the clip snaps into the hole. Do not force the cover if it's not in position, as it will be difficult to remove.

2. Adjusting a Threaded SwingJet:

  • Preparation: Turn on the pool pump to activate the SwingJet. If the SwingJet is part of a water valve circuit, wait for it to come on and then pause the water valve.
  • Using the SwingJet Key: Insert the provided SwingJet key (part # 005-721-4512-00) into the hole on the side of the cover.
  • Unlocking the Cover: While pushing down on the key, rotate the cover counter-clockwise until it stops. Do not remove the key at this point.
  • Rotating the Nozzle: The extended nozzle should now be free to rotate to the desired position. If it doesn't rotate easily, remove the key, slightly move the cover counter-clockwise, and re-insert the key to try again.
  • Locking the Cover: Once the nozzle is set to the correct position, remove the key and rotate the cover clockwise to re-lock it in place.
  • Verification: Cycle the SwingJet by turning the pump off and on to ensure the desired position has been set correctly.

Maintenance Features

  • Preventing Seizing: The manual explicitly states to use at least one wrap of Teflon tape on the threads during installation to prevent the nozzle threads from seizing up over time.
  • Tool-Assisted Removal: The SwingJet installation and removal tool (part # 005-720-4508-00) is essential for removing the SwingJet. The cover must always be removed before using this tool to prevent damage.
  • No Direct Wrench Use: Users are strictly warned against using a wrench directly on the SwingJet itself, as this could cause damage. The tool is designed to cover the SwingJet retainer for safe removal.

Paramount Fitness SwingJet Specifications

General IconGeneral
BrandParamount Fitness
ModelSwingJet
CategorySwimming Pool Cleaners
LanguageEnglish

Related product manuals