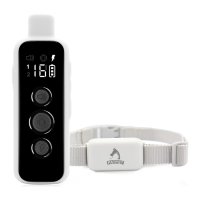
p-collar 650
Quick Start
2
The dog training collar is designed to let dogs live safely, happily
and get along with people more harmoniously.
Thanks for purchasing!
Do not use with aggressive dogs.
Aggressive dogs can cause severe injury and even death to their owner
and others. If you are unsure whether this product is appropriate for
your dog, please consult your veterinarian or certified trainer.
Safety during on-leash training.
It is vitally important that you and your dog remain safe while learning
during on-leash training. Your dog should be on a strong leash, long
enough for him to attempt to chase an object, but short enough for him
not to reach a road or other unsafe area. You must also be physically
strong enough to restrain your dog when he tries to chase.
Risk of skin damage.
Please read and follow the instructions in this manual. Proper fit of the
collar is important. A collar worn for too long or made too tight on the
pet’s neck may cause skin damage ranging from redness to pressure
ulcers. This condition is commonly known as bed sores.
Avoid leaving the collar on the dog for more than 12 hours per day.
When possible reposition the collar on the pet’s neck every 1 to 2
hours.
Never connect a lead to the electronic collar; it will cause excessive
pressure on the contacts.
If a rash or sore is found, discontinue use of the collar until the skin
has healed.
If the condition persists beyond 48 hours, see your veterinarian.
This product is not a toy, please keep away from children.
This product is only for use with healthy dogs.
3
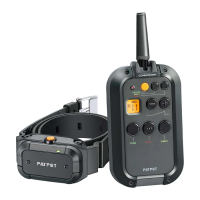
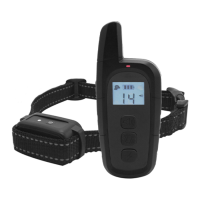
Remote
.Contact Points
.Charging Port (with cover)
.On/Off Button
.LED Indicator
. Contact spring sheet
Overview
5
Receiver Collar
46
1. Plug in and fully charge the Remote and the Receiver collar.
For the initial charge,be sure to charge it for 4 hours.
Subsequent charges only take 2-3 hours.
2. When full charged, the red LED on the Receiver Collar will become
green. The Battery Display of the Remote will stop cycling and
appear full.
3. Please replace the rubber cover when the Receiver Collar is full
charged.
Tips: 1. Excessive charging will shorten battery life. Only charge
them when batteries are low.
2. When you’re not using the collar, please turn it off to
increase the battery life.
Note:
Please use the Output:DC 5V 500-800mA
charger to charge the product.
Don’t use a charger that does not meet the
specifications to charge the product.
Please read the quick start before beginning.
Setting Up the Product
Before you can use the Dog Training Collar, you must
set up the product as below steps:
1. Charging the Remote and the Receiver Collar.
2. Prepare the Remote and turn it on.
3. Prepare the Receiver Collar and turn it on.
4. Function test, test function of buttons before wearing it on dog.
5. How to use the Test Lamp, test Shock function or use as a screw driver.
6. Pair the Remote and the Receiver Collar, pair them when the product
lose its code or pair for a second collar.
Charging the Remote and the Receiver Collar
Turn ON/OFF the Remote
1. Long press the ON/OFF button to turn the remote ON.
2. LCD will be lighted, and show the information of current channel,
battery power and levels. If not, please charge the remote.
3. Long press the ON/OFF button to turn the remote OFF.
Prepare the Remote
Prepare the Receiver
Please use our distribution test tool to install the
contact points.
NOTE:
To extend the life of the batteries, please turn the Receiver
Collar off when it is not in use.
Turn on the Receiver Collar
Press the On/Off Button the Green LED light comes on.
In normal mode, the Green LED will flash every 4 seconds,
indicating the Receiver Collar is on and ready to receive a signal
from the Remote.
Turn off the Receiver Collar
Press and hold the On/Off Button until the Red LED light shuts off
(This takes approximately 3 seconds).
Release the On/Off Button.
Function Test
We recommend you experience firsthand how the different levels
feel on yourself and always begin at the lowest level, and increase
the levels up to your personal comfort levels.
1. Place one finger over both Contact Points of the training collar.
2. Hold your remote approximately 2 ft. from the training collar.
Press the Vibration Button continuously for 1 to 2 seconds.
You should feel continuous vibration.
Press to increase the Shock Level.
Press to decrease the Shock Level.
Vibration: sends a vibration with non-adjustable level to the
Receiver Collar.
Tone: sends a tone with non-adjustable level to the Receiver
Collar.
Shock: sends 1-16 adjustable levels of static stimulation to
the Receiver Collar.
Slide up, control dog 1, slide down,control dog 2.
7
4. Increase the level until the sensation begins to feel uncomfortable.
NOTE: Continuous stimulation will transmit for no more the 10
continuous seconds. To reactivate, release and repress the button.
3. Press to decrease levels. Starting at level 1,press the Shock Button.
How to Use the Test Lamp
Shock Function Test
Conductive Silicone).
The Shock Level can be adjusted from 1 to 16 levels ,
please adjust it properly as per your dog’s reaction.
It is not recommended to press and hold the Vibration/Shock
Button too long to avoid physical or psychological hurt to the dog.
Note:
1. Turn on the Receiver Collar.
2. Hold the Test Lamp contacts against the (or
Contact Points
P
Q
R
S
T
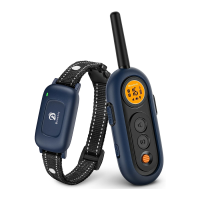
A. Mode indication
B. Battery Display
C. Shock Level +
D. Shock Level -
E. On/Off Button
F. Channel Display
G. Channel Conversion Switch
H. Shock Level Display
I. Tone Button
J. Vibration Button
K. Shock Button
L. Charging Port
A
B
C
D
E
F
G
H
I
J
K
L
T
You can also choose to use contact spring sheet,
which make the contact more effective and more comfortable.
Long press to turn on, long press to turn off.
P
Q
R
S
0.3.0.02.650001-PT-00