This document describes the Patpet p-collar 301 dog training collar, designed to help dogs live safely, happily, and harmoniously with people.
Function Description
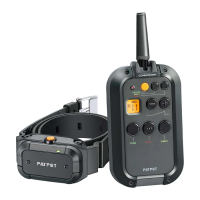
The Patpet p-collar 301 is an electronic dog training collar system that includes a remote transmitter and a receiver collar. It offers three types of stimulation: tone, vibration, and static shock, to aid in dog training. The system allows for adjustment of vibration and shock levels to suit the dog's temperament and training needs. It also supports training multiple dogs with a single remote by switching channels.
- Aggressive Dogs: Do not use this product with aggressive dogs, as it may cause severe injury or death to the owner or others. Consult a veterinarian or certified trainer if unsure about suitability.
- On-Leash Training: Ensure the dog is on a strong leash, long enough for movement but short enough to prevent reaching unsafe areas. The user must be physically strong enough to restrain the dog.
- Skin Damage Risk: Proper collar fit is crucial. Avoid leaving the collar on for more than 12 hours per day. Reposition the collar every 1-2 hours. Never connect a lead to the electronic collar, as this causes excessive pressure on contact points. Discontinue use if a rash or sore is found until the skin heals. If the condition persists beyond 48 hours, consult a veterinarian.
- General Safety: This product is not a toy and should be kept away from children. It is only for use with healthy dogs. Do not shave the pet's neck, as this can increase skin irritation. The collar should not be worn for more than 12 hours per day.
Overview of Components
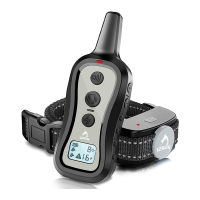
Remote:
- A. LED Indicator: Shows the remote's status.
- B. Tone Button: Sends a non-adjustable tone command to the receiver.
- C. Level +: Increases the vibration or shock level.
- D. Level -: Decreases the vibration or shock level.
- E. Vibration Button: Sends a vibration command (levels 1-8) to the receiver.
- F. Vibration Level Display: Shows the current vibration intensity.
- G. Shock Level Display: Shows the current static shock intensity.
- H. On/Off Button: Turns the remote on or off.
- I. Channel Conversion Button: Short press to switch between dog channels. Press and hold for about 5 seconds to set Vibration & Shock Level.
- J. Shock Button: Sends a static shock command (levels 1-16) to the receiver.
- K. Battery Capacity Display: Shows the remote's battery level.
- L. Channel Display: Shows the currently selected dog channel.
- M. High Shock Level Warning: Indicates when the shock level is over 8.
Receiver Collar:
- N. Contact Points: Deliver stimulation to the dog's skin.
- O. Conductive Silicone Covers: Provide a softer contact point for the dog's skin.
- P. LED Indicator: Shows the receiver's status.
- Q. On/Off Button: Turns the receiver collar on or off.
Important Technical Specifications
- Battery Type: AAA (LR03) battery for both remote and receiver.
- Battery Life (typical use): Remote: 60 days; Receiver: 30 days.
- Remote Waterproof Rating: Non-Waterproof (Keep away from water).
- Receiver Waterproof Rating: IEC 60529 IPX5, rain proof.
- Operating Temperature Range: From 0-40°C (32-104°F).
- Wireless Power: 10mW.
- Wireless Range: 300m (984 feet).
- Vibration Levels: 1-8.
- Shock Levels: 1-16.
- Continuous Stimulation Limit: 10 seconds, followed by a 5-second time-out.
Usage Features
Setting Up the Product:
- Prepare the Remote: Install batteries (negative first, then positive) and turn it on. The LCD will light up, showing channel, battery power, and levels. To turn off, press and hold the ON/OFF button until the LCD goes off (2-3 seconds).
- Prepare the Receiver Collar:
- Remove existing conductive screws if present.
- Install batteries according to the engraved mark.
- Install Contact Points: Select appropriate length (longer for thicker coats, shorter for thinner coats). Insert and tighten clockwise using the Test Lamp.
- Install Conductive Silicone Covers onto the Contact Points for comfort.
- Assemble Collar Strap: Unhitch the nylon belt, take off the slide buckle, thread the strap through the receiver collar, then through the slide buckle, then through the side release buckle, and finally thread excess strap through the slide buckle to ensure a tight fit.
- Turn on the Receiver Collar: Press the On/Off Button; the green LED will light up and flash every 4 seconds in normal mode, indicating it's ready to receive signals.
- Turn off the Receiver Collar: Press and hold the On/Off Button until the red LED shuts off (approx. 3 seconds). Release the button.
- Function Test:
- Experience stimulation levels on yourself first, starting at the lowest.
- Place a finger over both contact points.
- Hold the remote 2 ft from the receiver. Press the Vibration Button for 1-2 seconds to feel continuous vibration.
- Press and hold the Channel Conversion Button (1/2) for about 5 seconds until the Shock icon flashes, then use +/- to adjust shock levels. Increase until uncomfortable.
- Use the Test Lamp to verify shock function: Turn on the receiver, hold the Test Lamp contacts against the Contact Points (or silicone covers), press the Shock Button. The lamp will light up, brighter with increased shock level. The Test Lamp can also be used as a screwdriver to tighten/loosen contact points.
- Pairing the Remote and Receiver Collar:
- Use the Channel Conversion Button (1/2) on the remote to select the desired dog channel (e.g., Dog 1).
- With the remote on and receiver off, press and hold the receiver's ON/OFF button for 4-5 seconds. The red and green LEDs will blink for about 10 seconds, indicating pairing readiness.
- Press and hold the Tone Button and Vibration Button simultaneously on the remote for 2-3 seconds. The receiver's LED will flash green 5 times, indicating successful pairing.
- To pair a second collar, select Dog 2 on the remote and repeat steps 2-4.
Dog Training:
- Fitting: Ensure the collar is snug, allowing one finger between the collar and the dog's neck. Too loose, and contact points may rub; too tight, and breathing may be restricted.
- Shock Level Selection: Start at Level 1 and gradually increase. The appropriate level is when the dog shows a mild reaction (e.g., ear flick, lip lick, neck muscle tensing). Higher levels may be needed when the dog is highly distracted.
- Stimulation Duration: Continuous stimulation lasts no more than 10 seconds, followed by a 5-second time-out before it can be reactivated.
- Channel Conversion: Short press the Channel Conversion Button to switch between dog channels. Press and hold to adjust vibration/shock levels.
- Level Adjustment: Use the '+' button to increase and '-' button to decrease shock/vibration levels.
Maintenance Features
Battery Replacement:
Batteries need replacement when:
- The receiver collar's indicator light emits a red color every 4 seconds or flashes rapidly.
- The remote's LCD battery icon shows only 1 bar (shock function may be affected).
- The indicator light on either the remote or receiver collar does not come on.
- The indicator light on either device only comes on momentarily when a button is pressed.
To extend battery life, turn off the receiver collar when not in use. Remove the battery if not using for a long time.
Troubleshooting Guide:
- Pet not responding:
- Ensure the receiver collar is turned on.
- Check battery levels in both remote and receiver.
- Consider environmental factors (terrain, weather, other radio devices) affecting range.
- Test the receiver collar using the Test Lamp.
- Increase the shock level.
- Ensure contact points are snugly against the pet's skin.
- Receiver Collar not turning on:
- Check that two LR03/AAA batteries are installed properly.
- Receiver Collar not responding to Remote:
- Ensure the receiver collar is on.
- Check that batteries are properly inserted in the remote if the indicator light doesn't come on when a button is pressed.
- If issues persist, re-pair the remote and receiver collar.
- 1-Year Limited Lifetime Warranty: Covers parts and labor for the first year. Accessories (straps, batteries) are covered for the first year only. After the first year, only parts are covered; labor fees and shipping costs are the customer's responsibility. The warranty expires after 5 years if the model is discontinued.
- Warranty Qualification: Proof of purchase (original receipt) is required. Without it, the unit's age will be estimated by serial number.
- Not Covered: Products bought secondhand or resold, units purchased from unauthorized dealers after 30 days (contact dealer directly for initial 30 days), repairs due to misuse, improper maintenance, lost units, or water damage to non-water-resistant components.
- Repair Procedure: Refer to the "Troubleshooting Guide" first. Customer is responsible for shipping costs under warranty. Patpet is not responsible for damaged or lost units in transit, or for loss of training time. A copy of the sales receipt and a brief explanation of the problem, along with contact information, must be included with the unit for repair.
Compliance (FCC-USA):
- This device complies with Part 15 of the FCC Rules. Operation is subject to two conditions: (1) it may not cause harmful interference, and (2) it must accept any interference received.
- Caution: Modifications not expressly approved by Patpet Technology Co., Ltd may void the user's authority to operate the equipment.
- Note: This equipment has been tested and complies with Class B digital device limits, providing reasonable protection against harmful interference in residential installations. If interference occurs, try reorienting/relocating the antenna, increasing separation between equipment and receiver, connecting to a different circuit, or consulting a dealer/technician.