1
SIDEKICK SHOWER HEAD
CABEZAL DE DUCHA DE SIDEKICK
TÊTE DE DOUCHE ACOLYTE
Write purchased model number here.
Escriba aquí el número del modelo comprado.
Inscrivez le numéro de modèle ici.
B.
A.
3
4
1
2
3 3/8"
(86mm)
Recommened
1
2
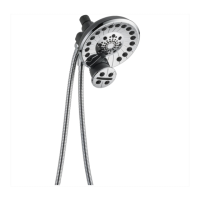
Models/Modelos/Modèles
76455
p
76465
p
Series/Series/Seria
93866 Rev. B3/24/2018
(3) Verify that there is a gasket in the ball joint.
(4) Hand tighten the shower head onto the shower arm. (Shower arm
and flange sold separately.) DO NOT USE TOOLS. The use of tools
may cause product failure or damage and voids the warranty.
Notice: Removal of or tampering with the flow restrictor may result in
shower head failure and will void the warranty.
(3) Verifique que haya una arandela en la junta esférica.
(4) Apriete con la mano el cabezal de ducha en el brazo de la ducha.
(El brazo y la brida de la ducha se venden por separado). NO USE
HERRAMIENTAS. El uso de herramientas puede causar fallas o daños en
el producto y anular la garantía.
Atención: La eliminación o la alteración del limitador de flujo puede causar
la falla del cabezal de la ducha y anular la garantía.
(3) Vérifiez s’il y a un joint dans la rotule.
(4) Serrez la pomme de douche sur le bras de douche. (Bras de douche
et bride vendus séparément.) NE PAS UTILISER D’OUTILS. L’utilisation
d’outils peut entraîner une défaillance ou un endommagement du produit et
annuler la garantie.
Avis: Le retrait ou la modification du limiteur de débit peut entraîner une
défaillance de la tête de douche et annuler la garantie.
Il est recommandé que la distance minimale entre le mur fini (1) et
l'extrémité du bras de douche (2) soit de 3-3/8" (86 mm).
The minimum recommended distance from the finished wall (1) to
the end of the shower arm (2) is 3-3/8" (86 mm).
La distancia mínima recomendada desde la pared acabada (1) hasta el
extremo del brazo de la ducha (2) es de 3-3/8" (86 mm).
A.
A.
A.
B.
(1)
Verify that there is a gasket in each hose nuts on the end of the hose.
(2)
Hand tighten one end of the hose onto the shower head and the other
end to the hand shower. DO NOT USE TOOLS. The use of tools may
cause product failure or damage and voids the warranty.
(1)
Verifique que haya una arandela en cada tuerca de la manguera en
los extremos de la manguera.
(2)
Apriete con la mano un extremo de la manguera en el cabezal
de la ducha y el otro extremo en la ducha de mano. NO USE
HERRAMIENTAS. El uso de herramientas puede causar fallas o daños
en el producto y anular la garantía.
(1)
Assurez-vous qu’il y a un joint dans chaque écrou de tuyau aux
extrémités du tuyau.
(2)
Serrez une extrémité du tuyau sur la pomme de douche et l’autre
extrémité sur la douchette. NE PAS UTILISER D’OUTILS. L’utilisation
d’outils peut entraîner une défaillance ou un endommagement du
produit et annuler la garantie.
B.
B.
93866
p
Specify Finish
Especifíque el Acabado
Précisez le Fini
1-800-438-6673
www.peerlessfaucet.com
?