1
95323 Rev. D
?
Plumber tape
Cinta para plomero
Ruban de plomberie
Wrench
Llave
Clé
Screwdriver
Destornillador
Tournevis
Hex key (3/32")
Llave Allen (3/32")
Clé Allen (3/32")
You may need:
Usted puede necesitar:
Articles dont vous pouvez avoir besoin:
95323
Models/Modelos/Modèles
PTT14019, PTT14119
PTT14219, PTT14419,
Series/Series/Seria
Write purchased model number here.
Escriba aquí el número del modelo comprado.
Inscrivez le numéro de modèle ici.
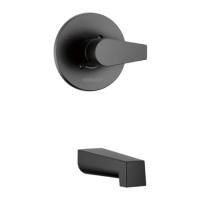
SINGLE HANDLE WASHERLESS PRESSURE
BALANCED TUB & SHOWER VALVES
VÁLVULAS DE REGADRA Y BAÑERA DE
PRESIÓN BALANCEADA SIN ARANDELAS
ROBINET DE BAIGNOIRE / DOUCHE
MONOCOMMANDE À ÉQUILIBRAGE DE
PRESSION
87530
CAUTION This pressure balanced device does not control or adjust for temperature
changes, only pressure fluctuations. As the installer of this valve, it is your responsibility to
adjust the valve per the instructions given to insure safe, maximum temperature. The necessary
Rotational Limit Stop adjustments must be made at the time of installation.
Further adjustments may be necessary due to seasonal water temperature change. Retain this
instruction sheet for future reference.
WARNING It is necessary to adjust the Rotational Limit Stop so that the water coming out
of the valve will not scald the user when the handle of the valve is rotated to the hot side. In some
instances, setting the Rotational Limit Stop in the hottest position (full counterclockwise) could
result in scald injury.
WARNING Read these instructions before installation. The failure to read and follow these
instructions may result in personal injury or property damage and may void the warranty.
!
!
!
PRECAUCIÓN Este dispositivo con presión equilibrada no controla ni ajusta los
cambios de temperatura, solo las fluctuaciones de presión. Como instalador de esta válvula, es
su responsabilidad ajustar la válvula de acuerdo con las instrucciones dadas para garantizar
una temperatura máxima segura. Los ajustes de parada del límite rotacional necesarios deben
hacerse en el momento de la instalación.
Hacer más ajustes pueden ser necesarios debido al cambio estacional de la temperatura del
agua. Guarde esta hoja de instrucciones para referencia futura.
ADVERTENCIA Es necesario ajustar el tope del límite rotacional para que el agua que
sale de la válvula no escaldee al usuario cuando la manija de la válvula se gira hacia el lado
caliente. En algunos casos, establecer el tope del límite rotacional en la posición más caliente
(completamente en el sentido anti-horario) puede provocar lesión por escaldadura.
!
!
ATTENTION Cet appareil à équilibrage de pression atténue uniquement les fluctuations
de pression, pas les variations de température. L’installateur doit régler la soupape conformément
aux instructions afin que la température maximale soit sans danger. La butée de température
maximale doit être réglée au moment de l’installation.
Des réglages supplémentaires peuvent être nécessaires en raison des changements de
température de l’eau saisonniers. Conservez la présente feuille d’instructions pour qu’elle puisse
être consultée ultérieurement.
MISE EN GARDE Il est nécessaire de régler la butée de température maximale de
manière que l’eau s’écoulant de la soupape ne puisse ébouillanter l’utilisateur à la position qui
laisse passer le maximum d’eau chaude. Dans certains cas, le réglage de la butée de température
maximale à la position la plus chaude (à l’extrémité de la plage dans les sens antihoraire) pourrait
entraîner l’ébouillantage.
!
!
ADVERTENCIA Lea estas instrucciones antes de hacer la instalación. El hecho de no
leer y seguir estas instrucciones puede resultar en lesiones personales o daños a la propiedad y
puede anular la garantía.
MISE EN GARDE Veuillez lire les présentes instructions avant l’installation. L’omission
de lire et de respecter les présentes instructions peut occasionner des blessures ou des
dommages matériels et entraîner l’annulation de la garantie.
!
!
95323
PTT14019 PTT14119 PTT14419PTT14219
Hole Dimensions
(minimum and maximum hole size in
wall for valve installation)
Las Dimensiones de los Hoyos
(el tamaño del hoyo mínimo y máximo
en la pared para la instalación de la
válvula)
Dimension du trou
(dimensions minimales et maximales
du trou dans la paroi pour l’installation
de la soupape)
4"
(102mm)
4"
(102mm)
10/30/2023
1-800-438-6673
www.peerlessfaucet.com/customer-support
X00095323