EN_English
Thank you for choosing a
Peg-Pérego product.
WARNING
• IMPORTANT: READ THESE
INSTRUCTIONS CAREFULLY
AND KEEP THEM FOR FUTURE
REFERENCE. FAILURE TO FOLLOW
THESE INSTRUCTIONS COULD PUT
THE CHILD’S SAFETY AT RISK.
• ALL ASSEMBLY AND OPERATING
PROCEDURES SHOULD BE PERFORMED
BY AN ADULT; DO NOT USE THE
PRODUCT IF IT HAS BROKEN OR
MISSING PARTS.
• PREVENT SERIOUS INJURY OR DEATH
FROM FALLS OR SLIDING OUT; ALWAYS
USE COMPLETE 5 POINT SEATBELT;
THE CHILD SHOULD BE SECURED IN
THE HIGH CHAIR AT ALL TIMES, EITHER
IN THE RECLINED OR IN THE UPRIGHT
POSITION.
• ALWAYS USE THE CROTCH STRAP.
• NEVER LEAVE THE CHILD
UNATTENDED; ALWAYS KEEP CHILD IN
VIEW WHILE IN THE HIGHCHAIR.
• TRAY AND ACCESSORY TRAYS ARE NOT
DESIGNED TO SUPPORT THE CHILD’S
WEIGHT; TRAY IS NOT DESIGNED TO
HOLD THE CHILD IN THE CHAIR.
• ALWAYS USE THE HIGHCHAIR ON A
FLAT, HORIZONTAL SURFACE.
• IT IS RECOMMENDED THAT THE HIGH
CHAIR BE USED IN THE UPRIGHT
POSITION ONLY BY CHILDREN CAPABLE
OF SITTING UPRIGHT.
• BE CAREFUL OF WHERE YOU PLACE
THE PRODUCT. AVOID PLACING THE
CHILD NEAR SAFETY HAZARDS SUCH
AS ELECTRICAL CORDS, SOURCES OF
HEAT, OR FLAMES.
• DO NOT PUT FINGERS IN THE
MECHANISM. MAKE SURE YOUR
CHILD’S ARMS AND LEGS ARE CLEAR
OF THE MOVING PARTS DURING
ADJUSTMENT.
• USING ACCESSORIES THAT HAVE
NOT BEEN APPROVED BY THE
MANUFACTURER MAY BE HAZARDOUS.
• DO NOT USE THE PRODUCT NEAR
STAIRS OR STEPS.
• BE CAREFUL NOT TO PLACE THE
PRODUCT NEAR SOURCES OF HEAT
OR FLAMES, SUCH AS GAS STOVES,
ELECTRIC HEATERS, ETC.
• MAKE SURE THE BELT IS ATTACHED
PROPERLY.
• DO NOT USE THE HIGH CHAIR UNLESS
ALL OF THE PARTS ARE PROPERLY
FITTED AND ADJUSTED.
• NOTICE: THIS ARTICLE MEETS OR
EXCEEDS ALL REQUIREMENTS
COVERED IN ASTM F833 STANDARD
AND LATEST REVISIONS.
instructions for use
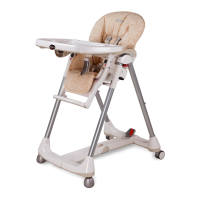
ASSEMBLING THE HIGH CHAIR
1• Attach the wheels, making sure to insert the
ones with the brakes on the back part of the
high chair.
2• Attach the two front wheels, pressing in the
direction shown by the arrow.
3• When it comes out of the packaging, the
high chair is not in a correct position for use
(packing position). To use the high chair, lift
it to one of the seven possible heights as
shown in the figure. To place the high chair
in the correct position for use, see directions
below.
TO OPEN THE HIGH CHAIR
4• To open the high chair, push the little red
levers on the sides downwards as in the figure,
pressing down on the back supports.
5• Before using the high chair, remove the spacers
as shown in the figure.
6• Lower the footrest, as shown in the figure.
BRAKE
7• The high chair has four swivel wheels, with
brakes on two of them. To brake the high chair,
lower the little brake levers on the rear wheels.
To release the brakes, lift the levers. For your
convenience, always make sure the brakes are
set before carrying out any other operation on
the high chair.
ADJUSTABLE FOOTREST
8• The adjustable footrest can be set at three
different heights. To extend it, press the buttons
on the side and pull the footrest down until the
buttons click into the next position, as shown in
the figure.
T R AY
9• To attach the tray, pull the lever under it
 Loading...