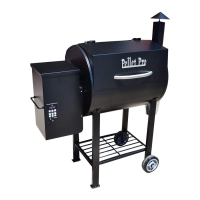
Setting Up Your Pellet Pro® Grill
1) Cut down sides of box
2) Open lid and remove all parts inside of the grill. Lay each part out in an organized fashion for easy
access. Locate the bag of hardware inside of the chimney tube.
3) With one other person, carefully lay grill body on its side with the hopper assembly facing downward.
Be careful that the grill body does not fall over.
Attaching the Grill Legs:
1. Locate the (4) grill legs included. (two without wheels, two with large wheels)
2. Using (8) large black Allen head bolts w/ nut, attach the two solid legs to the side of the grill closest to
the hopper assembly with the large Allen wrench and open-end wrench provided.
→Tighten each bolt only finger tight.
3. Using the other (8) large black Allen head bolts w/ nut, attach the (2) remaining large wheeled legs to
the side of the grill furthest away from the hopper assembly using the same Allen wrench and open-end
wrench. Be sure that the wheels are facing outward.
→Tighten each bolt only finger tight.
4. Once legs are in place, attach the bottom storage shelf using the (4) Long Bolts to each leg and tighten
with wrench.
5. With the assistance of another person, turn the grill right side up and tighten the leg bolts/nuts with
wrench.
Attaching the Grill Lid Handle:
1. Locate the grill handle on the inside of the lid and remove the (2) bolts and washers that secure it.
2. Move handle to the outside of the grill and secure it to the grill lid from the inside with (2) bolts and
washers.
Attaching Chimney & Side Handle:
1. Locate chimney arm, felt gasket, and chimney topper.
2. Using the (2) nickel plated bolts w/ nut, attach the chimney to the side of the grill with both open-end
wrenches provided.
→Be sure gasket is sandwiched between the chimney arm and side wall of the grill.
3. Once chimney arm is secured to the side of the grill, screw on the chimney topper.
4. Locate the handle and (2) large silver bolts and washers. Attach handle underneath the smoke stack
and tighten bolts with wrench.
Finally, remove all plastic and cardboard packaging from remaining parts and replace
heat diffusor, drip pan and grill rack inside of the grill. Refer to Pg. 5 for Initial Firing
Instructions.
 Loading...