16/12/2010
E305DIN1
* Not incl. – non incl. – niet meegelev. –
incl. – nicht mitgeliefert - no incl.
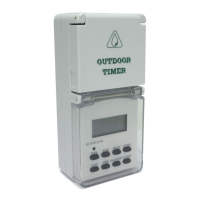
E305DIN1 – DIGITAL WEEK TIMER
1. Introduction
To all residents of the European Union
Important environmental information about this product
This symbol on the device or the package indicates that disposal of the device after its lifecycle
could harm the environment. Do not dispose of the unit (or batteries) as unsorted municipal
waste; it should be taken to a sp
ecialized company for recycling. This device should be returned
to your distributor or to a local recycling service. Respect the local environmental rules.
If in doubt, contact your local waste disposal authorities.
Thank you for choosing Velleman! Please
read the manual thoroughly before bringing this device into
service. If the device was damaged in transit, do not install or use it and contact your dealer. This timer
can be used to control the lighting, heating and other appliances.
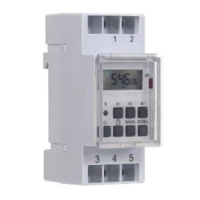
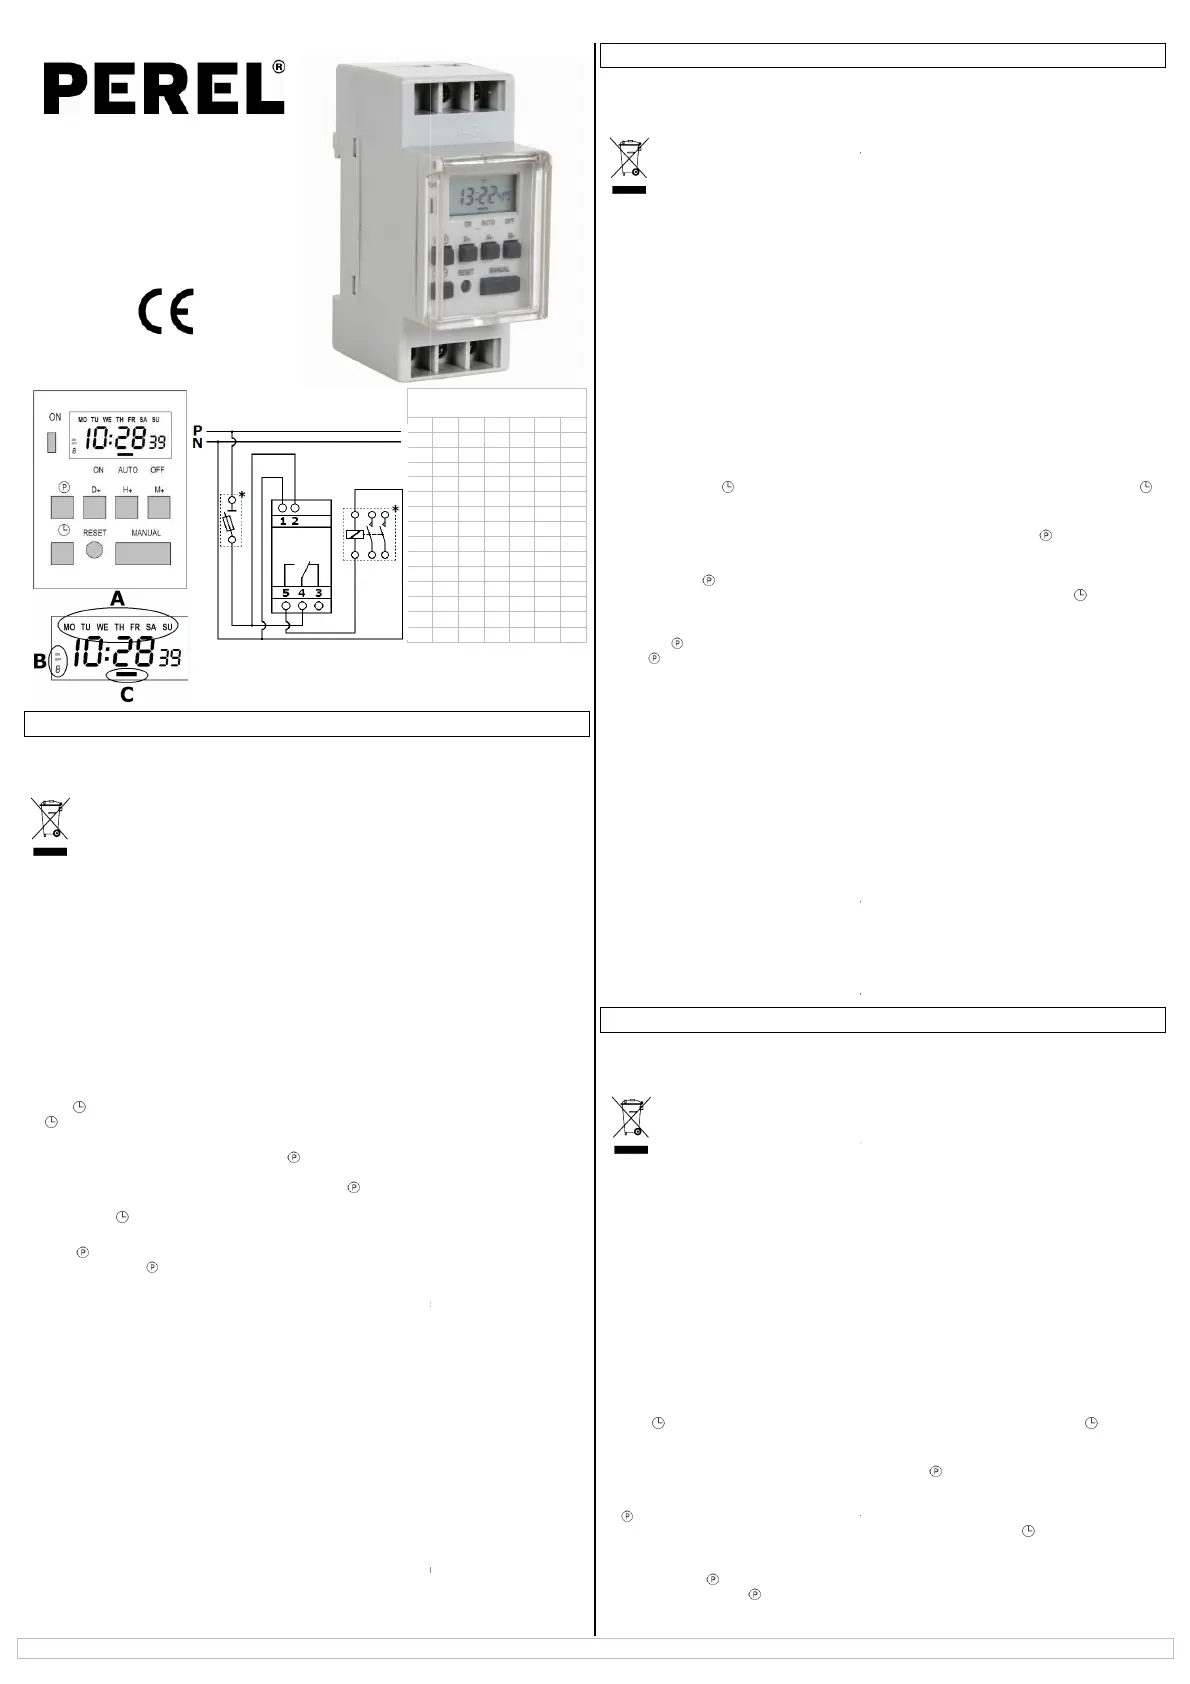
2. Wiring
• This timer
is to be used in DIN rail enclosures with protection grade IP30 minimum. The installation
should be entrusted to a qualified technician only. Do not install the timer if you lack knowledge of
electrical installation.
• Place the timer on the DIN rail or moun
t the timer using the support. Connect the power to terminals 1
and 2. The live connector must be protected with an MCB or fuse of max. 16A. Connect the controlled
circuit between terminals 3 and 4 for a closing function, or between 4 and 5 for an opening
Tighten the screws properly to make good contact pressure. Make sure there is no cable insulation in
the connection terminal.
3. Programming
• Time and Date Setting
Hold pressed, and set the day with D+, set the hours with H+
to confirm.
• Program Setting
This timer features 8 on / off programs. Press to set the first power-
days the program must be active with D+ (15 modes, see table
); the selected days are highlighted on
the display [A]. Now, set the time with H+ and M+. Press
to confirm. Next, set the power
program accordingly. Repeat the operation for the remaining 7 power-
Finally, press to show the current time.
• Verifying and modifying a Setting
Press
several times to display each setting. To modify, simply set a new date and time with
and M+, and press to confirm.
• Resetting the Timer
Press RESET
with a pointy object. The clock and all the settings will be erased.
• Manual Override
Press MANUAL and choose between permanent power-on (ON)
(AUTO) mode. The status is indicated on the display [C]. The selected
mode.
• LED Indicator
The LED lights up when the NO contact (5-4) is closed.
4. Technical Specifications
Power Supply 220 ~ 250VAC/50Hz
Output
Resistive Load 16A @ 230VAC, 3680W max.
Inductive Load 8A @ 230VAC (cos φ = 0.4)
Timer Interval 1 min
Power Consumption 4.4W
Operating Temperature -10°C ~ 40°C
Deviation ± 1 min/month
Use this device with original accessories only. Velleman nv cannot be held responsible in the event of
damage or injury resulted from (incorrect) use of this d
evice. For more info concerning this product
the warranty, please visit our website www.perel.eu.
The information in this manual is subject to
change without prior notice.
Modus – modo
This symbol on the device or the package indicates that disposal of the device after its lifecycle
could harm the environment. Do not dispose of the unit (or batteries) as unsorted municipal
ecialized company for recycling. This device should be returned
to your distributor or to a local recycling service. Respect the local environmental rules.
read the manual thoroughly before bringing this device into
service. If the device was damaged in transit, do not install or use it and contact your dealer. This timer
is to be used in DIN rail enclosures with protection grade IP30 minimum. The installation
should be entrusted to a qualified technician only. Do not install the timer if you lack knowledge of
t the timer using the support. Connect the power to terminals 1
and 2. The live connector must be protected with an MCB or fuse of max. 16A. Connect the controlled
circuit between terminals 3 and 4 for a closing function, or between 4 and 5 for an opening
function.
Tighten the screws properly to make good contact pressure. Make sure there is no cable insulation in
with M+. Release
[B]. Select which
); the selected days are highlighted on
to confirm. Next, set the power
-off
-off programs.
several times to display each setting. To modify, simply set a new date and time with
D+, H+
with a pointy object. The clock and all the settings will be erased.
-off (OFF) and auto
will only work in auto
Use this device with original accessories only. Velleman nv cannot be held responsible in the event of
evice. For more info concerning this product
and
The information in this manual is subject to
E305DIN1 –
PROGRAMMATEUR HEBDOMADAIRE NUMÉRIQUE
1. Introduction
Aux résidents de l'Union européenne
Des informations environnementales importantes concernant ce produit
Ce symbole sur l'appareil ou l'emballage indique que l’élimination d’un appareil en fin de vie
peut polluer l'environnement. Ne pas jeter un appareil électrique ou
éventuelles) parmi les déchets municipaux non sujets au tri sélectif
l’appareil en question. Renvoyer les équipements usagés à votre fournisseur ou à un service de
recyclage local. Il convient de respect
er la réglementation locale relative à la protection de
l’environnement.
En cas de questions, contacter les autorités locales pour élimination.
Nous vous remercions de votre achat
! Lire la présente notice attentivement avant la mise en service de
l’appareil. Si l’appareil a été endommagé pendant le transport, ne pas l’installer et consulter votre
revendeur. Ce programmateur convient pour l’allumage et l’extinction programmées d’éclairage, de d’un
chauffage central ou d’autres appareils.
2. Câblage
Ce programmateur est destiné à un montage dans une armoire à rails DIN (indice de protection IP30 ou
plus). Confier l’installation à un technicien qualifié. Ne pas raccorder ce programmateur si vous ne
disposez pas des connaissances requises.
Placer le pro
grammateur sur le rail DIN ou le monter à l’aide du support de montage. Raccorder les
modules d’alimentation des bornes 1 et 2 au réseau. Protéger le connecteur sous tension par un coupe
circuit ou un fusible de max. 16
A. Raccorder le circuit aux bornes 3
bornes 4 et 5 pour un circuit ouvert. Serrer les vis de manière à ce que le contact soit solide. Veiller à
retirer le revêtement du câble dans la borne de connexion.
3. Programmation
• Réglage de l’heure et de la date
Maintenir enfoncé , et régler la date avec
pour confirmer.
• Programmation
Ce programmateur intègre 8 programmes d’allumage et
premier programme d’allumage [B]
. Sélectionner les jours applicables avec
the selected days are highlighted on the display
confirmer avec
. Paramétrer ensuite le programme d’extinction de la même manière. Répéter cette
opération pour les 7 programmes d’allumage et d’extinction restants. Enfin, enfoncer
current time.
• Vérification et modification d’un programme
Enfoncer pour af
fiche un programme. Modifier la date et l’heure avec
avec .
• Réinitialisation du programmateur
Enfoncer RESET
avec un objet pointu. L’horloge et les programmes seront effacés.
• Commande manuelle
Enfoncer MANUAL
et sélectionner le mode d’allumage permanent
permanente (OFF) ou le mode automatique
programmes selected
ne fonctionnent qu’en mode automatique.
• La LED d’indication
The LED lights up when the NO contact (5-
4. Spécifications techniques
Alimentation
Sortie
Charge résistive 16
Charge inductive 8
Intervalle 1 min
Consommation 4,4
Température de service -
Décalage
N’employer cet appareil qu’avec des accessoires d’origine. SA Velleman ne sera aucunement
responsable de dommages ou lésions survenus à un usage (incorrect) de cet appareil. Pour plus
d’information concernant cet article
informations présentées dans cette notice peuvent être modifiées sans notification préalable.
E305DIN1 –
1. Inleiding
Aan alle ingezetenen van de Europese Unie
Belangrijke milieu-
informatie betreffende dit product
Dit symbool op het toestel of de verpakking geeft aan dat, als het na zijn levenscyclus wordt
weggeworpen, dit toestel schade kan toebrengen aan het milieu. Gooi dit toestel (en eventuele
batterijen) ni
et bij het gewone huishoudelijke afval; het moet bij een gespecialiseerd bedrijf
terechtkomen voor recyclage. U moet dit toestel naar uw verdeler of naar een lokaal
recyclagepunt brengen. Respecteer de plaatselijke milieuwetgeving.
Hebt u vragen, contactee
r dan de plaatselijke autoriteiten
Dank u voor uw aankoop! Lees deze handleiding grondig voor u het toestel in gebruik neemt. Werd het
toestel beschadigd tijdens het transport, installeer het dan niet en raadpleeg uw dealer. De
worden gebruikt voor het aansturen van verlichting, verwarmingsinstallaties en andere toestellen.
2. Aansluiting
•
Deze timer is ontworpen voor montage in een DIN
Vertrouw de installatie aan toe een
geschoold technicus. Installeer de timer niet zelf indien niet over
de nodige kennis beschikt.
• Plaats de timer op de DIN-
rail of monteer de timer met behulp van het montageplaatje. Sluit de
voeding aan op klemmen 1 en 2. Bescherm de aansluiting onder spann
miniatuurstroomonderbreker of een zekering van max. 16
voor een sluitende functie, of op klemmen 4 en 5 voor een openende functie. Span de schroeven
voldoende aan voor een goed contact. Verwijder de ka
3. Programmering
• De tijd en de datum instellen
Houd ingedrukt. Stel de dag in met D+
bevestigen.
• Een programma instellen
Deze timer heeft 8 in-
stellen [B]
. Selecteer de dagen waarop u het programma wenst in te schakelen met
tabel); de geselecteerde dagen verschijnen op de display
om te bevestigen. Stel vervolgens op dezelfde manier het uitschakelprogramma in. Herhaal deze
stappen voor de overige 7 in-
en uitschakelprogramma’s. Druk ten slotte op
de uuraanduiding.
• Een instelling controleren en wijzigen
Druk telkens op
om het programma weer te geven. Wijzig de datum en tijd gewoonweg met
en M+, en bevestig met .
• Het timergeheugen wissen
Druk op RESET
met een puntig object. De klok en alle ingestelde programma’s worden gewist.
©Velleman nv
PROGRAMMATEUR HEBDOMADAIRE NUMÉRIQUE
Des informations environnementales importantes concernant ce produit
Ce symbole sur l'appareil ou l'emballage indique que l’élimination d’un appareil en fin de vie
peut polluer l'environnement. Ne pas jeter un appareil électrique ou
électronique (et des piles
éventuelles) parmi les déchets municipaux non sujets au tri sélectif
; une déchèterie traitera
l’appareil en question. Renvoyer les équipements usagés à votre fournisseur ou à un service de
er la réglementation locale relative à la protection de
En cas de questions, contacter les autorités locales pour élimination.
! Lire la présente notice attentivement avant la mise en service de
l’appareil. Si l’appareil a été endommagé pendant le transport, ne pas l’installer et consulter votre
revendeur. Ce programmateur convient pour l’allumage et l’extinction programmées d’éclairage, de d’un
Ce programmateur est destiné à un montage dans une armoire à rails DIN (indice de protection IP30 ou
plus). Confier l’installation à un technicien qualifié. Ne pas raccorder ce programmateur si vous ne
grammateur sur le rail DIN ou le monter à l’aide du support de montage. Raccorder les
modules d’alimentation des bornes 1 et 2 au réseau. Protéger le connecteur sous tension par un coupe
-
A. Raccorder le circuit aux bornes 3
et 4 pour un circuit fermé, ou aux
bornes 4 et 5 pour un circuit ouvert. Serrer les vis de manière à ce que le contact soit solide. Veiller à
retirer le revêtement du câble dans la borne de connexion.
, l’heure avec H+ et les minutes avec M+. Relâcher
Ce programmateur intègre 8 programmes d’allumage et
d’extinction. Enfoncer pour paramétrer le
. Sélectionner les jours applicables avec
D+ (15 modes, see table);
the selected days are highlighted on the display
[A]. Régler l’heure et les minutes avec H+ et M+, et
. Paramétrer ensuite le programme d’extinction de la même manière. Répéter cette
opération pour les 7 programmes d’allumage et d’extinction restants. Enfin, enfoncer
to show the
fiche un programme. Modifier la date et l’heure avec
D+, H+ et M+, et confirmer
avec un objet pointu. L’horloge et les programmes seront effacés.
et sélectionner le mode d’allumage permanent
(ON), le mode d’extinction
. The status is indicated on the display [C].Les
ne fonctionnent qu’en mode automatique.
VCA / 50 Hz
VCA, 3680 W max.
VCA (cos φ = 0,4)
N’employer cet appareil qu’avec des accessoires d’origine. SA Velleman ne sera aucunement
responsable de dommages ou lésions survenus à un usage (incorrect) de cet appareil. Pour plus
, visitez notre site web www.perel.eu. Toutes les
informations présentées dans cette notice peuvent être modifiées sans notification préalable.
informatie betreffende dit product
Dit symbool op het toestel of de verpakking geeft aan dat, als het na zijn levenscyclus wordt
weggeworpen, dit toestel schade kan toebrengen aan het milieu. Gooi dit toestel (en eventuele
et bij het gewone huishoudelijke afval; het moet bij een gespecialiseerd bedrijf
terechtkomen voor recyclage. U moet dit toestel naar uw verdeler of naar een lokaal
recyclagepunt brengen. Respecteer de plaatselijke milieuwetgeving.
r dan de plaatselijke autoriteiten
betreffende de verwijdering.
Dank u voor uw aankoop! Lees deze handleiding grondig voor u het toestel in gebruik neemt. Werd het
toestel beschadigd tijdens het transport, installeer het dan niet en raadpleeg uw dealer. De
ze timer kan
worden gebruikt voor het aansturen van verlichting, verwarmingsinstallaties en andere toestellen.
Deze timer is ontworpen voor montage in een DIN
-railkast met beschermingsgraad IP30 of hoger.
geschoold technicus. Installeer de timer niet zelf indien niet over
rail of monteer de timer met behulp van het montageplaatje. Sluit de
voeding aan op klemmen 1 en 2. Bescherm de aansluiting onder spann
ing met een
miniatuurstroomonderbreker of een zekering van max. 16
A. Sluit het circuit aan op klemmen 3 en 4
voor een sluitende functie, of op klemmen 4 en 5 voor een openende functie. Span de schroeven
voldoende aan voor een goed contact. Verwijder de ka
belmantels uit de klemmen.
H+ en de minuten met M+. Laat los om te
. Druk op om het eerste inschakelprogramma in te
. Selecteer de dagen waarop u het programma wenst in te schakelen met
D+ (15 modes, zie
tabel); de geselecteerde dagen verschijnen op de display
[A]. Stel nu de tijd in met H+ en M+. Druk op
om te bevestigen. Stel vervolgens op dezelfde manier het uitschakelprogramma in. Herhaal deze
en uitschakelprogramma’s. Druk ten slotte op
om terug te keren naar
om het programma weer te geven. Wijzig de datum en tijd gewoonweg met
D+, H+
met een puntig object. De klok en alle ingestelde programma’s worden gewist.
 Loading...