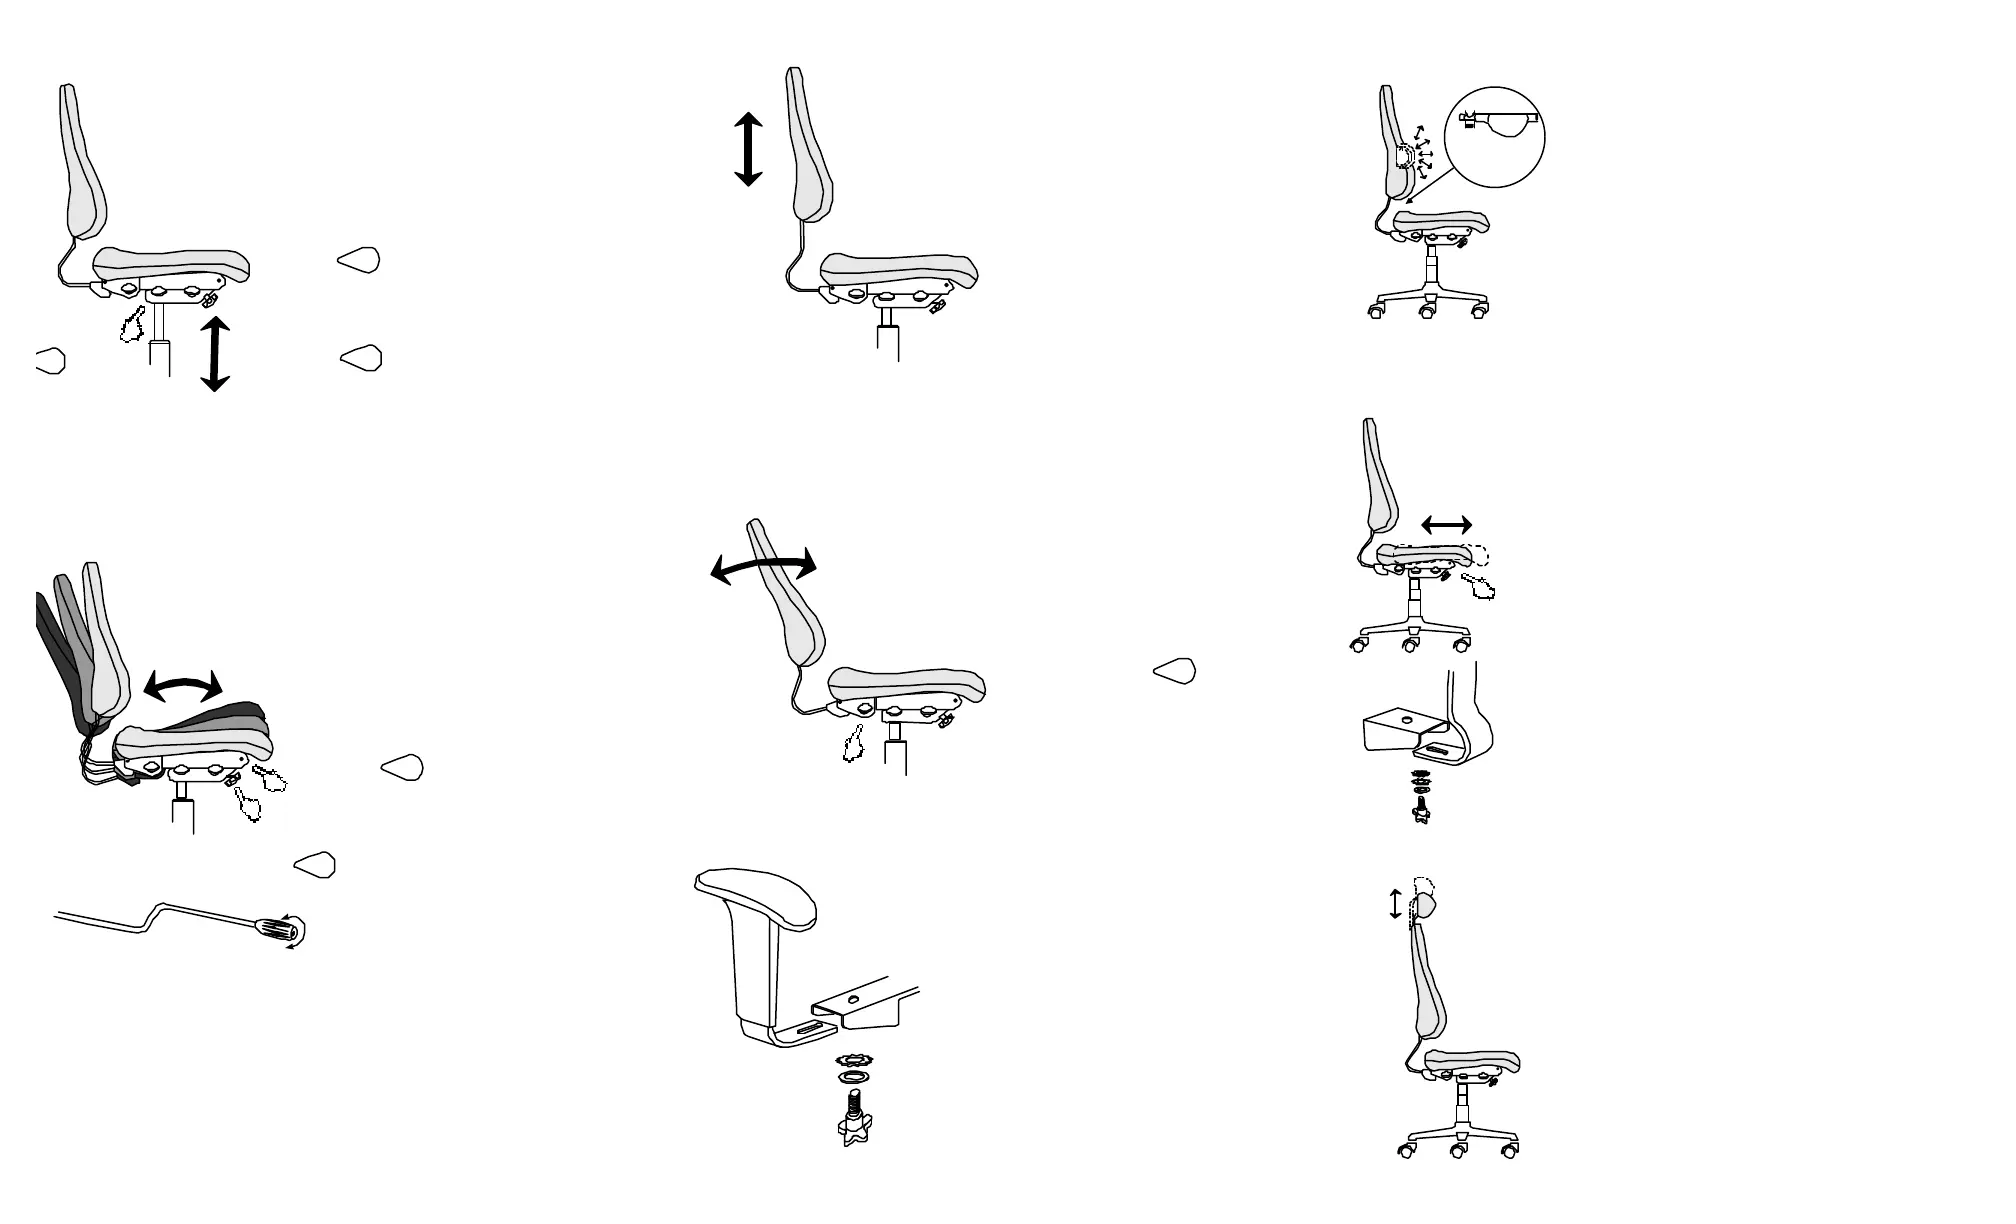
2. Adjust Seat Angle & Tilt Tension
3. Adjust Back Height 6. Adjust Air Lumbar (optional)
8. Adjust Headrest (optional)
The tilt tension adjustment balances your weight so the chair can be
tilted with ease. The ideal tilt tension lets you lean back in your chair
with minimum effort, but with enough resistance to provide back
support at any position throughout the tilt range. Normally, this
adjustment is performed once. To increase or decrease tension turn
the knob located on the underside of the chair, clockwise or
counter-clockwise.
To raise the backrest simple grasp
the back from either top, bottom or
sides and lift upward slowly. Listen
for the distinctive "click" as the
backrest auto-locks as it moves
upward every ½". To lower the
backrest, simply raise the back to
maximum height and allow the
backrest to fall to its lowest position.
The back height adjustment allows you to raise and lower the
backrest relative the seat. The backrest should be positioned
so that the small of your back is comfortably supported by the
backrests contoured lumbar.
4. Adjust Back Angle
To adjust the backrest angle pull up
on the lever labeled and lean
forward or backward until you have
found a comfortable position.
Release the lever and the backrest
will lock in your preferred position.
The backrest angle adjustment allows you to position the
backrest angle relative to the seat. The backrest should
be adjusted so that the angle between your torso and
thighs is greater than 90º and provides firm support
during your varied daily tasks. Maintaining constant
contact with the backrest at all time will maximize your
overall comfort and will reduce muscle fatigue, (sit back
deep in your chair).
BACKBACK
BACK
BACK
BACKBACK
BACKBACK
BACK
1. Adjust Seat Height
To raise seat height pull up on the middle lever
labeled and ease body weight off of the seat.
The seat will raise automatically, release the lever to
lock the seat in the desired position.
To lower the seat height, pull up on the middle lever
labeled while all your body weight rest on the
seat. Release the lever to lock the seat in the
desired position.
Adjust the seat so that your feet are resting flat on the floor and
there is minimal pressure on the back of your thighs. Dangling
feet or excessive pressure on the back of the thighs may lead to
restricted blood flow. If the work surface seems too high, raise
the seat until you are at comfortable working height and use a
footrest to support your feet.
BACK
ACK
ACK
ACK
BACK
ACK
ACKBACK
ACK
5. Adjust Armrests
Armrests can be adjusted both in height and width to
comfortably support your forearms. Armrest height
should be positioned so that the shoulders are
relaxed and the angle between the forearm and upper
arm is greater than 90º.
To adjust the armrest vertically up or down simply
squeeze the trigger on the front of the armrest and
raise or lower to your desired position. Releasing the
trigger will lock the arm into position.
To adjust the distance between the arms loosen the
knobs located under the arm bracket. Position the
spacing between the arms to your preference and
tighten the knobs.
7. Adjust Backrest Depth (optional)
J
Forward Tilt Lockout
When activated, the forward tilt lockout feature maintaines the seat angle parellel to
the floor in the resting postion. You can still free-float (rock) in your chair. When
de-activated the seat is allowed to tilt forward (an inclined position of 6º )
To activate or de-activate this feature your chair must be in the reclined position. To
acivate (limit forward tilt) the forward tilt lockout rotate the lever located directly
beneath the front right corner of your seat in a counter clockwise direction. To
de-activate (allow forward tilt) rotate the lever in a clockwise direction.
You have the choice of keeping the seat in a
free - float (rocking) motion or locked into one
selected position.
To lock the seat into one position, pull up on the
lever labeled allowing the chair to rock. Find
your preferred seating position and the lower the
lever to the down position to lock the seat angle.
Pulling up on and locking the lever labeled
in the up position activates the free - float
option. (see tilt tension to adjust the free - float
balance)
The Air Adjustable Lumbar allows you to customize the
amount of lumbar support in the backrest to meet your
specific preference.
By simply compressing the pump bulb, or depressing
the release valve, you may tailor the luimbar curvature
to your own needs.
The seat depth option allows for adjustments to the seat depth
(the distance from the front edge of the seat to the backrest)
The seat depth should be adjusted so that there is a space 2 - 3
finger width between the front edge of the seat and the back of
your knee.
All Built2Last chairs have approximately 7/8" of seat depth
adjustment built into the base of the back bar. Simply losen the
Back Bar Knob and slide the backrest forward or backward as
required.
The Seat Slider option allows for up to 2 1/2" of additional seat
depth. Adjustable in 1/2" increments from the seated position.
The Seat Slider is activated by depressing the lever located
beneath the front left corner of your seat. While the lever is
depressed simply adjust your seat forward or backward as
necessary. Releasing the lever will lock your seat into the
chosen position.
The Headrest feature provides additional cervical support
and comfort. Your headrest can be adjusted in 1/2"
increments, providing five different height settings.
Simply grasp the headrest and raise, listen for the
distinctive "click" that indicates that an auto-lock position.
To lower the headrest, raise it to its maximum height and
allow the headrest to fall to its lowest position and push
downward until you hear a "click"
J
release
valve
HEIGHTHEIGHT
HEIGHT
HEIGHT
HEIGHTHEIGHT
HEIGHTHEIGHT
HEIGHT
SEATSEAT
SEAT
SEAT
SEATSEAT
SEATSEAT
SEAT
HEIGHTHEIGHT
HEIGHT
HEIGHT
HEIGHTHEIGHT
HEIGHTHEIGHT
HEIGHT
SEATSEAT
SEAT
SEAT
SEATSEAT
SEATSEAT
SEAT
 Loading...