Do you have a question about the Performance PL 102GG and is the answer not in the manual?
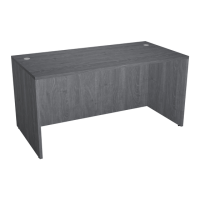
Line up the Cam Lock with the designated slot and turn clockwise to secure.
Insert the cam with its arrow pointing towards the hole in the panel edge.
Insert the Cam Lock into the Klix Cam and turn to lock the connection.
Connect Top Panel (A) to Side Panels (C,D) and Back Panel (B) using Cam Locks, Pins, and Klix Cams.
Secure L-Brackets (5) to Top (A), Back (B), and Side Panels (C,D) using Screws (6).
Screw Adjustable Glides (4) into the bottom of the Side Panels.
Push Housing Caps (3) onto the neck of each Klix Cam (2) to cover the mechanism.
| Brand | Performance |
|---|---|
| Model | PL 102GG |
| Category | Indoor Furnishing |
| Language | English |