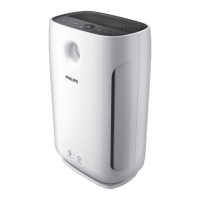
This document describes the Philips AC1215 air purifier, a device designed to improve indoor air quality.
Function Description
The Philips AC1215 is an air purifier that removes airborne particles and allergens from the air. It features a multi-stage filtration system, including a pre-filter, a NanoProtect filter Series 3 (FY1410), and a NanoProtect AC filter (FY1413). The device monitors air quality in real-time and adjusts its fan speed accordingly. It also includes a light sensor and a night sensing mode for optimized operation in various ambient light conditions.
Important Technical Specifications
The air purifier operates on a local power voltage, which should be checked against the appliance's indicated voltage before connection. It is designed for household use under normal operating conditions. The device does not remove carbon monoxide (CO) or radon (Rn) and should not be used as a safety device in accidents involving combustion processes or hazardous chemicals.
Usage Features
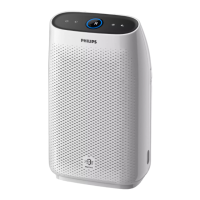
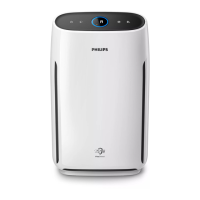
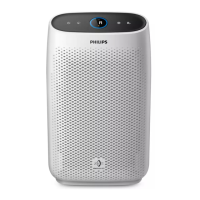
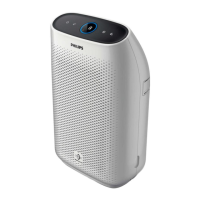
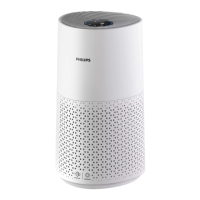
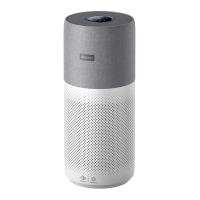
- Product Overview: The air purifier consists of a control panel (A), air quality light (B), air outlet (C), air quality sensor (D), NanoProtect filter Series 3 (FY1410) (E), NanoProtect AC filter (FY1413) (F), pre-filter (G), air inlet (H), and front panel (I).
- Controls Overview: The control panel includes an On/Off button (J), Night sensing mode button (K), display screen (L), fan speed button (M), and child lock button (N).
- Installing the Filter: Before first use, all filters must be installed. The process involves removing the front panel, pulling out the pre-filter, removing all other filters, and taking off their packaging. The thick filter (FY1410) is placed first, followed by the thin AC filter (FY1413), and then the pre-filter is reattached. The side of the filter with the tag should point towards the user. Hands should be washed thoroughly after installation.
- Understanding the Air Quality Light: The air quality light changes color to indicate the surrounding air quality level: Blue (Good), Blue-violet (Fair), Red-purple (Poor), and Red (Very poor). The sensor takes approximately 30 seconds to select the appropriate color after startup.
- Turning On and Off: The air purifier is turned on by touching the On/Off button (J) and off by touching and holding it for 3 seconds. By default, it operates in auto mode. If the device remains connected to the power outlet after being turned off, it will resume previous settings when turned on again. In case of accidental shutdown, it restarts automatically with previous settings once power is restored.
- Changing the Fan Speed: Multiple fan speeds are available: auto mode, speeds 1, 2, 3, and turbo mode (t).
- Auto Mode (A): Selected by repeatedly touching the fan speed button (M).
- Allergen Mode: A specially designed mode to reduce common allergens like pollen and pet dander. Selected by touching the fan speed button (M); "Auto (A)" and an allergen icon will display.
- Manual Mode: Selected by repeatedly touching the fan speed button (M) to choose the desired speed.
- Turbo Mode (t): Operates the air purifier at its highest speed. Selected by touching the fan speed button (M).
- Light Sensor: The air purifier adjusts its operation based on ambient light. When ambient light dims for 10 seconds, control panel lights turn off slowly. Touching any button during this period reactivates the lights. If no action is taken within 10 seconds, all lights turn off. Lights reactivate when ambient light brightens for at least 10 seconds.
- Night Sensing Mode: This mode can be activated manually or automatically.
- Manual Activation: Touch the Night sensing mode button (K) before sleeping. If the air quality light is blue, the purifier enters night sensing mode directly, operating quietly with dimmed lights. If not blue, it runs in turbo mode for up to 10 minutes (with slow blinking air quality light) before entering night sensing mode.
- Auto Activation: In auto or allergen mode, if the light sensor detects that room lights are off, the purifier automatically enters night sensing mode. It adjusts fan speed in real-time to maintain clean air, and the air quality light dims. The light sensor detects room lights after 11 hours in night sensing mode. If room lights are turned on, the purifier exits night sensing mode and resumes previous operation. Manual exit is possible by touching the Night sensing mode button (K) or fan speed button (M).
- Set the Child Lock: Activate by touching and holding the child lock button (N) for 3 seconds. The child lock icon (N) appears and blinks, and other buttons become unresponsive. Deactivate by touching and holding the child lock button (N) for 3 seconds again; the icon disappears. The child lock automatically unlocks when pre-filter cleaning or filter replacement codes are displayed.
Maintenance Features
- Cleaning: Always turn off and unplug the air purifier before cleaning. Do not immerse it in water or other liquids. Avoid abrasive, aggressive, or flammable cleaning agents. Only the pre-filter is washable; other filters are not. Do not use a vacuum cleaner to clean filters or the air quality sensor.
- Cleaning the Body: Regularly clean the interior and exterior with a soft, dry cloth. The air outlet can also be cleaned with a dry, soft cloth. The front cover can be detached and washed under running tap water.
- Cleaning the Air Quality Sensor: Clean every 2 months for optimal performance. If used in a dusty environment, more frequent cleaning may be needed. High humidity can cause condensation on the sensor, leading to inaccurate air quality readings; in such cases, clean the sensor or use manual speed settings. The process involves turning off and unplugging the device, cleaning the sensor inlet and outlet with a soft brush, removing the sensor cover, cleaning the sensor and dust inlet/outlet with a damp cotton swab, drying all parts thoroughly, and reattaching the cover. The air quality cover should always be closed during operation.
- Cleaning the Pre-filter: Clean when "F0" is displayed on the screen. The process involves turning off and unplugging the device, removing the front panel, pulling out the pre-filter, brushing off heavy dust with a soft brush, and washing it under running tap water. Allow the pre-filter to air dry completely before reinserting it. Hands should be washed after handling the filter. Reattach the pre-filter, ensuring the clip side faces you and all hooks are properly attached. Reattach the front panel. After cleaning, plug in the air purifier and touch and hold the pre-filter cleaning reset button for 3 seconds.
- Replacing the Filter: The air purifier has a filter replacement indicator. When filters need replacement, a code (A3 for FY1410, C7 for FY1413, or both alternately) is displayed. If filters are not replaced within 14 days, the purifier stops and locks automatically. Air filters are not washable or reusable.
- Replacing the Filters: Turn off and unplug the device. Remove and discard the used filter(s) according to the displayed alert code. Do not touch or smell the pleated filter surface. Remove all packaging from new filters. Insert new filters (FY1410 first, then FY1413). Plug in the air purifier. Touch and hold the filter lifetime counter reset button for 3 seconds. Wash hands after changing filters.
- Filter Reset: Filters can be replaced even if no replacement code is displayed. After replacement, manually reset the filter lifetime counter. Touch and hold the fan speed button (M) and child lock button (N) simultaneously for 3 seconds to enter filter reset mode. "A3" will display. Touch and hold the filter lifetime counter reset button for 3 seconds to reset the FY1410 filter. "C7" will display. Touch and hold the filter lifetime counter reset button for 3 seconds to reset the FY1413 filter and exit reset mode.
- Storage: Turn off and unplug the air purifier. Clean the device, air quality sensor, and pre-filter. Allow all parts to dry thoroughly. Wrap the filter and pre-filter separately in airtight plastic bags. Store the air purifier, filters, and pre-filter in a cool, dry location. Wash hands thoroughly after handling filters.