Congratulations on your purchase and
welcome to Philips!
To fully benifit from the support that
Philips offers, register your product at
www.philips.com/welcome.
IMPORTANT!
• PLEASE NOTE THAT THE VOLTAGE
SELECTOR LOCATED AT THE REAR OF
THIS SYSTEM IS PRESET AT 220V FROM
THE FACTORY. FOR COUNTRIES THAT
OPERATE AT 110V-127V PLEASE ADJUST
TO 110V-127V BEFORE YOU SWITCH ON
THE SYSTEM.
Supplied accessories
– 1 X certified AC 7.5V adapter
(Input: 220-230V ~50Hz 30mA,
Output: 7.5V 250mA)
– 1 X outdoor sensor
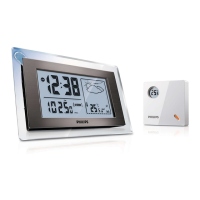
Controls (see 1)
1 ALM 1/ ALM 2
– activates/confirms ALARM 1 /ALARM 2
time setting
– switches off the alarm
2 RADIO ON/OFF
– switches the radio on/off
– switches the set on or to standby
– stops the active buzzer or radio alarm for
24 hours
– switches off the sleep timer
3 TIME SET
– activates/confirms clock/date setting
4 AUTO SCAN/DATE
– programs preset radio stations
– displays month and day information in
standby mode
– changes display order between month and
day during setting time
– receives transmission from the sensor
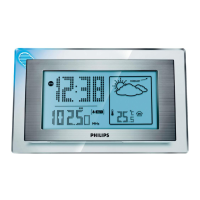
5 DISPLAY
– toggles between indoor temperature,
indoor humidity and outdoor temperature
6 RADIO•BUZ
– selects alarm mode: radio or buzzer
7
REPEAT ALARM/BRIGHTNESS CONTROL
– pushes to switch off alarm for a 9-minute
period
– changes the brightness of the display
illumination
8 LCD Display – shows the clock/ alarm time
or radio and weather forecast information
9 SLEEP/ALARM RESET
– switches off radio for timer mode
– adjusts timer options for radio playback
– stops the active buzzer or radio alarm for
24 hours
0 PRESET +/-
–
selects a preset radion station
! TUNING +/-
– tunes to radio stations
– adjusts clock / alarm time
@ VOL– adjusts sound level
# Color lamp– indicates the different forth-
coming weather situation
$ Battery compartment – opens to insert
4 x 1.5V AAA batteries
% RESET
– press if the set / display does not react to
operation of any button
^ (
o
C
o
F) Slide Switch
– selects between Centigrade (
o
C) or
Fahrenheit (
o
F) temperature unit display
& DC 7.5V
– socket for AC/DC 7.5V adapter
* Pigtail – FM antenna to improve FM reception
Controls on the sensor (see 1)
1 LCD display
– shows current temperature, and low bat-
tery indication of the sensor
2 LED light
– flashes when the sensor is transmitting
3 RESET
– resets to start transmitting
4 (
o
C
o
F) Slide Switch
– selects between Centigrade (
o
C) or
Fahrenheit (
o
F) temperature unit display
5 CHANNEL 1/ 2 /3
– selects RF channel to transmit and receive
between the senor and the main unit
6 Door lock
– turns to lock and un-lock the sensor door.
7 Sensor support
– pulls out to stand the sensor
English Controls