English Controls/Power Supply
Congratulations on your purchase and
welcome to Philips!
To fully benefit from the support that
Philips offers, register your product at
www.philips.com/welcome.
Supplied Accessories
– AC power cord
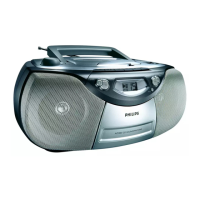
Top/front panels (See 1)
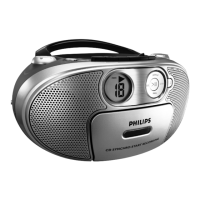
1
VOLUME
–
adjusts volume level.
2
Source selector: CD,TUNER,TAPE/OFF
–
selects CD, radio or tape source of sound
–
power off switch
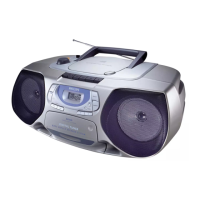
3
CASSETTE RECORDER keys:
PAUSE–
pauses playback or recording
STOP•OPEN
–
stops the tape or recording;
–
opens the cassette holder.
F.FWD / REW –
fast winds/ rewinds tape;
PLAY –
starts playback;
REC –
starts recording.
4
Display
–
shows the CD functions
5
2 ; - starts or pauses CD playback
22 / 11
–
selects the next/previous track
– searches forwards/backwards (press and
hold the button) within the current track
REPEAT
–
repeats a track/
CD program/entire CD.
6 PROG – programs tracks and reviews the
program
7 LIFT TO OPEN – opens/ closes the CD
door.
8 TUNING
– tunes to radio stations
9
SHUFFLE – plays all tracks in random order
0
BAND –
selects waveband (FM or MW).
! 9
STOP –
stops CD playback;;
–
erases a CD program
Back/bottom panels (
See 2
and 3)
@ Telescopic antenna - improves FM
reception.
# AC MAINS~ - inlet for power cord.
$
DBB
–
turns the bass enhancement on/off.
% p – 3.5 mm stereo headphone socket
Helpful hints: The speakers will be muted
when headphones are connected to the set.
^ Battery door - open to insert 6 x 1.5V
R-14/ UM-2/ C-cells
CAUTION
Use of controls or adjustments or
performance of procedures other
than herein may result in unsafe
operation.
This set complies with the radio
interference requirements of the
European Union.
Power Supply
Whenever convenient, use the power supply
cord if you want to conserve battery life.
Make sure you remove the plug from the set
and wall outlet before inserting batteries.
Batteries (not included)
1 Open the battery door and insert 6 batteries,
type R-14, UM-2 or C-cells, (preferably
alkaline) with the correct polarity as indicated
by the "+" and "–" symbols inside the com-
partment. (See 2).
2 Replace the battery door, making sure the bat-
teries are firmly and correctly in place.The set is
now ready to operate.
Batteries contain chemical substances, so
they should be disposed of properly.