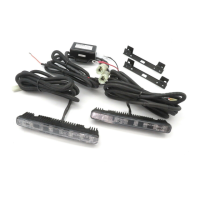
Philips LED DayLight 8 modules are
dimmed at night and fully replace the position
(parking) lights. Since it is illegal to drive with four
front position (parking) lights, the original lamps
must be removed.
Tip Before you install the Control box
You can identify the cable you need to connect
the LED modules:
1 Switch on the position (parking) light
2 Unplug the headlamp connector
3 Touch each connector pin with the orange cable
extremity, the control box will identify the powered
cable (LED light will switch on).
Important On certain cars models, removing
the lamps may generate a defective lamp warning
signal. To solve this issue, you must replace
the original lamps with the ones delivered
in the Philips package. These simulate the behavior
of the original lamps without producing light.
5 Wiring instructions
Perform the wiring installation of the LED DayLight 8 modules according to the numbered sequence below: