@
TwSTALLATION AND CONNECTIONS
m
=l
(ol
-1
o1
,l
)
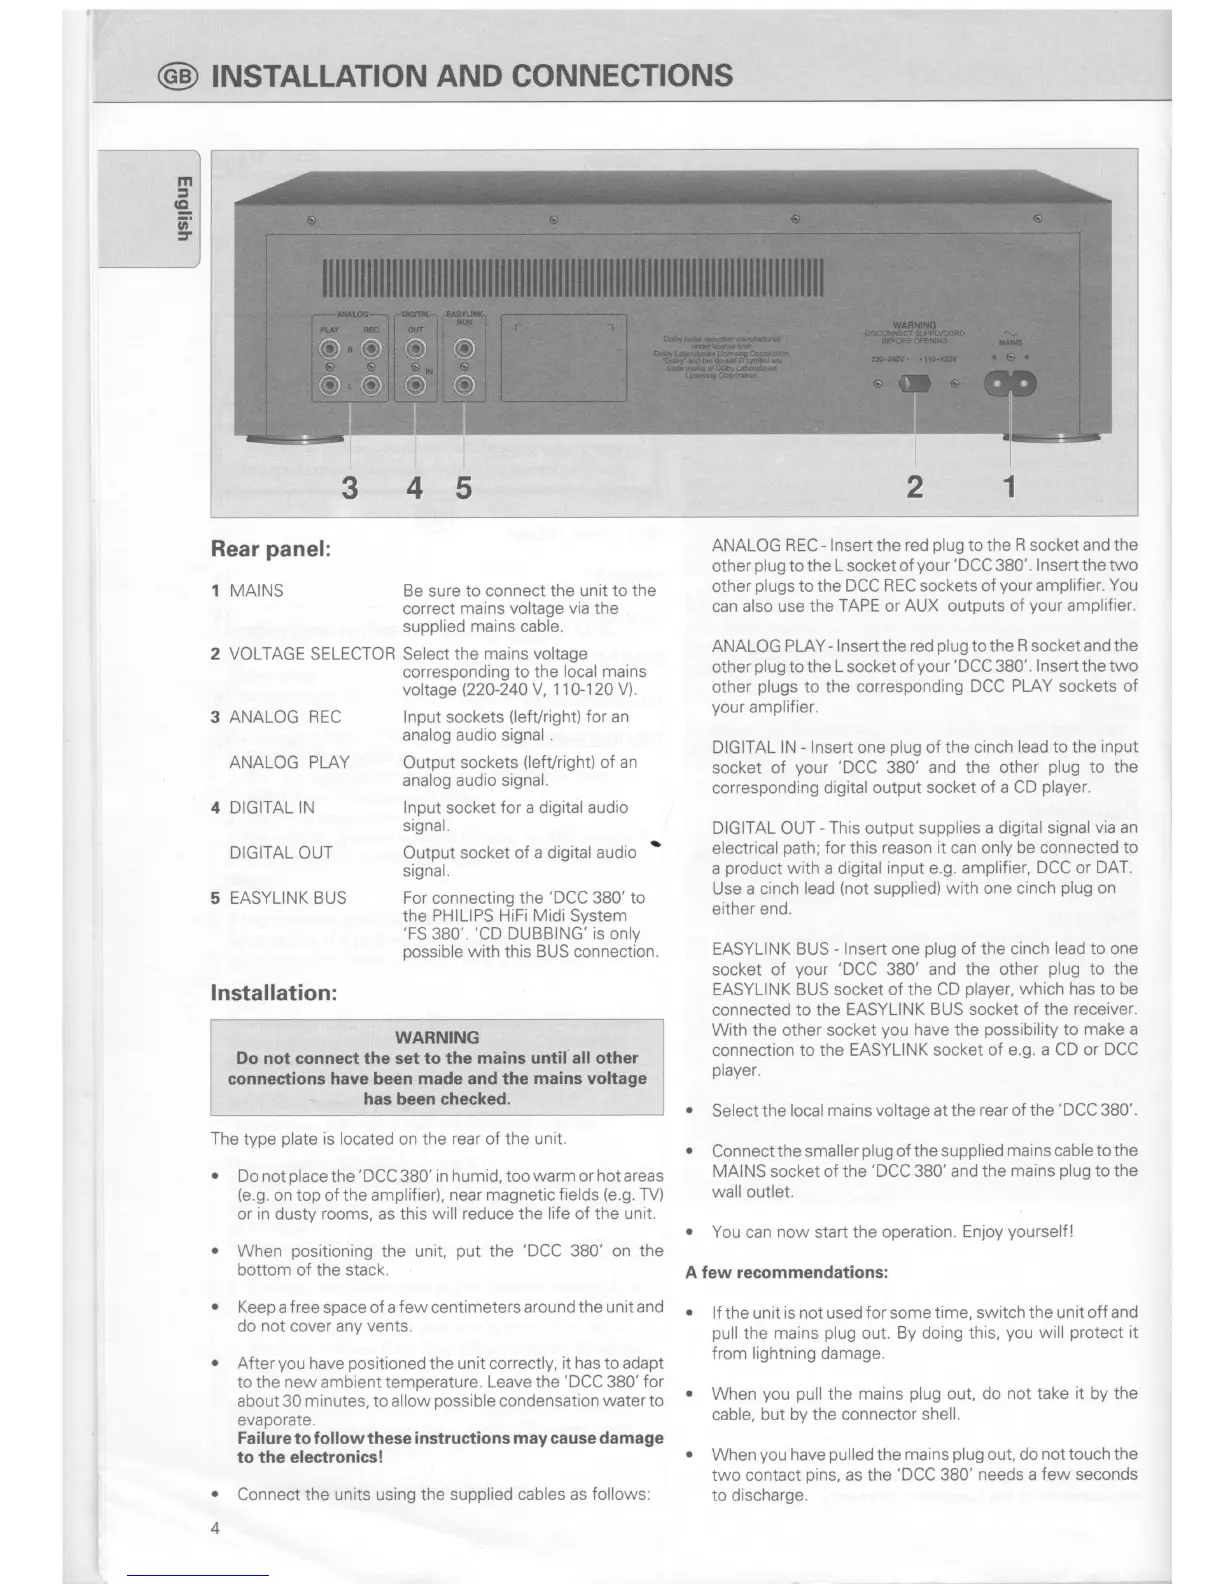
Rear
panel:
1 MAINS
2 VOLTAGE SELECTOR
3 ANALOG
REC
ANALOG PLAY
4 DIGITAL IN
DIG
AL
OUT
5 EASYLINK BUS
Be sure to connect the unit to the
correct
mains voltage via the
supplied mains cable.
Select the
mains voltage
corresponding
to the local
mains
voltage
(220-240
V, 110-120 V).
lnput
sockets
(lefVright)
for an
analog audio signal
.
Output sockets
(lefVright)
of
an
analog
audio signal.
lnput socket
for
a digital audio
signal.
Output socket of
a digital audio
'
signal.
For connecting the
'DCC
380' to
the
PHILIPS HiFi MidiSystem
'FS
380'.
'CD
DUBBING'is only
possible
with
this
BUS connection.
ANALOG REC
-
lnsert
the
red
plug
to the R socket and the
other
plug
to the
L
socket of
your
'DCC
380'.
lnsert the two
other
plugs
to the
DCC REC sockets of
your
amplifier. You
can also use the
TAPE
or
AUX outputs of
your
amplifier.
ANALOG PLAY-
lnsertthe red
plug
tothe
R
socketand the
other
plug
to the
L
socket of
your
'DCC
380'.
lnsert
the
two
other
plugs
to
the corresponding
DCC PLAY sockets of
your
amplifier.
DIGITAL
lN
-
lnsert
one
plug
of the cinch
lead to the input
socket of
your
'DCC
380' and
the other
plug
to the
corresponding digital output
socket of a CD
player.
DIGITAL OUT
-
This
output supplies
a digital signal
via an
electrical
path;
for
this
reason it can only be connected
to
a
product
with a digital
input e.g. amplifier,
DCC
or
DAT.
Use a cinch
lead
(not
supplied)
with one cinch
plug
on
either end.
EASYLINK
BUS
-
lnsert one
plug
of the cinch
lead to one
socket of
your
'DCC
380' and the other
plug
to the
EASYLINK BUS socket of the CD
player,
which has to be
connected
to the EASYLINK
BUS socket of the
receiver.
With the other
socket
you
have the
possibility
to make a
connection
to the EASYLINK socket
of e.g. a CD or
DCC
player.
o
Select the local
mains voltage at the rear of the
'DCC
380'.
o
Connect the smaller
plug
of the supplied
mains cable to the
MAINS
socket
of the
'DCC
380'and the
mains
plug
to the
wall
outlet.
.
You can
now
start the
operation. En.loy
yourself
!
A few recommendations:
o
lf
the unit
is not used for some time, switch
the unit off and
pull
the
mains
plug
out.
By
doing
this,
you
will
protect
it
from lightning damage.
o
When
you pull
the
mains
plug
out, do
not
take
it by the
cable, but by the connector
shell.
r
When
you
have
pulled
the
mains
plug
out, do
not
touch
the
two contact
pins,
as the'DCC
380'
needs
a
few seconds
to discharge.
lnstallation:
WARN!NG
Do not
connect
the set to
the
mains until all other
conneetions have been made
and
the
mains voltage
has been checked.
The
type
plate
is located
on the
rear
of
the unit.
.
Do not
place
the
'DCC
380' in humid, too
warm
or
hot
areas
(e.9.
on top of the amplifier),
near magnetic fields
(e.g.
TV)
or
in
dusty
rooms, as this will reduce the
life
of the unit.
.
When
positioning
the unit,
put
the
'DCC
380' on the
bottom of the stack.
.
Keep a f ree
space
of a few centimeters around the unit
and
do
not
cover any
vents.
o
After
you
have
positioned
the
unit correctly,
it has
to adapt
to the
new
ambient temperature.
Leave the
'DCC
380'for
about 30
minutes,
to allow
possible
condensation
water to
evaporate.
Failure to follow these instructions
may
cause damage
to the electronics!
o
Connect the units using the supplied cables
as follows:
4
2
5
4
 Loading...