9
English
Preparation
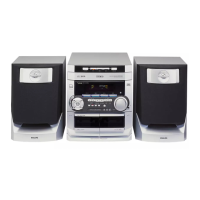
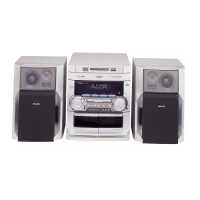
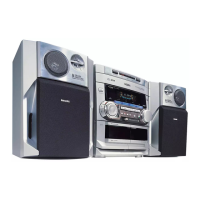
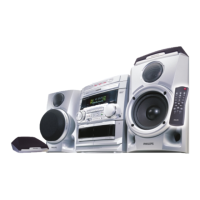
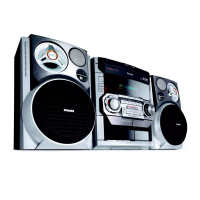
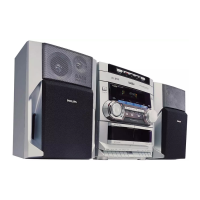
Controls
(illustrations on page 3)
D
Connecting other equipment to your
player
You can connect the audio left and right OUT
terminals of a TV, VCR, Laser Disc player, DVD
player or CD Recorder to the AUX IN terminals
at the rear of the system.
E
Adjusting the Operating Voltage (not
available for version /30)
Before connecting the AC power cord to the
wall outlet, make sure that the voltage selector at
the rear of the system is set to the local power
line voltage. If not, reset the selector before
connecting to the wall outlet.
F
AC Power Supply
After all other connections have been made,
connect the AC power cord to the system and
to the wall outlet.
Inserting batteries into the
Remote Control
¶ Insert the batteries (not supplied) into the
remote control as shown in the battery
compartment (Type R06 or AA).
CAUTION
– Remove batteries if they are exhausted
or not to be used for a long time.
– Do not use old and new or different
types of batteries in combination.
– Batteries contain chemical substances, so
they should be disposed off properly.
Controls on the system and
remote control
1
STANDBY-ON
– to switch the system on or to standby mode.
2
DIGITAL SOUND CONTROL DISPLAY
PANEL
– to view the desired DSC display.
3
DBB (DYNAMIC BASS BOOST)
– to switch on bass boost to enhance bass
response or to switch off bass boost.
4
JOG CONTROL/DSC
– to select the desired sound effect :
OPTIMAL, JAZZ, ROCK or TECHNO.
5
PROGRAM
for CD ................. to programme CD tracks.
for TUNER ........ to programme preset radio
stations.
for CLOCK ....... to select 12 or 24 hour in clock
setting mode.
6
MICROPHONE (not available for version /30)
– to connect microphone jack.
7
MIC LEVEL (not available for version /30)
– to adjust the mixing level for karaoke or
microphone recording.
8
DISPLAY SCREEN
– to view the current setting of the system.
9
CD CHANGER TRAY
0
DISC CHANGE
– to change disc(s).
!
OPEN•CLOSE
– to open or close the CD changer tray.
@
DISC 1 / DISC 2 / DISC 3 (CD DIRECT
PLAY)
– to select a CD tray for playback.
#
SOURCE – to select the following:
CD / (CD 1•2•3)
– to select CD mode. When disc playback is
stopped, press to select disc tray 1, 2 or 3.
TUNER / (BAND)
– to select Tuner mode. When in tuner mode,
press to select the waveband: FM or MW.
TAPE / (TAPE 1• 2)
– to select Tape mode.
AUX (VIDEO)
– to select sound from an external source (e.g. TV,
VCR, Laser Disc player, DVD player or CD
Recorder).
10
English
Controls
Notes for remote control:
– First select the source you wish to
control by pressing one of the source select
keys on the remote control (e.g. CD ,
TUNER, etc.).
– Then select the desired function (É,
í,
ë,
etc.).
2
21
3
TUNERTAPE 1/2CD
SLEEPAUXDIM
DSC DBB
MUTE
REPEAT
PAUSE
SHUFFLE
Å
CD DIRECT
VOLUME
á
à
ë
í
É
Ç
4
$
$
%
£
@
&
#
3
≤
$
%
$
∞
§
≥
$
MODE SELECTION
SEARCH àá (TUNING àá )
for CD ................. to search backward/forward.
for TUNER ......... to tune to a lower or higher radio
frequency.
for CLOCK ....... to set the hour (on the system
only) .
STOP•CLEAR Ç
for CD ................. to stop disc playback or to clear
a programme.
for TUNER ........ to stop programming (on the
system only).
for DEMO ......... to start or stop demonstration
mode (on the system only).
for CLOCK ....... to exit clock setting or cancel
timer (on the system only).
for PLUG & PLAY
................................. to exit plug & play mode and
return to standby mode (on the
system only).
PLAY É / PAUSE Å
for CD ................. to start or interrupt playback.
for PLUG & PLAY
................................. to initiate and star t plug & play
from standby/demo mode (on
the system only).
PREV í / NEXT ë(PRESET 4 3 )
for CD ................. to skip to the beginning of the
current, previous, or next track.
for TUNER ........ to select a preset station in
memory.
for CLOCK ....... to set the minute (on the system
only) .
%
VOLUME
– to increase or decrease the volume.
^
n
– to connect headphones.
&
DIM
– to select different brightness for the display
screen : DIM 1, DIM 2, DIM 3 or DIM OFF.
*
CLOCK•TIMER
– to view the clock, set the clock or set the timer.
(
TAPE DECK 2
)
TAPE DECK 2 OPERATION
PLAYÉ ........... to start playback.
à .......................... to rewind the tape.
á .......................... to fast forward the tape.
STOP•OPEN…to stop playback or to open
the tape door.
PAUSE .............. to interrupt playback.
¡
TAPE DECK 1 OPERATION
RECORD ........ to start recording.
PLAYÉ ........... to start playback.
à .......................... to rewind the tape.
á .......................... to fast forward the tape.
STOP•OPEN…to stop playback/recording or
to open the tape door.
PAUSE .............. to interrupt playback or
recording.
™
TAPE DECK 1
£
REPEAT
– to repeat a track, a disc, or all available discs.
≤
MUTE
– to switch off the sound temporarily.
∞
SHUFFLE
– to play all the available discs and their tracks in
random order.
§
SLEEP
– to switch the system to standby mode at a
selected time.
≥
B
– to switch the system to standby mode.
 Loading...