23
English
3139 116 18731
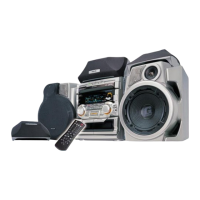
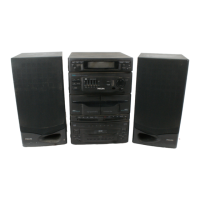
RECORDING
INTERACTIVE SOUND STUDIO
TAPECD
PROG
CLOCK/
TIMER
STANDBY
ON
A.REV
TUNER AUX
PRESET
▲
▲
STOP•CLEARSEARCH • TUNING PLAY • SIDE
MINI HIFI SYSTEM
CD1 • 2 • 3
CDR
BAND
TAPE 1 • 2
M
O
R
E
E
N
T
E
R
J
O
G
M
A
X
S
O
U
N
D
MIC
MIC
LEVEL
V
O
L
U
M
E
SURF
DSC
PERSONAL
DBB
HOLD
STROBE VEC
PAN
DUB
(HSD)
REC
SS
LR
C
PRO LOGIC
NEWS!
RDS
DOLBY B
NR
DOLBY B
DNR
NEWS/TA
RDS/
CD TEXT
Notes:
– If you do not intend to record via the
microphone, unplug the microphone to
avoid accidental mixing with other
recording source.
– For recording, use only tape of IEC type I
(normal tape) or IEC type II (Cr0
2
).
– The tape is secured at both ends with
leader tape. At the beginning and end of
tape, nothing will be recorded for 6 to 7
seconds.
– The recording level is set automatically,
regardless of the position of Volume,
DBB, VEC or DSC.
Dolby B NR can be selected for Tuner or
CD recording.
– To prevent accidental recording, break
out the tab on the left shoulder of the
tape side you want to protect.
– If “
CHECK TAPE
” is displayed, the
protection tab has been broken. Put a
piece of clear adhesive tape over the
opening. Do not cover the Cr0
2
tape
detection hole when covering the tab
opening.
Recording from other sources
(only on tape deck 2)
1 Press TAPE ( TAPE 1•2 ) to select tape
deck 2.
2 Load a blank tape into tape deck 2 with
the open side downward.
3 Press SIDE on remote control to select
the recording side.
™ The BACK or FRONT flag will be
displayed, depending on the side
selected.
4 Press DOLBY NR to record with Dolby
NR
(except in TAPE 1 mode)
.
5 Press CD, TUNER or AUX.
• Start playback of the selected source.
6 Press REC to start recording.
™ The REC flag starts flashing.
7 Press Ç to stop recording.
Notes:
– Only
åå
åå
å
or
∂∂
∂∂
∂
mode is available
during recording.
– During recording, it is not possible to
listen to another source.
SWITCH OFF DOLBY PRO LOGIC WHEN RECORDING
 Loading...