Do you have a question about the Philips HTS3450 and is the answer not in the manual?
Proper speakers system placement is important to ensure optimum sound performance.
Keep the antennas away from the electronic devices to prevent unwanted interference.
Connect the various coloured plugs from the speakers to the same coloured sockets at the rear of the AV subwoofer.
Use the supplied inter-connect cable to connect TO AV SUBWOOFER socket and TO DVD SYSTEM socket.
Use the supplied composite video cable to connect the CVBS socket on this DVD system to the VIDEO IN socket on your TV.
To hear the TV audio through this home theatre system, use the red and white audio cables.
Press STANDBY ON on the DVD system. Press SOURCE on the DVD system until 'DISC' appears on the display panel.
Press SETUP. Press to select OSD Language and press OK to confirm.
Press OPEN CLOSE to open the disc tray. Load a disc and close the disc tray. Playback will start automatically.
Press TUNER. The display panel will show 'AUTO INSTALL PRESS PLAY'. Press PLAY until 'START' appears.
Press SURR to switch between stereo and multi-channel. Press SOUND to select preset digital sound effects.
For more troubleshooting tips, see the user manual. Covers no picture, no sound, and system not working issues.
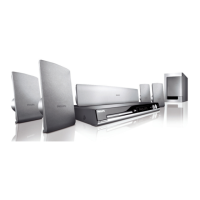
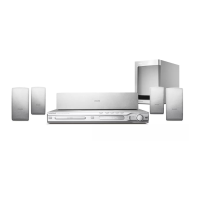
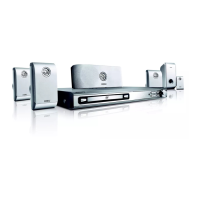
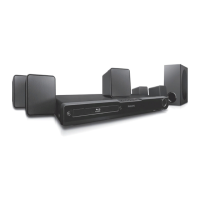
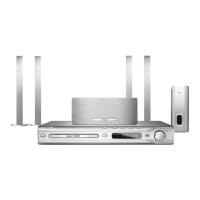
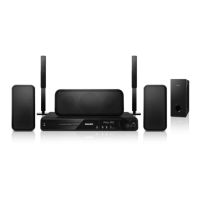
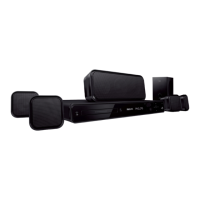
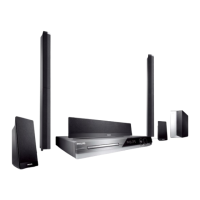
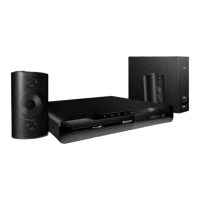
This document describes the setup and basic operation of a Philips DVD Home Theatre System, model HTS3450. It serves as a Quick Start Guide, focusing on initial connections, speaker placement, and fundamental playback functions.
The Philips DVD Home Theatre System is designed to provide an immersive audio-visual experience, integrating a DVD player with a multi-channel speaker system. Its primary function is to play DVDs and CDs, delivering surround sound for movies and music. Additionally, it features an FM/AM radio tuner, allowing users to listen to their favorite radio stations through the home theatre speakers. The system also supports connecting to a television to output video and can receive audio from the TV to play through its speakers, enhancing the TV viewing experience.
Speaker Placement: Optimal sound performance is achieved through proper speaker placement.
Antenna Connection:
Speaker Connection: The system uses colour-coded plugs for the speakers, which connect to corresponding colour-coded sockets at the rear of the AV subwoofer. This ensures correct channel assignment (e.g., front left, front right, centre, rear left, rear right).
AV Subwoofer to DVD System Connection: An inter-connect cable is used to link the "TO AV SUBWOOFER" socket on the subwoofer to the "TO DVD SYSTEM" socket on the main DVD system. Screws at the sides of the connectors should be tightened to secure the connection.
DVD System to TV Connection: The supplied composite video cable connects the "CVBS" socket on the DVD system to the "VIDEO IN" socket on the TV. This transmits the video signal from the DVD player to the television.
Power Connection: Power cables from the DVD system, AV subwoofer, and TV should be plugged into AC power outlets. It is important to connect the DVD system directly to the TV for optimal performance.
Audio from TV to DVD System (Optional): To hear TV audio through the home theatre system, red and white audio cables (not supplied) connect the "AUDIO output" sockets on the TV to the "TV IN (R/L)" sockets on the DVD system. Pressing the "TV" button on the remote control will direct the TV's sound output through the home theatre speakers.
Finding the Viewing Channel:
Selecting the Display Language:
Disc Playback:
Radio Listening:
Surround Sound Experience:
The Quick Start Guide primarily focuses on initial setup and basic operation, with limited explicit maintenance features detailed. However, it does provide troubleshooting tips that can be considered part of routine maintenance or problem resolution:
Troubleshooting No Picture:
Troubleshooting No Sound:
Troubleshooting System Not Working:
User Manual and Online Support: For more comprehensive troubleshooting and maintenance information, users are directed to the full user manual and the Philips support website (www.philips.com/support). This indicates that detailed maintenance procedures, if any, would be found in these resources. The guide also emphasizes respecting copyrights, which is a general guideline for responsible usage.
| Audio Output Power | 300 W |
|---|---|
| Number of Channels | 5.1 |
| DVD Player | Yes |
| HDMI Inputs | 1 |
| USB Playback | Yes |
| FM Tuner | Yes |
| RMS rated power | 300 W |
| Impedance | 4 Ohm |
| Frequency range | 20 Hz - 20 kHz |
| DVD Region Code | 2 |
| Power consumption (standby) | 0.5 W |
| Type | Home Theater System |
| Total Power Output | 300 W |
| USB Port | Yes |
| HDMI | Yes |
| Bluetooth | No |
| Sound System | Dolby Digital |
| Media type | DVD, CD, MP3 |
| Signal-to-Noise Ratio (SNR) | 65 dB |
| Video D/A Converter (DAC) | 12 bit |
| Audio D/A Converter (DAC) | 24 bit |
| Center speaker frequency range | 150Hz - 20kHz |
| Satellite speaker frequency range | 150Hz - 20kHz |
| Subwoofer frequency range | 20 Hz - 150 Hz |
| Supported Formats | MP3, WMA |