PCS 104 587
3-5
INSTRUCTIONS FOR USE
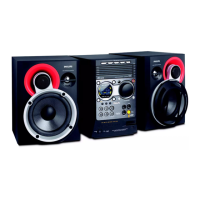
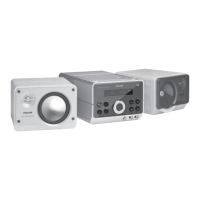
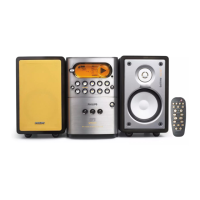
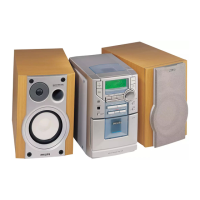
Tape Recorder
TIMER
ON • OFF
PROGRAM
INTERACTIVE SOUND
STANDBY
ON
SHUFFLE
REPEAT
DBB
DSC
PRESETSTOP PLAY•PAUSE
iR
SENSOR
VOLUME
INCREDIBLE SURR.
CLOCK
SELECT
SOURCE
PROGRAM
TIMER
TUNING
TUNING
RECORD
REV MODE
BAND
SIDE A/B
PREV NEXT
SIDE A
SIDE B
TIMER
ON • OFF
RDS
Tape playback
1 Select TAPE source.
‹ The display shows TAPE briefly. The tape
counter TAPE 000 display with the
SIDE
A
or
SIDE B and reverse mode status are then shown
during tape mode.
2 Press OPEN to open the tape door.
3 Insert a recorded tape and close the tape door.
¶ Load the tape with the open side downward and
the full spool to the left.
4 Press PLAY•PAUSE 2; (on the remote
control 2) to start playback.
5 By pressing à or á on the remote control, fast
winding of tape is possible in both directions.
¶ To review and cue at low volume, press ¡1 or
2™ on the system.
¶ During fast winding or review/cue you can
monitor the tape message with the tape counter.
Release the fast wind/cue control at your desired
passage.
6 To stop the tape, press STOP 9 on the system
or remote control.
¶ To reset the tape counter, press STOP 9 again.
Note:
– The sound source cannot be changed while
recording a tape.
Switching tape sides
The tape side can be switched manually or
automatically before or during tape playback.
¶ Press SIDE A/B (SIDE/; or during playback
only 2 on the remote control).
‹ The display shows
SIDE A or SIDE B and the
tape counter resets to 000.
Reverse mode options
¶ Press REV MODE once or more to select your
option;
å : playback stops at the end of the tape.
∂ : both sides are played once.
∫ : both sides are played repeatedly, up
to 5 times each side.
General Information on
Recording
¶ Recording is permissible insofar as copyright or
other rights of third parties are not infringed.
¶ For recording, use only NORMAL (IEC type I)
cassette on which the tabs have not yet been
broken. This deck is not suited for recording on
METAL (IEC IV) type cassettes.
¶ The best recording level is set automatically.
Altering the VOLUME, INCREDIBLE
SURROUND, DBB or INTERACTIVE SOUND
controls will not affect the recording in progress.
¶ At the very beginning and end of the tape, no
recording will take place during the 7 seconds
when the leader tape passes the recorder heads.
¶ To protect a tape from accidental erasure, have
the tape in front of you and break out the left
tab. Recording on this side is no longer possible.
If, however, you wish to record over this side
again, cover the tabs with a piece of adhesive
tape.
Synchro Start CD recording
1 Select CD source.
2 Insert a disc and if desired, programme track
numbers.
3 Press OPEN to open the tape door.
4 Insert a suitable tape into the deck and close the
tape door.
5 Press RECORD to start recording.
‹ COPY or RECORD is displayed briefly and
RECORD
is shown during recording.
‹ Playing of the disc programme starts
automatically from the beginning of the disc/
after 7 seconds. It is not necessary to start the
CD player separately.
¶ If you wish, press CLOCK once to monitor the
counter display.
6 To stop recording, press STOP 9.
Recording from the Radio
1 Tune to the desired radio station (see Tuning to
radio stations).
2 Press OPEN to open the tape door.
3
Insert a suitable tape into the deck and close the
tape door.
4 Press RECORD to start recording.
‹ RECORD is displayed briefly and RECORD is
shown during recording.
¶ If you wish, press CLOCK once to monitor the
counter display.
5 To stop recording, press STOP 9.
Recording from AUX
1 Select AUX source.
2 If necessary, prepare the additional appliance for
recording.
3 Press RECORD to start recording.
‹ RECORD is displayed briefly and RECORD is
shown during recording.
¶ If you wish, press CLOCK once to monitor the
counter display.
4 To stop recording, press STOP 9.
Tape Recorder
Recording Timer
To record from the radio, you will need to use a
preset radio station and to set a start (ON) and
finish (OFF) time.
1 Insert a suitable tape into the deck.
‹ If desired, select tape reverse mode option.
2 Select the preset radio station to record from.
3 Press TIMER ON•OFF for more than 2
seconds.
‹
TIMER flashes and a source is displayed.
4 Press SELECT SOURCE repeatedly, or turn
VOLUME clockwise until REC TUN source is
displayed.
5 Press TIMER ON•OFF to confirm the source.
‹ SET ON TIME is displayed, TIMER and the
clock digits for the hours flash.
6 Tu rn VOLUME to set the hours: clockwise for
hours up; anti-clockwise for hours down.
7 Press TIMER ON•OFF again.
‹ The clock digits for the minutes flash.
8 Tu rn VOLUME to set the minutes: clockwise for
minutes up; anti-clockwise for minutes down.
9 Press TIMER ON•OFF to confirm the ON
start time.
‹ SET OFF TIME is displayed, TIMER and the
clock digits for the hours flash.
10Repeat steps 6-8 to set the finish time.
11Press TIMER ON•OFF to confirm the timer
settings.
‹ TIMER is shown and the recording timer is
now set.
 Loading...