(2)
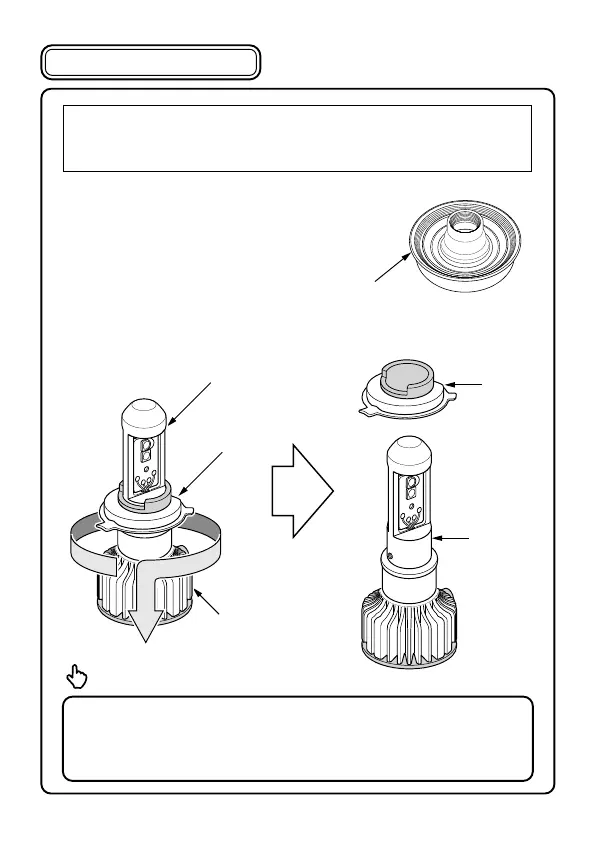
Hold the metal cap on the LED bulb (Part ①) assembly firmly and then turn the heat sink part
as shown in the illustration below.
●
When installing the metal cap
section to the main body of the
lamp, be very careful not to drop
the cap inside the housing.
●
Be extremely careful when pulling the metal cap section out of the LED bulb, because this
section is very thin. If it is held too tightly, there is a danger that you may cut your fingers.
It may be a good idea to hold the metal cap section with a soft cloth when carrying out the
work procedures.
(3)
Install the metal cap to the vehicle's
lamp unit(①). Fix it firmly in place
using the bulb spring (②).
(4)
Remove the O-ring from the LED bulb.
(5)
Install the original rubber cap to the LED bulb.
※
As shown on the right side of the illustration,
push the rubber cap all the way in so that the
circular part of the heat sink lines up evenly
with the inside end of the rubber cap.
※
If the rubber cap is too tight and will not go in
further, lubricate the end with some silicon
spray or apply some synthetic detergent diluted
in water. (Please do not use products that use
organic liquids such as CRC556, which
may cause the rubber material to
deteriorate.
O-ring
LED bulb
LED bulb
①
②
If there is a mark indicating "TOP", then install the
LED bulb with the "TOP" mark facing upwards.
Install the harness face down.
Please prepare it
if possible
End of internal
circular section
of heat sink
End of internal circular section
Original
Rubber cap
Heat sink
section of the
LED bulb
Cross section of LED bulb assembly viewed from the side
【1】Replacement procedure
※
When installing this product on some vehicles, the installation work may be easier if parts
such as the headlamps, front bumpers or front grill are removed. Remove such parts before
installation as deemed necessary.
(1)
Before starting the installation work, refer to the vehicle's
installation manual and verify the place where the bulb will
be installed and carry out the installation.
※
Please note that the original rubber cap will be reused
after the new LED bulb is installed.
original rubber cap
LED bulb (Part ①)
heat sink part
metal cap
metal cap
LED bulb
lamp unit
bulb spring
original rubber cap
harness
ADVICE
 Loading...