EasyManua.ls Logo

PICO NEO 3 - User Manual

PICO NEO 3
6 pages
Print Icon
To Next Page IconTo Next Page
Loading...
For any inquires: a.marini@dcvmn.net
Question and Answer IconNeed help?

Do you have a question about the PICO NEO 3 and is the answer not in the manual?

Summary

Hardware Overview

Headset Components and Controls

Details functions of Pico button, Power button, and status indicator lights.

Controllers and Initial Setup

Controller Functions

Explains button functions and screen re-centering for controllers.

Initial Headset Setup

Steps to power on, activate controllers, and wear the headset.

Connectivity and Software

Connecting to Wi-Fi

Steps to connect the headset to a Wi-Fi network.

Creating a User Account

Process for creating an account within the headset.

Installing Apps from Pico Store

Guide to navigating and installing applications from the Pico store.

Advanced Application Installation

Using SideQuest for App Installation

Guide to installing .APK files via the SideQuest platform.

Advanced Features

Live-Casting for Review

Instructions on how to live-cast the VR user's view to a computer.

Overview

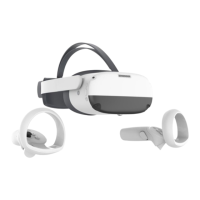
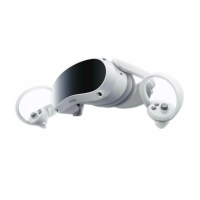
The Pico Neo 3 is a virtual reality (VR) headset designed for immersive experiences, offering a range of features for both individual use and training applications. It provides a comprehensive VR environment, allowing users to interact with digital content through head movements and handheld controllers.

Function Description

The Pico Neo 3 serves as a self-contained VR system, meaning it doesn't require an external computer for basic operation. Its primary function is to deliver virtual reality content, from games and entertainment to specialized training modules. The headset features a display that presents a virtual world to the user, while integrated sensors track head movements, allowing for natural navigation and interaction within the virtual environment. Handheld controllers provide additional input, enabling users to manipulate objects, select options, and perform actions within the VR space. The device is designed to be user-friendly, with intuitive controls and a straightforward setup process. It supports both stationary and walk-around boundary options, accommodating different play areas and user preferences. The ability to install applications from the Pico store and sideload custom APK files, such as the DCVMN VR Training Modules, expands its utility beyond standard entertainment, making it a versatile tool for educational and professional development.

Usage Features

The Pico Neo 3 offers a variety of usage features that enhance the VR experience:

  • Headset Controls:

    • Pico Button: A short press returns to the home screen, a long press (1 second) re-centers the screen, and a short press wakes up the device. This button provides quick access to core functionalities.
    • POWER Button: A long press for 2 seconds powers on the device, a long press for 5 seconds powers it off, and a long press for 10 seconds performs a hardware reset. A short press allows the device to enter sleep mode or wake up. These power management options ensure efficient use and troubleshooting.
    • Indicator Light: Located next to the POWER button, this light provides visual feedback on the headset's status: blue indicates power on with over 20% battery, red signifies less than 20% battery, yellow indicates charging with less than 98% battery, and green means the battery is fully charged. This helps users monitor battery levels at a glance.
    • Volume Adjuster: Allows users to easily adjust the audio volume up or down, enhancing the immersive experience.
    • USB-C Port: Used for charging the headset and connecting it to a computer for data transfer, such as installing applications.
    • 3.5 mm Audio Jack: Provides an option for users to connect their preferred headphones for private and high-quality audio.
    • IPD Adjustment: The headset allows for adjustment of the Interpupillary Distance (IPD) with three settings (58mm, 63.5mm, and 69mm). Users can gently move the lenses inward or outward to find the clearest setting, ensuring optimal image clarity and reducing eye strain.
    • Head Control Mode: If controllers are not connected, users can navigate the home screen by moving their head to direct pointers and use the Pico and BACK buttons on the headset to confirm selections. This provides an alternative interaction method.
    • Sleep/Wake Up: The headset automatically enters sleep mode when taken off and wakes up when worn, conserving battery and providing a seamless user experience.
  • Controller Controls:

    • Thumbsticks: Used for navigation and movement within the VR environment.
    • Back Button: Provides a way to go back in menus or cancel actions.
    • Pico Button: Similar to the headset's Pico button, a short press returns to the home screen, a long press (1 second) re-centers the screen, and a short press wakes up the controller.
    • Trigger Button: Used to select content and interact with objects in the virtual world.
    • Grip Button: Typically used for gripping or holding objects within the VR environment.
    • Screen Re-centering: If images drift off-center, users can look straight ahead and press and hold the Pico button on the controller for more than 1 second to re-center the screen, maintaining a comfortable viewing experience.
    • Battery Operation: The controllers are battery-operated, providing untethered freedom of movement.
  • Setup and Installation:

    • Wi-Fi Connection: The headset can easily connect to Wi-Fi networks, allowing for online content access and updates. Users can select their Wi-Fi network and enter the password through an intuitive interface.
    • Account Creation: Users can create an account directly within the headset's main menu, enabling personalized settings and access to the Pico store.
    • Application Installation (Pico Store): Applications and games can be downloaded and installed directly from the APP STORE within the headset. The "Enhance" mini-game is recommended for new users to get accustomed to VR controls.
    • Application Installation (SideQuest): For specialized applications like the DCVMN VR Training Modules, SideQuest software can be installed on a computer. This platform allows users to sideload .APK files onto the headset via a USB-C connection, expanding the range of available content. The process involves connecting the headset to the computer, ensuring SideQuest recognizes the device, and then selecting the .APK file for installation.
  • Training and Review Features:

    • DCVMN VR Training Modules: The headset is compatible with specific VR training modules, which can be installed and accessed through the APP LIBRARY. These modules provide immersive learning experiences.
    • Screencast for Review: For training purposes, the VR user's view can be live-casted to a connected computer. This allows trainers to observe and assess trainees' performance in real-time. The feature involves connecting the headset to the computer via USB-C, opening SideQuest, and clicking the TV symbol. Users can adjust viewing ratios (e.g., 1600:1400:100:100) for optimal viewing before starting the live-cast.

Maintenance Features

While the manual does not explicitly detail extensive maintenance features, several aspects contribute to the device's upkeep and longevity:

  • Battery Management: The indicator light provides clear feedback on battery status, allowing users to charge the headset and controllers proactively, preventing unexpected power loss during use.
  • Software Updates: Although not explicitly stated as a maintenance feature, the ability to connect to Wi-Fi implies that the headset can receive over-the-air software updates, which often include performance improvements, bug fixes, and new functionalities, contributing to the device's long-term usability and stability.
  • Hardware Reset: The option to perform a hardware reset by long-pressing the POWER button for 10 seconds serves as a crucial troubleshooting tool for resolving software glitches or unresponsiveness, helping to maintain the device's operational integrity.
  • IPD Adjustment: The ability to adjust IPD not only enhances user comfort but also ensures that the lenses are correctly aligned for optimal viewing, which can indirectly contribute to the longevity of the display by reducing strain on the optical components.
  • Cleanliness: While not explicitly mentioned, general maintenance practices for electronic devices, such as keeping the lenses clean and free of dust or smudges, would be essential for maintaining image clarity and the overall user experience. The design of the headset, with its adjustable straps, suggests that it can be comfortably worn and removed, which can help prevent accidental damage during handling.

In summary, the Pico Neo 3 is a versatile VR headset designed for a wide range of applications, from entertainment to professional training. Its intuitive controls, flexible setup options, and robust feature set make it an accessible and powerful tool for experiencing virtual reality.

PICO NEO 3 Specifications

General IconGeneral
Display TypeLCD
Resolution3664 x 1920
Resolution Per Eye1832 x 1920
Refresh Rate90Hz
Field of View98°
ProcessorQualcomm Snapdragon XR2
RAM6GB
Battery5300mAh
Weight620g
TrackingInside-out 6DoF
Controllers6DoF controllers
ConnectivityWi-Fi 6, Bluetooth 5.1
Storage256GB
Battery Life2-3 hours
AudioBuilt-in speakers
IPD Adjustment58-72mm

Related product manuals