NOTE: Detailed information on the PIKO SmartDecoder XP 5.1 is available as a PDF le on our Webshop
on the page of the respective item number. The le contains a full description of all functions and
operating possibilities for the new SmartDecoder XP 5.1.
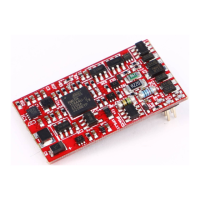
Description
This PIKO SmartDecoder XP 5.1 with 8-pin interface according to NEM652 is a compact, yet powerful multi-protocol
decoder. It complies with the current RCN standards in all areas and can be used in DCC, mfx® and Motorola® digital
systems. The decoder can be used on DC or AC analog layouts. It automatically senses what operating mode is used
on your layout and is RailCom®/RailCom Plus® compatible. The SmartDecoder XP 5.1 features several programmable
braking distance functions in addition to numerous other programmable functions.
The load-controlled decoder operates with an auto-adaptive motor control and is therefore suitable not only for
DC motors, but also for bell armature motors up to a continuous current consumption of 1.2 A. The decoder will
also tolerate a temporary current draw up to 2 Amps. The motor speed table can be set using the minimum,
median, and maximum motor speed (simple curve), or by the user-programable 28-speed step extended curve.
The decoder has two directional light outputs and an additional special function output, which can be activated via
function keys up to F68 (DCC). The switching (shunting) gear, with extended slow speed range, the three possible
starting and braking delays, are also switchable via function keys. Due to the advanced power management the
PIKO SmartDecoder XP 5.1 is supported in case of brief loss of power is supported.
Installing the PIKO SmartDecoder XP 5.1
Remove the jumper plug from your model’s NEM 652 interface. At the same place insert the 8-pin plug of the decoder
carefully into the interface socket. Please note the coding of PIN 1 note. If the plug is turned 180°, the locomotive will run
in the wrong direction and the light will not work. Check for crossed wires and short circuits before and after reinstalling
the shell. Place the model on your programming track with programming mode activated on your DCC system. During
programming or when reading the model’s DCC address, a small amount of current will ow through the model, which
does not affect the decoder; even in the event of a short circuit.
Special function A1
The special function output A1 of the PIKO SmartDecoder XP 5.1 can only be used if the desired consumer is already
connected to the NEM 652 interface in the vehicle, or if there are solder pads on the main board.
First-time use of the decoder (state of delivery)
Enter address 3 on your DCC control system. Depending on your DCC system‘s data format, the decoder will
operate using 28 speed steps or in Motorola® mode. When using a RailCom Plus®-enabled DCC system or with
an mfx®-capable system, the decoder is recognized in a few seconds and can be operated immediately. If the
decoder is used on a conventional analog layout, it can be controlled with a DC or AC power pack. The decoder will
automatically detect the layout’s operating mode.
NOTE: In DC analog mode, your model will only start at a higher voltage than what you may accustomed to when
operating analog models. You will need to turn the throttle up for the model to start operating.
Function outputs in analog mode
It is possible to program the decoder so that function keys F0 - F12 (as they are assigned in the function mapping) can
also be activated in analog mode. To do this, CVs 13 & 14 must rst be programmed with a DCC central control unit.
The corresponding values can be found in the CV table of the detailed operating instructions.
The light function (F0) and output A1 (F1) are switched on ex works.
* factory set values
CV Description Area
Value*
1 Locomotive address
DCC: 1 - 127
Motorola
®
: 1 - 80
3
2 Minimum speed (the speed from 0 until the locomotive is running at speed step 1)
0 - 255 0
3 Acceleration delay
0 - 255 30
4
Braking delay 0 - 255 30
5 Maximum speed (must be greater than CV 2)
0 - 255 200
6 Average speed (must be greater than CV 2 and less than CV 5)
0 - 255 100
7 Software version (The processor can be updated) - differently
8
Manufacturer's ID Decoderreset CV8 = 8
different
162
12
Decoder operating mode
Bit 0=1 DC (analog operation; direct current) on
Bit 2=1 DCC data format on
Bit 4=1 AC (analog 3-rail operation; alternating current) on
Bit 5=1 Motorola® data format on
Bit 6=1 mfx® data format on
0 - 117
117
17
18
Long locomotive address
17 = high Byte
18 = low Byte
1 - 10239
192 - 231
0 - 255
1000
195
232
27
Brake signal settings (automatic stop)
Bit 0 = 1 -> ABC (Automatic Brake Control) right rail positive
Bit 1 = 1 -> ABC left rail positive
Bit 4 = 1 -> DC; opposite direction of travel
Bit 5 = 1 -> DC; same direction of travel
0 - 51
0
29
DCC standard conguration
Bit 0=0 Normal direction of travel
Bit 0=1 Opposite direction of travel
Bit 1=0 14 speed steps
Bit 1=1 28 speed steps
Bit 2=0
Digital mode only
Bit 2=1 Automatic analog/digital recognition
Bit 3=0 RailCom® turned off
Bit 3=1 RailCom® turned on
Bit 4=0 Speed steps over CV 2, 5, and 6
Bit 4=1 Use the characteristic curve from CV 67 - 94
Bit 5=0 Short address (CV1)
Bit 5=1 Long address (CV 17/18)
0-63 14
30
Error codes for the motor, thermal overload, and function outputs:
1 = motor error, 2 = thermal overload error, 4 = function output error
0-7 0
Value
*0
1
0
*2
0
*4
Value
*1
*4
*16
*32
*64
Value
1
2
16
32
0
*8
*0
16
*0
32
A short circuit in the motor, lighting, pick-up wiper, or wheelsets can destroy the
decoder as well as the electronics of the model!
#56503
PIKO
multiprotocol
SmartDecoder XP 5.1 NEM652
mfx® capability included
56503-90-7001_2021
PIKO Spielwaren GmbH
Lutherstr. 30
96515 Sonneberg
GERMANY
Assignment of the function keys
F0 Light F1 Function output A1