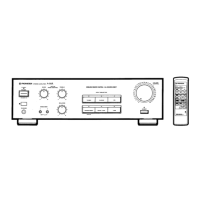
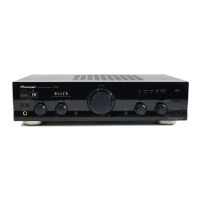
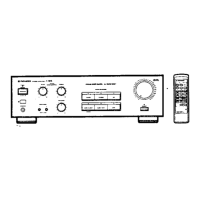
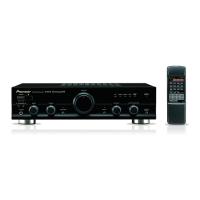
This document describes the Pioneer A-351R Stereo Amplifier, a remote-control integrated amplifier designed to provide high-fidelity audio performance with user convenience.
Function Description
The Pioneer A-351R serves as the central hub for an audio system, allowing users to connect and manage various audio sources and output them to speaker systems. Its primary function is to amplify audio signals from input sources to drive speakers effectively.
Key functional components include:
- Input Selection: The amplifier offers six distinct inputs: PHONO (for turntables), TUNER (for AM/FM broadcast reception), CD (for compact disc players), LINE (for general audio components), TAPE 1/DAT (for cassette decks or digital audio cassette decks), and TAPE 2/ADPT (for a second cassette deck or an adaptor like a graphic equalizer). This comprehensive selection allows for a versatile audio setup.
- Amplification: It provides substantial power output, capable of driving speakers with varying impedances, including those with low impedance, which is beneficial for achieving better digital sound quality.
- Tone Control: The amplifier features active tone control with separate BASS and TREBLE adjustments. These controls allow users to fine-tune the low and high frequencies of the audio output. A notable feature is that lows and highs are automatically boosted when the volume is lowered, compensating for the human ear's reduced sensitivity to bass and treble at lower listening levels.
- Balance Control: A BALANCE control is included to adjust the sound distribution between the left and right speakers, ensuring a balanced stereo image.
- "DIRECT" Button: This feature allows users to bypass the tone and balance control circuits. When activated, the audio signal is routed directly through the amplifier's core, resulting in the highest purity and a flat, uncolored sound, which is ideal for critical listening.
- Speaker Output: The amplifier supports connections for two pairs of speaker systems (SPEAKERS A and SPEAKERS B), allowing users to connect and switch between different speaker setups or drive multiple pairs simultaneously.
- Headphone Output: A PHONES jack is provided for private listening with headphones, automatically muting the speakers when in use.
- Remote Control Capability: The A-351R is a remote-control integrated amplifier, meaning it can be operated wirelessly using the supplied remote control unit. This remote also integrates with other Pioneer audio equipment bearing the "SR" mark, allowing for unified control of an entire Pioneer system.
- Control Out Jack: This jack outputs control signals to other Pioneer components with the "SR" mark, enabling synchronized operation within a Pioneer system.
- Power Management: The unit includes a POWER STANDBY/ON switch/indicator. In STANDBY mode, the main power flow is cut, but a minute flow of power maintains operational readiness, which is useful for timer operations.
Usage Features
The Pioneer A-351R is designed for straightforward operation, offering features that enhance the listening experience and system integration:
- Installation: The amplifier should be installed in a well-ventilated area, away from direct sunlight, heat sources, dampness, or dust to prevent malfunction and ensure longevity. Proper ventilation is crucial to avoid excessive heat buildup.
- Connecting Components: All audio components (turntable, tuner, CD player, cassette decks, VCR, etc.) are connected to the rear panel's dedicated input terminals using RCA cables. Speaker systems are connected to the SPEAKERS A and B terminals, ensuring correct polarity and secure connections. The power cord is the last connection to be made, always with the power switch off.
- Speaker Cord Connections: Speaker wires should be stripped, twisted, and securely inserted into the amplifier's speaker terminals. Care must be taken to prevent stray wire strands from touching other terminals, which could cause short circuits or damage. The amplifier supports speakers with rated impedances of 4-16 Ω for single pairs and 8-16 Ω when both A and B terminals are used.
- Remote Control Operation: The remote control unit requires two "AAA" dry cell batteries, inserted with correct polarity. The remote operates within approximately 7 meters and a 30-degree angle from the amplifier's remote sensor window. Obstacles between the remote and the sensor will prevent operation. The remote allows control over input selection, volume, power, and basic operations for connected Pioneer components (like CD players, tuners, and cassette decks).
- Basic Playback Procedure:
- Turn the POWER STANDBY/ON switch to ON.
- Select the desired speaker system (A or B) using the SPEAKERS selector buttons.
- Ensure the DIRECT button is off if tone control is desired.
- Select the desired input source using the INPUT SELECTOR buttons (e.g., PHONO, CD, TUNER).
- Start playback on the selected source component.
- Adjust the volume using the VOLUME CONTROL.
- Fine-tune the sound with BASS, TREBLE, and BALANCE controls if DIRECT is off.
- Graphic Equalizer Integration: A graphic equalizer can be connected to the TAPE 2/ADPT terminals. When TAPE 2/ADPT is selected, the equalizer can be used to finely adjust the sound of all sources. However, the equalizer is bypassed if the DIRECT button is on. The adaptor component's power switch must remain on for sound to be produced.
- Recording Tapes: To record, select the source to be recorded using the INPUT SELECTOR buttons, then operate the recording equipment (e.g., cassette deck) according to its instructions.
- Copying Tapes: The amplifier facilitates tape copying between two cassette decks (or a double cassette deck). Users select the source deck (TAPE 1/DAT or TAPE 2/ADPT) via the INPUT SELECTOR, then operate both decks in their respective playback and recording modes.
- Timer Recording: For timer recording, the amplifier's power cord should be connected to an audio timer, and the POWER STANDBY/ON switch must be set to ON (indicator off). Timer operation is not possible if the unit is in standby mode.
Maintenance Features
Maintaining the Pioneer A-351R is straightforward, focusing on keeping its external surfaces clean and ensuring proper handling of the power cord:
- External Surface Cleaning:
- For light dust and dirt, use a polishing cloth or a dry cloth.
- For very dirty surfaces, use a soft cloth dipped in a neutral cleanser diluted five to six times with water, wrung out well, and then wipe again with a dry cloth.
- Avoid using furniture wax or cleaners, thinners, benzine, insecticide sprays, or other chemicals on or near the unit, as these can corrode the surfaces.
- Power Cord Handling:
- Always handle the power cord by the plug, not by pulling the cord itself.
- Never touch the power cord with wet hands to prevent electric shock.
- Do not place the unit, furniture, or any other objects on the power cord, and avoid pinching it.
- Never tie knots in the cord or tie it with other cords.
- Route power cords carefully to prevent them from being stepped on.
- Regularly inspect the power cord for damage. A damaged cord can cause fire or electric shock and should be replaced by a PIONEER authorized service center or dealer.
- Troubleshooting: The manual provides a comprehensive troubleshooting guide for common issues like no power, no sound, sound from only one speaker, recording problems, or remote control malfunction. This guide helps users identify and resolve issues by checking connections, settings, and battery status before seeking professional service. For instance, if the remote control unit doesn't work, checks include battery status, operating range, and interference from fluorescent lights. If malfunctions occur due to external influences like lightning or static electricity, cycling the POWER STANDBY/ON switch off and then on again can restore normal operation.
The Pioneer A-351R is a robust and user-friendly stereo amplifier, designed to deliver quality audio performance and integrate seamlessly into a home audio system with its remote control capabilities and versatile input options.