Do you have a question about the Pioneer Blade HPR-09A2 and is the answer not in the manual?
Crucial safety guidelines to prevent injury, electric shock, and fire hazards during operation and maintenance.
Instructions for correctly installing AAA batteries into the remote control unit.
Step-by-step instructions for operating the air conditioner using the remote control.
Explains the function of the power button to turn the air conditioner on or off.
Details how to select different operating modes like Auto, Cool, Dry, Fan, and Heat.
Guides on setting the fan speed to various levels including Auto, Fan1-5, and Turbo.
Instructions on how to adjust the fan's vertical blowing angle for optimal air distribution.
Guides on setting the fan's horizontal louvers for left and right swing airflow.
How to use the plus and minus buttons to adjust temperature and timer settings.
Explains how to activate or deactivate the sleep mode for quiet operation.
Instructions on setting the on/off timer for automatic operation scheduling.
Describes the function to turn the display light on or off on the indoor unit.
How to use the 'I feel' function for temperature sensing and automatic adjustment.
Details on activating the ECO mode for energy-saving operation.
Information on using the health button to activate the cold plasma generator.
How to enable or disable the child lock feature on the remote control.
Procedure to switch the temperature display between Celsius and Fahrenheit.
Instructions for activating or configuring the Wi-Fi setting for smart control.
Guide to enabling/disabling the low temperature heating function.
List and explanation of various error codes displayed by the air conditioner.
Information on who to contact for assistance when problems cannot be resolved.
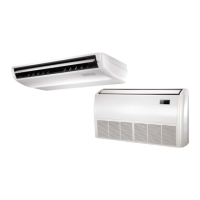
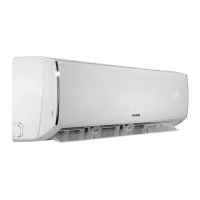
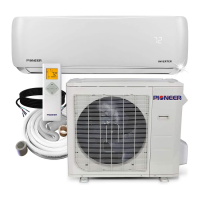
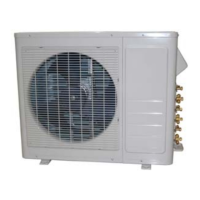
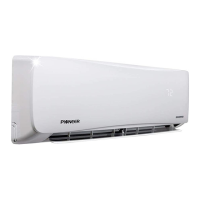
This document describes the Pioneer Blade Series Wall Mounted System, an air conditioner and heat pump designed for residential use. It functions to provide cooling, heating, dehumidification, and air circulation, utilizing hydrocarbon M50 refrigerant. The system is available in several models: HPR-09A2, HPR-12A2, HPR-18A2, and HPR-24A2.
The Pioneer Blade Series operates as both an air conditioner and a heat pump, offering versatile climate control. It uses M50 hydrocarbon refrigerant, which is highlighted as environmentally friendly, non-toxic, and non-ozone-depleting, while also being energy-efficient, consuming at least 35% less energy than comparable systems. The unit can operate in various modes: Auto, Cooling, Dry, Fan, and Heating.
In Auto mode, the air conditioner automatically adjusts its operation based on factory settings, and the set temperature cannot be manually adjusted or displayed. The fan speed in Auto mode is also automatically selected according to the ambient room temperature.
The Cooling mode allows the unit to operate under cooling conditions. Users can adjust the temperature using the "+" or "-" buttons on the remote control and set the fan speed (Fan1, Fan2, Fan3, Fan4, Fan5, Turbo, Stepless speed) and fan blowing angle.
In Dry mode, the air conditioner operates to dehumidify the room. In this mode, the fan speed is fixed at Fan1 (the lowest speed) and cannot be adjusted. The fan blowing angle can still be selected.
The Fan mode circulates air without cooling or heating. Users can select various fan speeds (Auto, Fan1-Fan5, Turbo, Stepless speed) and adjust the fan blowing angle.
For Heating mode, the unit provides warmth. Similar to Cooling mode, the temperature can be adjusted with the "+" or "-" buttons, and the fan speed and blowing angle can be set. A notable feature in heating mode is a delay of one to five minutes before air starts blowing, preventing the discharge of cold air at startup. This auto-delay time depends on the indoor ambient temperature.
The system also includes a Low Temperature Heating Function. When active in heating mode, the remote control displays "LA". This function can be entered or exited by pressing "Mode" and "+" simultaneously. While this function is active, the fan speed defaults to Auto and cannot be adjusted. Additionally, "Sleep," "Turbo," and "Quiet" settings cannot be activated simultaneously with low temperature heating. If "Sleep" is activated while low temperature heating is on, the unit will exit low temperature heating mode and enter sleep mode. Exiting low temperature heating mode restores the previously set speed and temperature.
The Pioneer Blade Series is controlled via a remote control, which features a display showing current settings such as fan speed, temperature, mode, and other activated functions. The remote control requires two AAA batteries.
Key buttons on the remote control include:
The remote control should be pointed at the signal receiver on the indoor unit, kept within eight meters, and free of obstacles. Fluorescent lamps or wireless telephones may interfere with the signal. Batteries should be removed if the remote control is not used for an extended period, and replaced if the display becomes fuzzy or blank.
Regular maintenance is crucial for the optimal performance and longevity of the Pioneer Blade Series.
Cleaning the Indoor Unit Surface: The surface of the indoor unit should be cleaned with a soft, dry, or damp cloth. The panel should not be removed during this process. Abrasive or volatile liquids should not be used.
Cleaning the Filter:
Important Notes for Filter Maintenance:
Pre-season Cleaning Checklist: Before the operating season begins, users should:
Post-season Checklist: After the operating season, users should:
Safety Warnings:
The manual also provides a problem-solving guide with common issues, possible causes, and solutions, and a list of error codes for diagnostic purposes. For any issues not covered or for other error codes, contacting a qualified professional is advised.
| Type | Split System |
|---|---|
| Cooling Capacity | 9000 BTU/h |
| Power Supply | 220-240V, 50Hz |
| Refrigerant | R410A |
| Weight (Indoor Unit) | 8 kg |