Do you have a question about the Pioneer CT-F7070 and is the answer not in the manual?
Instructions for changing the line voltage setting for 220V/240V models.
Instructions for changing line voltage and fuse settings for 120V/220V/240V models.
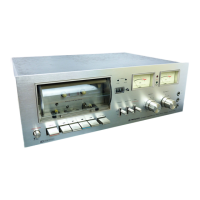
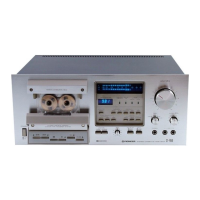
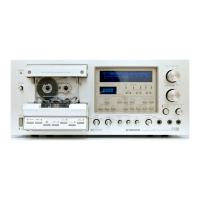
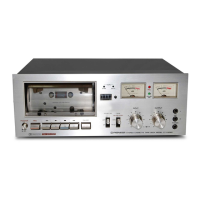
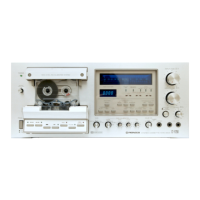
Ease of operation via front panel controls and vertical cassette transport.
High reliability due to DC servo motor, precision capstan, and drive belt.
Direct selection of modes (record, play, FF, rewind) without needing to stop.
Built-in Dolby system reduces tape hiss noise for better S/N ratio.
Durable ferrite solid head offers long life and superior frequency response.
Automatic bias/equalization switching for chrome tapes via detecting holes.
Features like Full Auto Stop and Memory Stop Switch enhance user convenience.
Cautions against direct sunlight, heat, humidity, dust, and magnetic fields.
Plays commercial pre-recorded stereo and mono music tapes.
Ability to record audio from FM broadcasts and records.
Supports live stereo or mono recording using microphones.
POWER SWITCH, REC, CrO2, Fe-Cr, DOLBY indicators and lamps.
CASSETTE DOOR, TAPE COUNTER, RESET BUTTON.
MEMORY STOP SWITCH, DOLBY NR SWITCH, TAPE SELECTOR SWITCH.
LEVEL METERS, OUTPUT LEVEL CONTROLS, INPUT LEVEL CONTROLS, PHONES JACK.
RECORD, PLAY, REWIND, STOP, FAST FORWARD levers for tape control.
PAUSE LEVER for temporary stop and MIC JACKS for microphone input.
Components guiding the tape path: Guides, Pins, Pinch Roller, Capstan.
ERASE HEAD and RECORD/PLAYBACK HEAD for tape signal processing.
Cassette retainer, detector pin, guide pin, and retaining arm.
ILLUMINATING LAMP for cassette compartment and ERASE PREVENTING DETECTOR.
DIN REC/PLAY JACK and LINE INPUT/OUTPUT jacks for audio signals.
INPUT SELECTOR SWITCH and LINE VOLTAGE SELECTOR for proper input.
AC POWER CORD connection and grounding (GND) terminal.
Classifies tapes by performance (Standard, LH, Chrome, Fe-Cr) and time.
Instructions for checking tape slack and condition before playback or recording.
How to use tabs to prevent accidental erasure and re-record by covering openings.
Guidelines for handling, checking, and storing cassettes to maintain quality.
Step-by-step guide for opening, inserting, closing, and removing cassettes.
Instructions for PLAY, RECORD, STOP, FAST FORWARD, and REWIND operations.
Temporarily stops tape motion during recording or playback.
Automatically stops the tape when fully wound onto one reel.
Recording overwrites previous audio; erase by setting input to minimum.
Steps to set and use the memory stop function with the tape counter.
Detects chrome tape via extra holes for automatic bias/equalization.
Power on, insert cassette, set PAUSE, DOLBY NR, and TAPE switches.
Adjust INPUT controls based on program source for optimal recording.
Release PAUSE to start, press STOP to end; auto-stop if tape runs out.
Proper levels prevent distortion and improve S/N ratio during recording.
Set peaks to -3 dB to 0 dB on level meters for optimal recording.
Selects bias/equalization for optimal performance with various tape types.
Automatic selection requires specific cassette holes for proper function.
Connect stereo mic to L/R jacks and follow standard recording steps.
Tips on mic types, cord length, monitoring, and preventing feedback.
Record a new program source immediately following a previously recorded one.
Record mono by setting the unused channel INPUT to minimum.
Record mic on one track and line on the other simultaneously.
Power on, insert cassette, reset counter, set DOLBY and TAPE switches.
Press Play lever, adjust OUTPUT controls, and stop playback.
Reduces tape noise by enhancing/attenuating frequencies during record/playback.
Generally compatible with most tapes; caution advised for C-120.
Lower recording levels can improve S/N and dynamic range with Dolby.
Use Dolby mode for pre-recorded Dolby tapes; avoid mixing modes.
Steps to clean heads, capstan, pinch roller for optimal performance.
Instructions for cleaning the inside of the cassette door with a soft cloth.
Use a head eraser periodically to maintain high frequency response.
Motor, Heads, Semiconductors, Dimensions, Weight, and furnished parts.
Fast Winding Time, Wow/Flutter, Frequency Response, S/N Ratio, Harmonic Distortion.
Details for MIC, LINE, HEADPHONES, and DIN jacks.
Power needs, consumption, and subfunctions like Dolby and memory stop.
Troubleshooting for tape not running or automatic stop functions.
Diagnosing weak frequencies, distorted sound, unsteady sound, and excessive noise.
Troubleshooting for inability to record or distorted recorded sound.
Checking and resolving problems with the memory stop function.
| Brand | Pioneer |
|---|---|
| Model | CT-F7070 |
| Category | Cassette Player |
| Language | English |