EasyManua.ls Logo

Pioneer CT-J720WR User Manual

Pioneer CT-J720WR
62 pages
To Next Page IconTo Next Page
Page #1 background imageLoading...
Page #1 background image
@)
PIONEER’
Operating
Instructions
Sala
Manual
de
instrucciones
(#
FA
ER
AAS
STEREO
TUNER
AMPLIFIER
AMPLIFICADOR
CON
SINTONIZADOR
ESTEREO
UBRBERUAR
SxX-J720/SX-J420/SX-J320
SOUND
FIELD
PROCESSOR
SOUND
IMAGE
CONTROLLER
PROCESADOR
DE
CAMPO
SONORO
CONTROLADOR
DE
IMAGEN
SONORA
BE
IB
Se
BERS
was
SP-J720K/SP-J420
GR-J320
STEREO
DOUBLE
CASSETTE
TAPE
DECK
GRABADORA
DE
DOBLE
CASETE
ESTEREOFONICA
TBS
EAE
CT-J720WR/CT-J3S20WR
AUTO
RETURN
STEREO
TURNTABLE
GIRADISCOS
ESTEREOFONICO
CON
RETORNO
AUTOMATICO
BHU
TRR
Eee
PL-J210
SPEAKER
SYSTEM*
SISTEMA
DE
ALTAVOCES*
RRR
S-J720V/S-J4a20V
*The
speaker
systems
may
differ
depending
on
the
systemconfiguration.
*E|
sistema
de
altavoces
puede
diferir
dependiendo
de
fa
configuracidén
del
sistema.
*
HGR
AARC,
Tha
ROTHER
APNE,
English
VOLTAGE
SELECTOR SWITCHES
Mains
voltages
in
Saudi
Arabia
are
127V
and
220V
only.
Never
use
this
model
with
a
110V
setting
in
Saudi
Arabia.
The
fine
voltage
selector
switches
are
on
the
rear
panel.
Before
3.
Next,
insert
a
screwdriver
in
the
groove
of
the
voltage
selector
at
the
left
and
adjust
unti!
the
voltage
is
the
same
as
at
the
right.
<Round
2-pin
AC
plug
model>
your
model
is
shipped
from
the
factory,
these
switches
are
set
to
1.
Use
a
medium-size
screwdriver.
the
power
requirements
of
the
destination.
Check
that
they
are
2.
insert
a
screwdriver
in
the
groove
of
the
voltage
selecter,
and
set
properly
before
plugging
the
power
cord
into
the-household
adjust
so
that
the
tip
of
the
groove
points
to
the
voltage
value
wall
socket.
If
the
voltage
is
not
properly
set
or
if
you
move
to
an
of
your
area.
eee
area
where
the
voltage
requirements
differ,
adjust
the
selector
switches
as
follows.
<Flat
blade
2-pin
AC
plug
model>
1,
Use
a
medium-size
screwdriver,
2,
First,
insert
a
screwdriver
in
the
groove
of
the
voltage
selector
at
the
right,
and
adjust
so
that
the
tip
of
the
groove
points
to
the
voltage
value
of
your
area.
[Tuner
amplifier]
<Flat
blade
2-pin
AC
plug
model>
<Round
2-pin
AC
piug
mode!
v
INFORMATION
TO
USER
Alteration
or
modifications
carried
out
without
appropriate
authorization
may
invalidate
the
users
right
to
operate
the
equipment.
INFORMATION
TO
USER
This
equipment
has
been
tested
and
found
to
comply
with
the
limits
for
a
Class
B
digital
device,
pursuant
to
Part
15
of
the
FCC
Rules.
These
limits
are
designed
to
provide
reasonable
protection
against
harmful
interference
in
a
residential
installation.
This
equipment
|
generates,
uses,
and
can
radiate
radio
frequency
energy
and,
if
not
installed
and
used
in
accordance
with
the
instructions,
may
cause
harmful
interference
to
radio
communications.
However,
there
is
no
guarantee
that
interference
will
not
occur
in
a
particular
installation.
if
this
equipment
does
cause
harmful
interference
to
radio
or
television
reception,
which
can
be
determined
by
turning
the
equipment
off
and
on,
the
user
is
encouraged
to
try
to
correct
the
interference
by
one
or
more
of
the
follawing
measures:
~
Reorient
or
relocate
the
receiving
antenna.
~
increase
the
separation
between
the
equipment
and
receiver.
~
Connect
the
equipment
into
an
outlet
on
a
circuit
different
from
that
to
which
the
receiver
is
connected.
Consuit
the
dealer
or
an
experienced
radio/TV
technician
for
help.
.
|
|
|
Question and Answer IconNeed help?

Do you have a question about the Pioneer CT-J720WR and is the answer not in the manual?

Pioneer CT-J720WR Specifications

General IconGeneral
Track System4-track, 2-channel stereo
TypeCassette Deck
MotorDC servo
Output0.5V (line)
Output Level/Impedance0.5 V/2.2 kΩ

Summary

Product Overview and Setup

Voltage Selector Switches

Instructions for setting the correct voltage for the unit based on region.

Cautions and Installation

Location and Installation Precautions

Advice on proper placement to avoid damage or malfunction due to heat, humidity, or interference.

Before Operating

Loading Batteries into Remote Control

Step-by-step instructions for correctly installing batteries in the remote control.

Dolby Audio Processing

Dolby Pro Logic Surround Explained

Description of the Dolby Pro Logic Surround feature for enhanced audio.

Dolby 3CH Logic Explained

Description of the Dolby 3CH Logic feature for an expansive sound field.

Speaker and System Setup

Speaker Placement Guide

Recommended speaker placement for optimal surround sound effect.

System Setup and Placement Notes

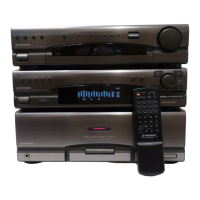
Advice on arranging components, avoiding vibration, heat, and TV interference.

Turntable Setup

PL-J210 Turntable Assembly

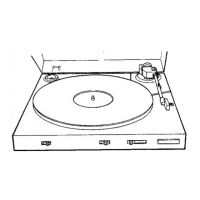
Step-by-step instructions for assembling the PL-J210 turntable.

System Connections

Antenna, System, and Power Connections

Diagram and list of primary connections for antennas, system cables, and power.

Audio Connections

Speaker Connections

Connecting various speaker types to the amplifier's terminals.

Component Interface Connections

Speaker Impedance and Connections

Requirements for speaker impedance and connection types.

Antenna Setup and Reception

FM Antenna Installation

Guide for installing the FM T-type antenna for optimal reception.

AM Antenna Setup

Guide for positioning and setting up the AM loop antenna.

Front Panel Facilities Overview

Key Audio Mode Controls

Descriptions of controls for sound field modes and audio settings.

Tuner Amplifier Front Panel Functions

Timer and Tuning Controls

Controls for setting timers and tuning radio stations.

Cassette Deck Front Panel Controls

Cassette Deck Operation Buttons

Buttons for controlling tape playback, recording, and other functions.

Cassette Deck Display and Copy Features

Turntable Front Panel Controls

Rear Panel Input/Output Jacks

Rear Panel System Integration

Remote Control Unit Overview (SX-J320)

Remote Control Functions

Remote Control Operations

Remote Control for Advanced Features

Cassette Tape Handling and Care

Basic Operations: Tuning and Presets

Tuner Station Tuning Procedures

Step-by-step guide for tuning into radio stations.

Tuner Station Memorization

Basic Operations: Reception and Playback

Basic Operations: Cassette Playback

Cassette Tape Playback Procedure

Steps for playing tapes in the cassette deck.

Basic Operations: Cassette Recording

Recording Onto Cassette Tape

Step-by-step guide for recording audio onto a cassette tape.

Cassette Recording Enhancements

Cassette Deck Application Guide

Cassette Deck Music Search

Music Track Searching Function

Locating specific songs on a tape using fast forward or rewind.

Cassette Tape Copying

Tape Copying Procedure

Steps for duplicating recorded tapes between decks at normal or high speed.

Auto Synchro Editing System (A.S.E.S.)

Normal and Fine Edit Modes Explained

Overview of A.S.E.S. editing modes for CD to tape transfer.

A.S.E.S. Operation Details

A.S.E.S. Fine Edit (COMPU PGM II)

Selecting Playback Scenes

Playback Scene Sound Adjustments

Playback Scene: AV Mode

Playback Scene: Surround Level Adjustment

Surround Level Calibration Process

Steps for balancing speaker levels using test tone and controls.

Playback Scene: Karaoke Mode

Karaoke Scene Setup and Operation

Preparing and using the karaoke function with microphones.

Playback Scene: Key Pitch and Sleep Timer

Timer Playback Functions

Setting Timer Playback Mode

How to set playback timers for wake-up alarms or scheduled playback.

Timer Playback Management

Timer Recording Function

Setting Timer Recording Mode

How to set timers for recording radio broadcasts.

Timer Recording Management

Maintenance Procedures

Head Section Cleaning Guide

How to clean tape heads, capstan, and pinch roller for optimal sound.

Component Maintenance

Troubleshooting Guide

Unit and Speaker Troubleshooting

Resolving common issues with power, sound, and speaker connections.

Cassette Deck Troubleshooting

Resolving common malfunctions related to the cassette deck.

Troubleshooting: Sound and Reception Issues

Sound Quality and Interference Troubleshooting

Addressing issues like muddy sound, high-frequency distortion, and noise.

Troubleshooting: Controls and Turntable Issues

Clock, Timer, Remote, and Sound Field Issues

Problems related to clock, timer, remote control, and sound field functions.

Related product manuals