EasyManua.ls Logo

Pioneer RX-1180 User Manual

Pioneer RX-1180
20 pages
To Next Page IconTo Next Page
Page #1 background imageLoading...
Page #1 background image
Operating
Instructions
Thank
you
for
buying
this
Pioneer
product.
Please
read
through
these
operating
instructions
so
you
will
know
how
to
operate
your
model
properly.
After
you
have
fin-
ished
reading
the
instructions,
put
them
away
in
a
safe
place
for
future
reference.
In
some
countries
or
regions,
the
shape
of
the
power
piug
and
power
outlet
may
sometimes
differ
from
that
shown
in
the
explanatory
drawings.
However,
the
method
of
connecting
and
operating
the
unit
is
the
same.
WARNING:
to
prevent
Fine
OR
SHOCK
HAZARD,
DO
NOT
EXPOSE
THIS
APPLIANCE
TO
RAIN
OR
MOISTURE.
IMPORTANT
NOTICE
[For
U.S.
and
Canadian
models]
The
serial
number
for
this
equipment
is
located
on
the
rear
panel.
Please
write
this
serial
number
on
your
enclosed
war-
ranty
card
and
keep
in
a
secure
area.
This
is
for
your
security.
[For
Canadian
model]
CAUTION:
to
prevent
ELECTRIC
SHOCK
DO
NOT
USE
THIS
(POLARIZED)
PLUG
WITH
AN
EXTENSION
CORD,
RECEPTACLE
OR
OTHER
OUTLET UNLESS
THE
BLADES
CAN
BE
FULLY
INSERTED
TO
PREVENT
BLADE
EXPOSURE.
ATTENTION:
pour
prevenin
Les
cHOcs
ELEC-
TRIQUES
NE
PAS
UTILISER
CETTE
FICHE
POLARISEE
AVEC
UN
PROLONGATEUR
UNE
PRISE
DE
COURANT
OU
UNE
AUTRE
SORTIE
DE
COURANT,
SAUF
SI
LES
LAMES
PEUVENT
ETRE
INSEREES
A
FOND
SANS
EN
LAISSER
AUCUNE
PARTIE
A
DECOUVERT.
TWO
VOLTAGE
SELECTOR
SWITCHES
Only
multi-voltage
models
are
provided
with
these
switches.
U.S.
and
Canadian
models
are
not
provided
with
these
switches.
Mains
voltages
in
Saudi
Arabia
are
127
V
and
220
V
only.
Never
use
this
model
with
110
V
setting
in
Saudi
Arabia.
The
line
voltage
selector
switches
are
on
the
rear
panel.
Before
|
FEATURES
CHECKING
ACCESSORY
ITEMS.
BEFORE
OPERATION
ANTENNA
CONNECTIONS
CONNECTIONS
PANEL
FACILITIES
REMOTE
CONTROL
UNIT
FACILITIES
TURNTABLE
FACILITIES
|
HOW
TO
HANDLE
CASSETTE
TAPES
.
|
GRAPHIC
EQUALIZER
CONTROLS
.........eeceeeeee
12
CONTENTS
STEREO
CASSETTE
DECK
RECEIVER
RX-1180/RX-1190
STEREO
TURNTABLE
PL-777AZ/PL-B8882Z
The
Model
PL-888Z
is
not
soid
in
the
U.S.A.
and
Canada.
your
model
is
shipped
from
the
factory,
these
switches
are
set
to
the
power
requirements
of
the
destination.
Check
they
are
set
properly
before
plugging
the
power
cord
into
the
house-
hold
wall
socket.
{f
the
voltage
is
not
properly
set
or
if
you
move
to
an
area
where
the
voltage
requirements
differ,
adjust
the
selector
switches
as
follows.
1.
Use
a
medium-size
screwdriver.
2.
First,
insert
a
screwdriver
into
the
groove
of
the
voltage
selector
at
the
top,
and
adjust
so
that
the
tip
of
the
groove
points
to
the
voltage
value
of
your
area.
3.
Next,
insert
a
screwdriver
into
the
groove
of
the
voltage
selector
at
the
bottom
and
adjust
until
the
voltage
is
the
same
as
at
the
top.
Both
switches
must
be
in
the
same
switch
setting.
@
Hove
tev
>
ov~240v
CHANNEL
STEP/FM
DE-EMPHASIS
SWITCH
Only
multi-voltage
models
are
provided
with
these
switches.
U.S.
and
Canadian
models
are
not
provided
with
these
switches.
The
unit
has
been
factory
preset
to
the
channel
allocation
and
de-emphasis
value
for
the
area
in
which
it
is
to
be
sold.
If
these
value
are
set
incorrectly,
the
frequency
display
may
stop
at
the
wrong
frequency,
or
sound
may
be
distorted,
resulting
in
an
inability
to
reproduce
reception
signals
at
their
proper
sound
quality.
For
this
reason,
be
sure
to
confirm
that
the
values
are
set
correctly
before
first
using
the
unit.
{100
kHz/10 kHz/75
ys]
position:
Set
to
this
position
for
areas
with
FM
reception
step
of
100
kHz,
AM
10
kHz,
and
de-emphasis
75
xs.
[50
KHz/9
kHz/50
us]
position:
Set
to
this
position,
for
areas
with
FM
reception
step
of
50
kHz,
AM
9
kHz,
and
de-emphasis
of
50
us.
When
unsure
about
the
channel
allocation
and
de-emphasis
values
for
your
area,
con-
sult
your
dealer
for
correct
information.
DE-EMPHASIS
100/10
kHz
|
PRELIMINARY
OPERATIONS.
BASIC
OPERATIONS
...
TAPE
COPYING
RECORDING
AND
PLAYBACK
USING
THE
AUDIO
TIMER.......0.000..-
eee
16
MIC
MIXING
MAINTENANCE
TROUBLESHOOTING
SPECIFICATIONS
®Q
PIONEER’
The
future
of
sound
and
vision.

Other manuals for Pioneer RX-1180

Question and Answer IconNeed help?

Do you have a question about the Pioneer RX-1180 and is the answer not in the manual?

Pioneer RX-1180 Specifications

General IconGeneral
Track System4-track, 2-channel stereo
Channels2
Tape TypeCrO2, Metal
Noise ReductionDolby B, Dolby C
InputsLine In
OutputsHeadphone
MotorElectronic DC servo motor

Summary

Important Notices and Setup

US/Canadian Model Serial Number

Serial number location on the rear panel for security and warranty.

Canadian Model Plug Safety

Caution regarding polarized plug use to prevent electric shock.

Voltage Selector & Channel Settings

Setting voltage and FM channel/de-emphasis for regional compatibility.

Safety Instructions

General Usage and Handling Safety

Covers reading instructions, handling, location, ventilation, heat, power sources, and cord protection.

Electrical and Servicing Safety

Focuses on shock hazards, polarization, and user-serviceable parts.

Antenna Grounding and Warnings

Covers antenna grounding, lightning alerts, UK wiring, and general safety notes.

Features and Preparation

Product Features

Lists key features of the stereo cassette deck receiver.

Checking Accessory Items

Lists essential accessories included with the product.

Initial Setup Procedures

Covers remote control battery insertion and turntable initial setup.

Antenna Connections

AM Antenna Setup

Instructions for connecting and positioning the AM loop antenna.

FM Antenna Setup

Instructions for connecting the FM T-type antenna.

External Antenna Installation

Guidance for connecting external FM and AM antennas for better reception.

Connections

Input/Output Cord Connections

Details on connecting input/output cords for various components.

Speaker Cord Connections

Instructions for properly connecting speaker cords to terminals.

Power Cord Connection

Final step of connecting the power cord to the AC wall socket.

Remote Control and Panel Overview

Remote Control Integration

Connecting the remote control unit to operate other components.

Panel Facilities Diagram

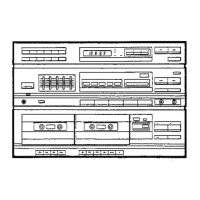
Diagram of panel facilities with numbered controls.

Panel Facilities Details

Tuner Section Controls

Details on station call, display, indicators, memory, tuning modes, and band selection.

Amplifier Section Controls

Explains power switch, indicators, headphone jack, and speaker selection.

Graphic Equalizer Controls

Description of the five frequency band controls for audio tailoring.

Panel Facilities Functions

Function Switches and Indicators

Description of various function switches and their indicators.

Tape Deck Controls

Details on tape deck switches, counter, recording indicator, and copy modes.

Dolby NR System

Explanation of the Dolby NR switch and its effect on playback.

Remote Control Unit Functions

Remote Control Range and Operation

Specifies the range and angle for remote control operation.

Function and Station Keys

Details on function selection keys and station tuning keys.

CD and Tape Control Keys

Explains CD keys for playback and tape pause/control functions.

Turntable Facilities

Turntable Components and Speed

Identifies turntable parts and explains the speed selection switch.

Arm Elevation and Disc Size

Details on the arm elevation switch and disc size selection for the turntable.

Start/Stop and Manual Play

Instructions for starting, stopping, and manual playback on the turntable.

Cassette Tape Handling

Loading Cassette Tapes

Points to bear in mind before loading cassette tapes.

Accidental Erasure Prevention

Explains the function of prevention tabs and how to re-record.

Tips on Using Cassette Tapes

Provides advice on leader tape, storage, and avoiding tape jams.

Audio Controls and Operations

Graphic Equalizer Controls

Explains the function of each graphic equalizer frequency control.

Preliminary and Basic Operations

Covers powering on, speaker selection, and function switch usage.

Turntable Record Play

Steps for record play on PL-777AZ and PL-888Z models.

Broadcast Reception

Preset Station Tuning

Instructions for tuning and presetting FM/AM stations.

Auto and Manual Tuning

Guidance on using automatic and manual tuning modes for reception.

Basic Operations

Reception Using Preset Tuning

Simple and accurate reception using memorized stations.

Last Station Memory

Recalls the last received station upon powering on.

Tape Playback Modes

Covers single playback and relay playback for cassette decks.

Tape Copying and Recording

Tape Copying Overview

Instructions for copying tapes using Deck II, including Dolby NR.

Normal and High Speed Copying

Steps for performing normal speed and high speed tape copying.

Auto-Stop Mechanism

Automatic stopping of tape when fully wound.

Recording and Playback Features

Unattended Recording

Setting up Deck II for unattended recording using an audio timer.

Wake-Up Playback

Using an audio timer for automatic playback initiation.

Microphone Mixing

Instructions for mixing microphone input with program sources.

Maintenance Procedures

Cleaning the Head Section

Routine cleaning of heads, capstan, and pinch roller.

Demagnetizing the Head

Procedure to demagnetize the head section regularly.

Replacing the Stylus

Instructions for replacing the turntable stylus.

Troubleshooting Guide

Amplifier and Cassette Deck Issues

Troubleshooting common problems with the amplifier and cassette deck.

Tuner and Turntable Issues

Troubleshooting common problems with the tuner and turntable.

Remote Control Malfunctions

Solutions for remote control operation failures.

Specifications

Amplifier Section Specifications

Technical specifications for the amplifier section.

Tape Deck Section Specifications

Technical specifications for the tape deck section.

Turntable Specifications

Technical specifications for the turntable.

Installed Cartridge and Dimensions

Installed Cartridge Details

Information on the installed cartridge type, stylus, and response.

Unit Dimensions and Weight

Physical dimensions and weight for the PL-888Z and PL-777AZ models.

Accessories

List of included accessories, such as the 45-RPM adaptor.

Related product manuals