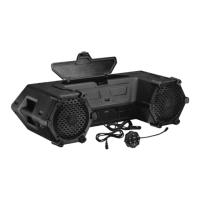
The Planet Audio PATV85 is an all-terrain sound system designed for use in ATVs (All Terrain Vehicles) and UTVs (Utility Vehicles). It features Bluetooth connectivity, LED illumination, 8-inch marine speakers, and 1.5-inch weatherproof tweeters, making it suitable for outdoor environments.
Function Description
The PATV85 serves as a versatile audio system, allowing users to stream music wirelessly from their mobile devices via Bluetooth. It supports both iOS and Android devices. In addition to Bluetooth, the system includes a 3.5mm AUX input jack, enabling connection to external audio devices such as MP3 players or mobile phones that do not have Bluetooth capabilities.
A key feature of the PATV85 is its integrated LED light bar, which provides illumination, enhancing visibility and ambiance during use. The system also includes a built-in USB charging port (1A) located within a large front storage compartment, allowing users to charge their mobile devices while on the go. It's important to note that this USB port is for charging only and does not support media playback.
The PATV85 is designed to be shockproof and weatherproof, ensuring durability and reliable performance in various outdoor conditions. It operates on a 12 VDC vehicle power supply.
Usage Features
Powering On/Off: The sound system can be turned on or off by pressing and holding the power button on the functional controller.
Bluetooth Connectivity:
- To initiate Bluetooth pairing, ensure the AUX cable is disconnected.
- Press and hold the power button on the functional controller to turn on the unit. The Bluetooth LED indicator will flash blue, indicating pairing mode.
- On your mobile device, enable Bluetooth and select "Planet Audio ATV" from the available devices. If prompted, enter "0000" as the password.
- Once successfully paired, the Bluetooth LED indicator will turn solid blue.
- Audio can then be played from your mobile device, with volume adjustable via the connected device.
- The system automatically reconnects to previously paired devices when both are turned on. To switch Bluetooth sources, disconnect the current connection and repeat the pairing process.
- For optimal audio performance, set the connected device's volume to at least 75% to avoid distortion.
- It is recommended to run the vehicle engine when operating the sound system to prevent battery exhaustion.
- The operational range of Bluetooth can be affected by obstacles. If the device moves out of range, it will disconnect and automatically reconnect when back in range.
- Connect a 3.5mm audio cable (not included) from the AUX input on the functional controller to the audio output jack of your external device (e.g., mobile phone, MP3 player). Specific cables may be needed for USB-C or Lightning connectors.
- The system automatically switches to AUX input, and the source LED indicator turns red.
- Play audio files on your connected device.
- To maximize audio performance, set the connected device's volume to at least 75%.
- To resume Bluetooth connection, the AUX cable must be disconnected.
- Running the vehicle engine is advised to prevent battery drain during AUX use.
Playback Control (Bluetooth & AUX):
- To pause or resume play, press the play/pause button.
- To select the previous or next track (Bluetooth only), use the track selection buttons. For AUX, track selection is controlled on the connected device.
- To adjust volume, use the volume buttons on the functional controller.
- To mute or unmute volume (AUX only), press the play/pause button.
LED Light Bar: The LED light bar on the front of the sound system can be turned on or off by pressing the dedicated button on the functional controller.
USB Charging: Open the front storage compartment to access the 1A USB port for charging mobile devices. This port is exclusively for charging.
Mounting:
- Unit Mounting: The sound system is secured to the rails or roll bars of the vehicle using four supplied mounting straps. No special tools are required. Regular checks of the mounting conditions are recommended for safety.
- Controller Mounting:
- Surface Mount: The functional controller can be fastened using double-sided adhesive tape (not included). Regular checks are necessary to ensure secure fastening.
- Handlebar Mount: Assemble the mounting clamp on the handlebar using the supplied clamp, brackets, bolts, nuts, washers, and rubber strips. The rubber strip provides a more secure grip. Then, snap the functional controller onto the snap bracket of the clamp via the slot on its back.
Power Connection:
- Option 1: Using Vehicle Power Port:
- Connect the functional controller, aligning the arrows on the connectors.
- Insert the 12V power port plug of the sound system into the vehicle's power port. The power LED indicator on the plug will illuminate.
- Unplug the cable after use if the power port is not ignition-switched to prevent battery drain.
- Option 2: Using Power Port Plug Adapter (for vehicles without 12V power port):
- Disconnect the negative terminal of the vehicle's battery first to prevent short circuits.
- Connect the functional controller.
- Connect the black/ground wire of the adapter to the vehicle's metal frame or negative battery terminal, ensuring the surface is clean.
- Connect the red wire of the adapter to the positive battery terminal. Use 12-14 gauge extension wires if needed.
- Important: Install a 15A in-line fuse (not included) and an on/off switch (not included) if the power port cable is not unplugged after each use or if the vehicle power port is not ignition-switched.
- Insert the sound system's power port plug into the adapter. The power LED indicator on the plug will illuminate.
- Option 3: Direct Connection to Vehicle Battery:
- Disconnect the negative terminal of the vehicle's battery first.
- Remove the plug from the supplied power port plug cable.
- Connect the negative wire of the power port plug to the vehicle's metal frame or negative battery terminal.
- Connect the positive wire of the power port plug to the positive battery terminal.
- Important: Install a 15A in-line fuse (not included) and an on/off switch (not included) in line with the positive power wire to prevent electrical damage.
- Ensure the ground wire is securely fastened to a clean metal surface.
- To prevent battery drain when not in use, disconnect the sound system or use the inline on/off switch.
Maintenance Features
Care for Your Product:
- Avoid cleaning the product in hot weather or direct sunlight.
- Do not use abrasive or highly alkaline cleaners.
- Do not use gasoline, acetone, carbon tetrachloride, or other aggressive chemical solutions.
- Do not scrape the product with sharp instruments.
- While weatherproof, never submerge the product in water.
- Clean the product with lukewarm water and mild soap or detergent using a clean sponge or soft cloth, then rinse well with clean water.
Fuse Replacement:
- If the power LED indicator on the power port plug does not illuminate, the internal fuse is likely blown.
- To replace, locate the screw cap on the front end of the power port plug. Turn it counterclockwise to open and access the fuse.
- Replace the blown fuse with a new 10A AGC fuse (glass cartridge type, not included).
- Reassemble the power port plug, ensuring the contact head sticks out.
Troubleshooting: The manual provides a troubleshooting guide for common issues such as no power, no sound, Bluetooth connection problems, poor audio quality, and unresponsiveness. It suggests checking power connections, ACC switch status, fuses, device volume, AUX cable connection, Bluetooth pairing, device range, and power cycling the unit. For persistent issues, contacting technical support is recommended.
Environmental Care: The product should not be disposed of with normal household waste. Users are advised to follow local laws for disposing of electronic products to help preserve the environment.