Note
– 1 – – 2 –
– 3 – – 4 –
1. Package Contents
Thank you for choosing PLANET WNRT-617G. Before installing
the router, please verify the contents inside the package
box.
The items below should be contained in the package.
If there is any item missed or damaged, please
contact the seller immediately.
3. Hardware Installation
2. Physical Installation
– 7 – – 8 –
5. Manual Installation–Web Management
Default IP Address: 192.168.1.1
Default Username: admin
Default Password: admin
Default SSID: default
6. Wireless Network Connection
– 5 – – 6 –
The default User name and Password are both “admin”.
Then click OK button to continue.
STEP 1: The Web management allows you to access and
manage the Wireless Router easily. Launch the
Web browser and enter the default IP address
http://192.168.1.1
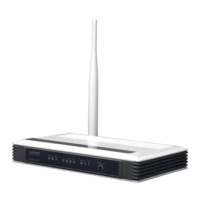
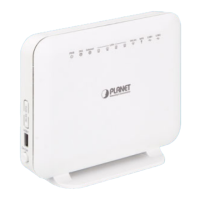
Front Panel Description
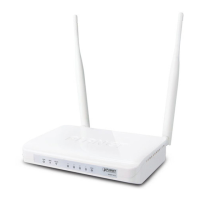
Rear Panel Description
Power LED
System LED
Wireless LED
WPS Funtion LED
3G Connection LED
WPS/Reset Button
WAN Port Status LED
LAN1~LAN4 LED
POWER
ON/OFF
WAN 4 3 2 1
PC/Laptop
3G USB Modem
DSL / Cable
Modem
Phone
Jack
Power
Adapter
RJ-45RJ-11
RJ-45
Power
001101010
POWER
ON/OFF
WAN 4 3 2 1
Power
Adapter
Power
POWER
ON/OFF
4 x 10/100Mbps LAN Ports
Connect to user’s PC or network devices
Power ON/OFF
Button
Power Connector
12V DC Input
WAN Port
(Connect to DSL/
Cable Modem)
5dBi Antenna
USB port
(Connect to
3G Modem)
Wireless Router
Quick Guide
CD-ROM
Power Adapter Antenna
Ethernet Cable
150Mbps
802.11n Wireless
3G Router
WNRT-617G
Step 1: Right-Click on the network icon displayed in the
system tray
Step 2: Highlight the wireless network (SSID) to connect and
click [Connect]
Step 3: Enter the encryption key of the Wireless Router
FURTHER INFORMATION:
The above steps introduce simple installations and configura-
tions for WNRT-617G. For further configurations of WAN, LAN,
Wireless, Firewall, Virtual Server, Security, Routing, DMZ, and
DDNS etc, please refer to the user’s manual in the CD. If you
have further questions, please contact the local dealer or
distributor where you purchased this product.
2011-E50210-000
USB
USB
WAN 4 3 2 1
USB
4. Manual Installation–Network Setup
A computer with wired Ethernet connection to the Wireless
Router is required for the first-time configuration.
1. Click “Start” button located at lower-left corner of you
computer
2. Click “Control Panel”
3. Double click “Network and Sharing Center” icon
4. Click “Change adapter settings”
5. Double click “Local Area Connection”
6. Select “Internal Protocol Version 4(TCP/IPv4)” and click
“Properties”
7. Select “Obtain an IP address automatically” and “Obtain
DNS server address automatically”, then click “OK”
STEP 1: Set your computer to get an IP address from the
Wireless Router: (Based on Windows 7)
STEP 2: When you enter into the Web User Interface, click
Quick Setup at the left hand side of the screen.
STEP 3: Once the basic configuration of the router is
done. Click Reboot button to make the change
take effect.
STEP 1: Connect the Power Adapter to the Wireless Router
and turn on it. Check the PWR LED on the front
panel is on accordingly.
STEP 2: Follow the figure below to connect network
devices. It depends on your demand to connect
wired DSL/Cable connection, or 3G USB modem,
or both (backup for each other).