EasyManua.ls Logo

Playnation TIC TAC TOE User Manual

Playnation TIC TAC TOE
2 pages
To Next Page IconTo Next Page
Page #1 background imageLoading...
Page #1 background image
Please note: Tic-Tac-Toe is intended for make-believe-play by children.
*FOR RESIDENTIAL USE ONLY*
*FOR CHILDREN AGES 3-11*
DOWELS
1: LOCATE THE BLUE COLLARS AND SLIDE THEM OVER THE
1: LOCATE THE GREEN DOWELS AND MATCH THEM AS FOLLOWS:
ONE THREADED STUD END, AND ONE THREADED INSERT.
STEP 4: TUMBLERS
STEP 1: ASSEMBLE THE DOWELS
TIC TAC TOE (07-0010)
DOWELS ON THE UNIT.
2: SCREW THE STUDS INTO THE INSERTS UNTIL TIGHT.
STEP 2: INSERTING THE DOWELS INTO THE BRACKET
COLLARS AND TUMBLERS.
2: REPEAT ASSEMBLY STEPS 3 AND 4 TO FINISH INSTALLING
STEP 3: INSERT COLLARS ONTO DOWELS
3: REPEAT STEPS 1 AND 2 WITH THE REMAINING TWO SETS
EACH DOWEL ABOVE THE COLLARS.
1: LOCATE THE TIC-TAC-TOE TUMBLERS AND PLACE ONE ON
1: LOCATE THE GREEN BRACKET AND PLACE ON TOP OF
ASSEMBLY. LINE UP THE HOLES IN THE BRACKET WITH THE
STEP 5: TOP BRACKET
1: LOCATE ONE OF THE GREEN BRACKETS AND PLACE
THE DOWELS IN AS SHOWN.
Question and Answer IconNeed help?

Do you have a question about the Playnation TIC TAC TOE and is the answer not in the manual?

Playnation TIC TAC TOE Specifications

General IconGeneral
CategoryPlay Sets & Playground Equipment
BrandPlaynation
NameTIC TAC TOE
ColorMulticolor
Number of Players2
Age Range3+

Summary

Assemble Dowels

Prepare and Screw Dowel Ends

Assemble dowels by connecting threaded stud ends and inserts tightly.

Repeat Dowel Assembly

Repeat the dowel assembly process for all remaining component sets.

Insert Dowels into Bracket

Place Bracket and Insert Dowels

Position the green bracket and insert the assembled dowels into their designated slots.

Insert Collars onto Dowels

Slide Collars Over Dowels

Slide the blue collars onto each dowel, positioning them above the bracket.

Install Tumblers and Finalize

Place Tumblers on Dowels

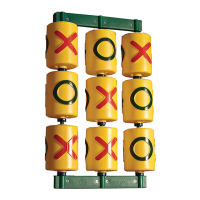
Place the Tic-Tac-Toe tumblers onto each dowel, situated above the previously installed collars.

Repeat Collar and Tumbler Installation

Replicate steps 3 and 4 to finish installing all remaining collars and tumblers.

Attach Top Bracket

Position and Align Top Bracket

Position the top green bracket onto the assembly and align its holes with the dowels.

Mount Unit to Slats

Prepare and Cut Mounting Slats

Prepare three 28-1/2" slats, cutting two to 23-3/4", for unit attachment.

Fasten Module to Slats

Center the assembled module on the prepared slats and secure it using eight 1" wood screws.

Mount Unit to Wall

Secure Unit to Wall Slats

Mount the unit to the wall's slats using four 1-1/2" wood screws.

Verify Opening Size

Ensure the opening size is 18-1/4"W x 22-3/4"H and adjust slats if necessary.