OPERATIVE DIAGRAMS
*1) For more details see Operating Diagram.
*2) See also Installation.
*3) You can correct the readings on the temperature sensor (+ or -).
*4) You can correct the readings on the wet bulb probe sensor (+ or -).
To calibrate the %RH reading (when using the psycrometric kit):
1. Remove the wet sock from the wet temperature probe.
2. Allow the wet temperature probe to dry for 10 mins.
3. Adjust the above setting to make the wet bulb temperature match that of the dry bulb.
Check periodically the sock installed on the sensor has not been clogged by
calcium carbonate scale. If you, remove it and clean or replace it.
*5) You can correct the readings on the 4-20mA humidity sensor (+ or -).
COSt PROGRAMMING (System constants)
These settings refer to the operation mode of the system and must be made on
initial startup. Press - / + at the same time for at least one second: the message
C.O.S.t. will be displayed.
Press than repeatedly HUM until the message regarding the chosen variable is
displayed (see table below) : value of variable and message will be displayed.
Press + or - to set a new value and then press HUM to confirm.
The next system constant will then appear.
You can press HUM for at least 2 seconds to exit and return to the Run Mode.
.sseM eulaV gninaeM etoN
t.Fid
°2.0
laitnereffiderutarepmet°
)1*
t.LEr
°0.0
otgnireffertfihsgnittes° t.teS
)1*
t.CYC
"0
sdnocesniemitelcycnoitalugererutarepmeT
)1*
t.nim
"0
sdnocesnielcycgninoitcaerutarepmetemitmuminiM
)1*
H.Fid
%0.1
laitnereffidytidimuH°
)1*
H.LEr
%0.0
otgnireffertfihsgnitteshR% H.teS
)1*
H.CYC
"0
sdnocesniemitelcycnoitalugerytidimuH
)1*
H.nim
"0
sdnocesnielcycgninoitcaytidimuhemitmuminiM
)1*
PnEt
1=
)F°2=,C°1=(noitatneserpererutarepmeT
ynuH
0=
)Am02-4=1,cirtemorcysp=0(epytrosnesytidimuH
)2*
Et.dA
°0.0
)-ro+(noitcerrocrosneserutarepmettupnI°
)3*
ut.dA
°0.0
)-ro+(noitcerrocrosnesblubtewerutarepmettupnI°
)4*
uH.dA
%0.0
)-ro+(noitcerrocytidimuhtupnIhR%
)5*
"HAND" MODE
In some start-up conditions may be useful to work in "manual" mode:
Power off the processor, press + key and keep it pressed giving power on: HAnd
message will be displayed (release now + key). Push + until is displayed number
required to be handed (see table State indication lamps) and push HUM for activing
relay. Pushing again + for increase relay number previous relay is disactivated.
You can press HUM key for a least two seconds to escape and return to the Run Mode.
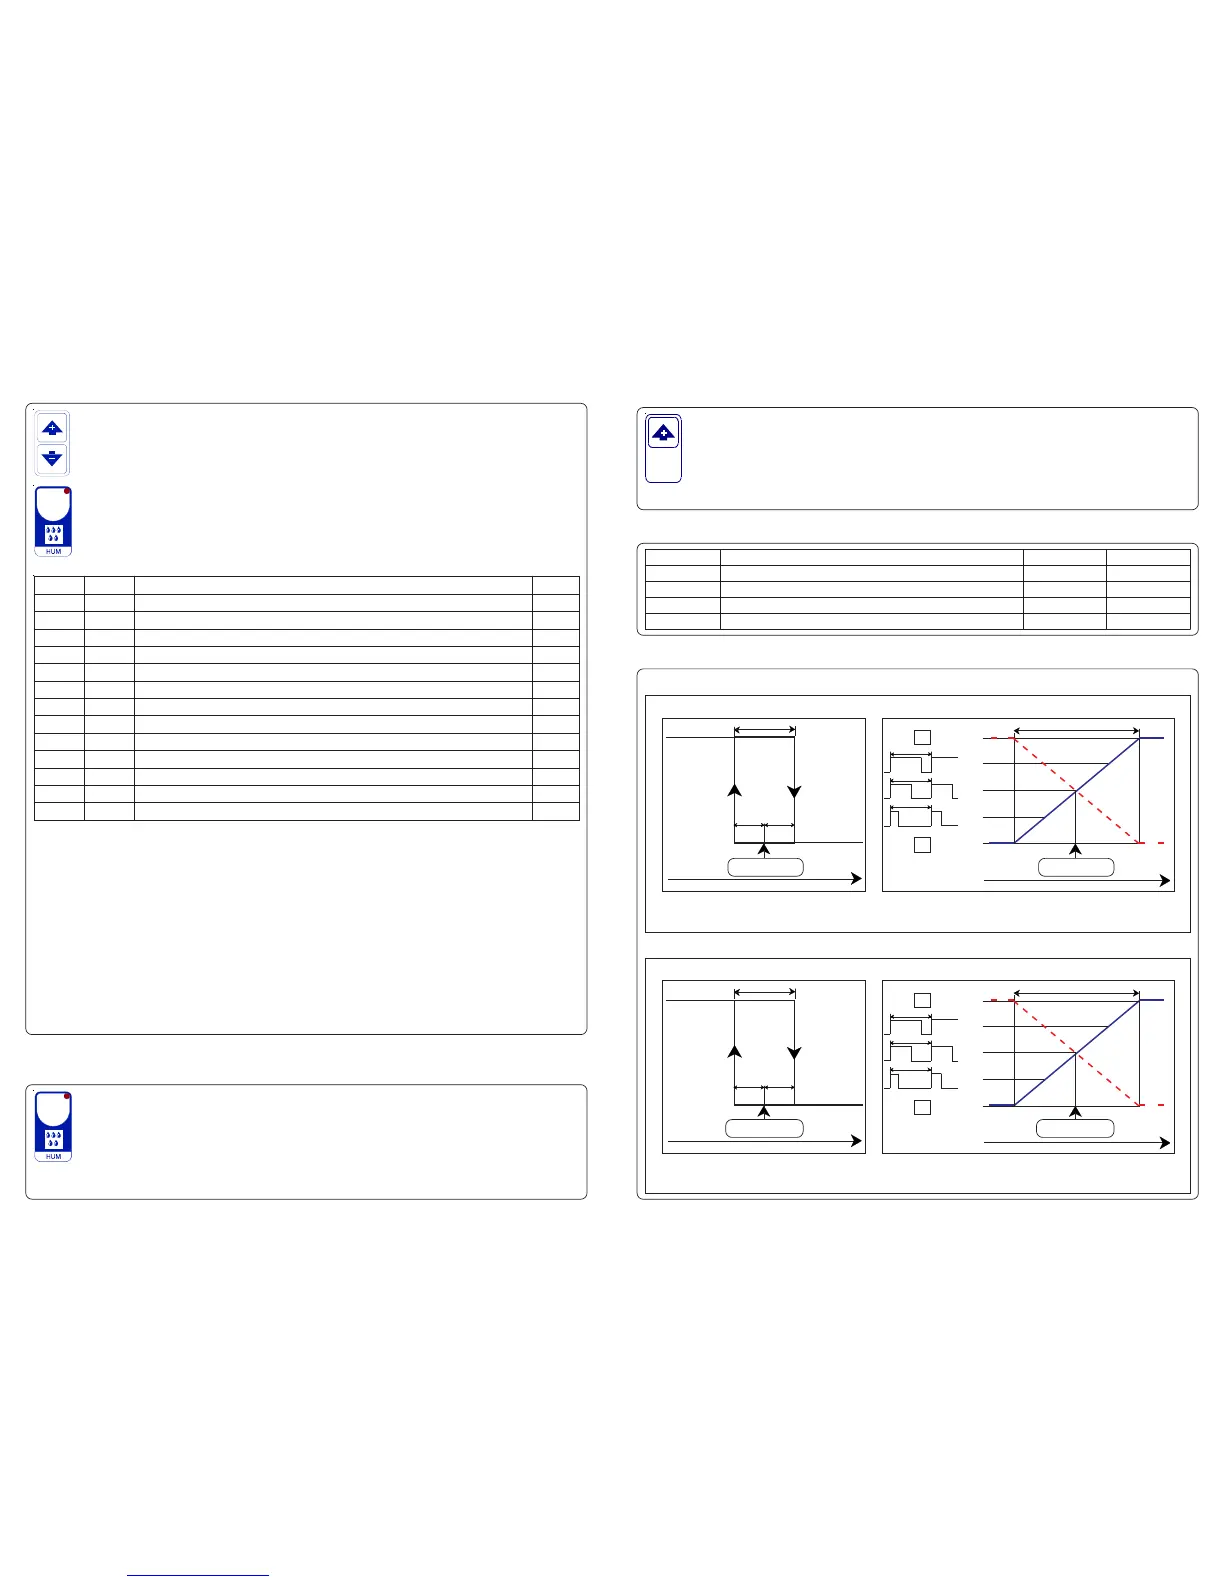
HUMIDITY
CYC.H = 1"...999" (Proportional mode)
100%
HUMIDITY
75%
50%
25%
0%
CYC.H= 0" (On-Off mode)
ON ON
CYC.t
CYC.t
ON ON
CYC.t
OFF
ON
ON
ON
*1 Relay's operating computed
with 0.1 sec. resolution and
with minimum duration = min.H
(see COSt).
diF.H
HUMIDITY
diF.H *
HUM
DEHUM
1/2 diF.H 1/2 diF.H
* In the case of proportional working (CYC.H different from 0") we suggest to set:
diF.H = 2.0° CYC.H= = 120" min.H= = 5"
ON
OFF OFF
ON
DEHM
HUM
Set.H + rEL.H Set.H + rEL.H
ON HUM
OFF DEHM
OFF HUM
ON DEHM
*1 Relay's output in the
time
TEMPERATURE
CYC.t = 1"...999" (Proportional mode)
100%
TEMPERATURE
75%
50%
25%
0%
CYC.t = 0" (On-Off mode)
ON ON
CYC.t
CYC.t
ON ON
CYC.t
OFF
ON
*1 Relay's output in the time
ON
ON
Set.t + rEL.t
*1 Relay's operating computed
with 0.1 sec. resolution and
with minimum duration = min.t
(see COSt).
diF.t
TEMPERATURE
diF.t *
HEAT
COOL
1/2 diF.t 1/2 diF.t
Set.t + rEL.t
* In the case of proportional working (CYC.t different from 0") we suggest to set:
diF.t = 2.0° CYC.t= = 120" min.t= = 5"
ON
OFF OFF
ON
COOL
HEAT
OFF HEAT
ON COOL
ON HEAT
OFF COOL
.pmaL etatS yaleR°N stcanoC
TAEH
nOtaeH 1 4-3
LOOC
nOlooC 1 5-4
MUH
nOmuH 2 7-6
MHED
nOmheD 2 8-7
STATE INDICATION LAMPS
PRESET PROGRAMS (Bootstrap)
This processor is already programmed with the following (variable) settings.
To return to these settings at any time you may:
Power off the processor, press HUM key and keep it pressed giving power on:
boot message will be displayed (release now HUM key).
SEt.t=20.0° SEt.H=80.0H.
The COSt values are shown in COSt Programming.
 Loading...