1.
Write
down
the
locaiiP
address
of
your
camera
..
To
find this,
open
IP Cam-
era Tools (Mac users open IP Scanner Tool) and
it
will
display
the
IP address
of
the
camera as an http:// address (i.e.
the
numbers will appear in sets such
as 192.168.1.10).
2. Log
onto
your
camera and
go
to
"Bas1c
Network
Settings" and change
the
HTTP
Port
to
8090 (this is a recommended number,
but
you can use other
numbers as well). The default
port
is
80
but
you
do
not
want
to
use this
number
because
it
is a public
port
and can cause security problems. Port
number
8090 is generally
not
used and is therefore safe
to
use. Note:
if
you
have
more
than one camera,
the
port
numbers
should ascend accordingly,
i.e. 8090, 8091, 8092
etc
.)
3.
-
~
1::-
...
7:-•.~
::o..ke.Bt'trw,~;-
Next write down your router's internet IP address. The easiest
way
to
find this is
to Google:
"What
is
my
IP address" and go
to
the
first link
wh1ch
pops
up
which
is
usually whatismyipaddress.com. This address is
hO\N
the world sees your
router's identity,
wh1ch
means
if
you want
to
be able
to
access you camera from
anywhere but home, you will need
to
know
this address.
4. The fourth step
is
to
log into your wireless router.
To
do
this, enter the
IP
address
of
your router
1nto
your
brO\Nser
and then enter
the
usemame and password
when prompted. If you are unsure
of
your router's name and password, refer
to
your router manual
or
view
a list
of
the
most
popular default router
IP
addresses,
usernames and passwords by Googling "Default Router Passwords and
IP
M
5.
dresses" and you will
get
that
1nfo
for almost
all
routers,
Go
through
the
options on you router until you find the "Virtual Server:·" Port
Forwarding;·
or
"port
Mapping" option.
(Your
router's manual will
expla1n
th1s
as
well). Once you're able
to
access the Port Forwarding
opt1ons
for your router,
you will then need
to
set the
LocaVPrivate
IP address
to
your camera's locaiiP ad-
dress.
set
the inbound port
to
8090 and the outbound port
to
8090
(again,
these
are recommended numbers, you can change port numbers later) Make sure the
type
is either
"Both"
or
"TCP.
Save
the configuration.
Now
you can log
1n
to
your camera from outside
of
your network by entering your
IP
address and port, for example if your router's IP address
1s
69
.191.169.
178
and
you
set
the camera's port
to
8090 then
type
in 69.191.169.178:8090
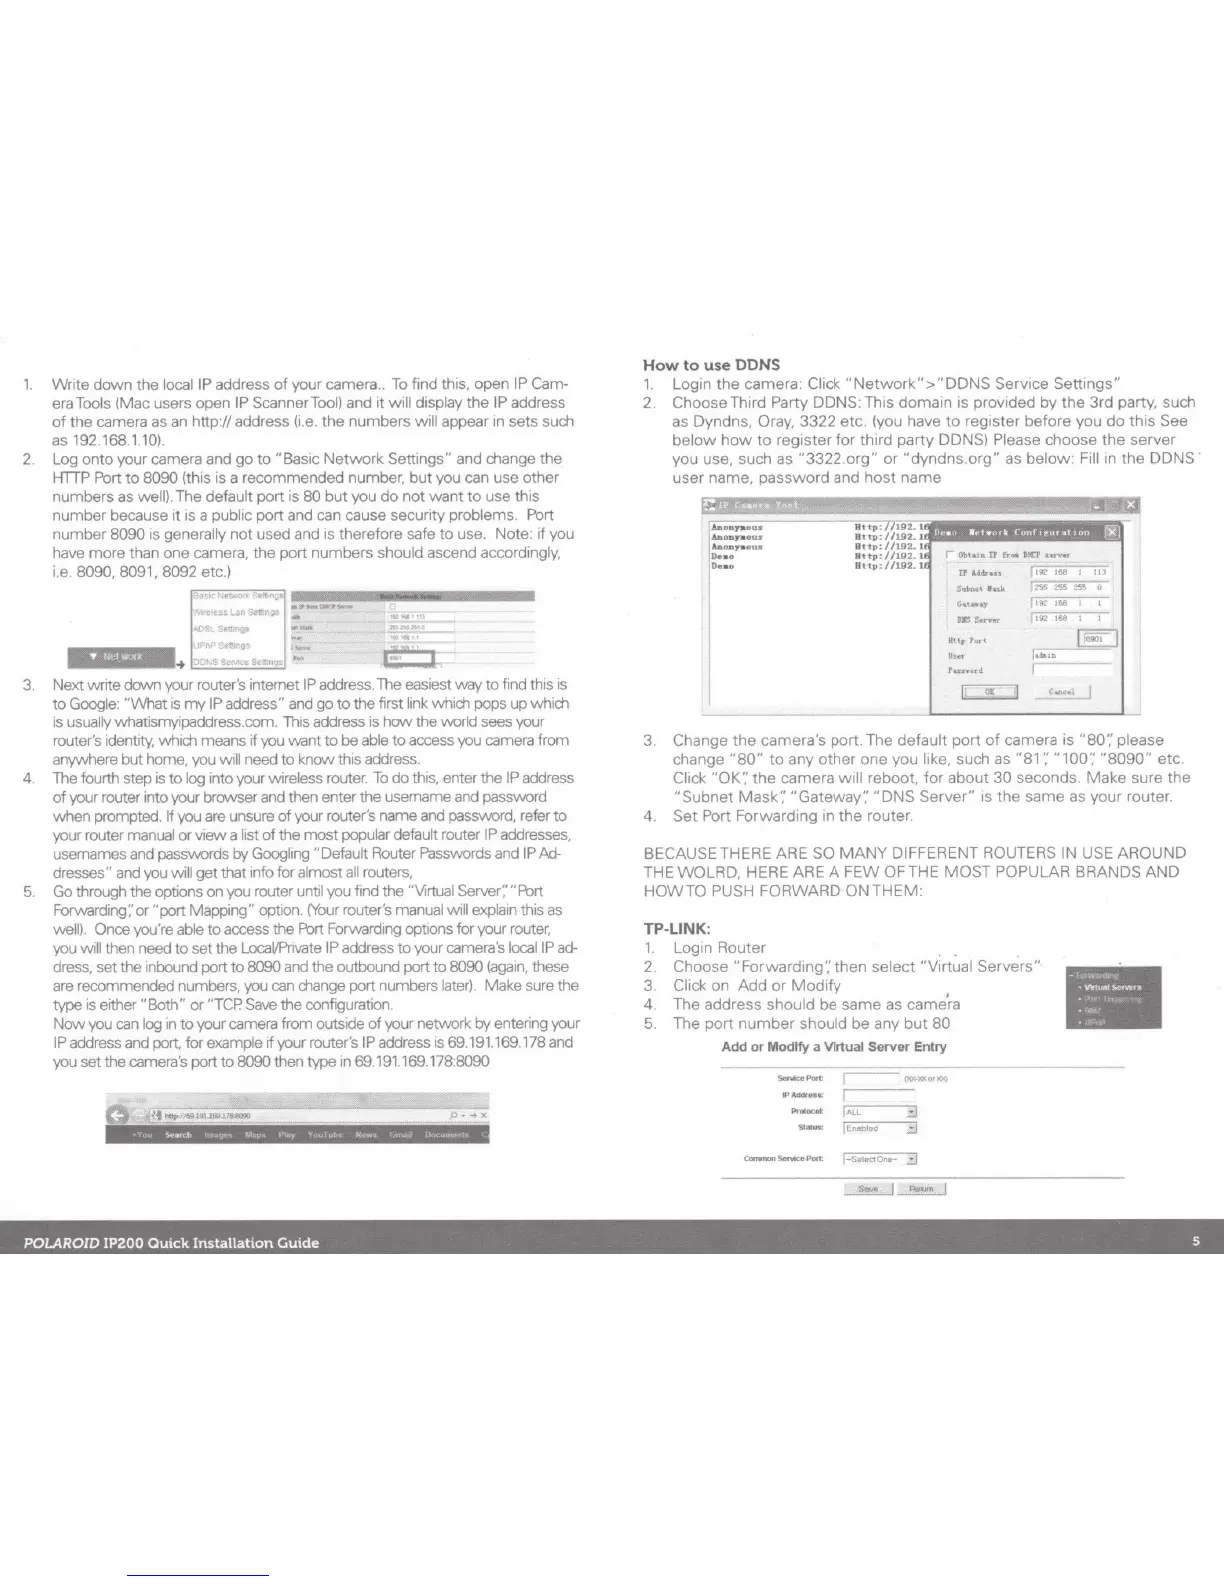
How
to
use
DONS
1.
Login
the
camera
: Click
"Network">"DDNS
Service
Settings"
2.
Choose
Th1rd
Party
DONS
: This
domain
is provided
by
the
3rd
party
, such
as Dyndns, Oray,
3322
etc.
(you have
to
register
before
you
do
this
See
below
how
to
reg1ster
for
third
party
DDNS) Please
choose
the
server
you
use, such
as
"3322.org"
or
"dyndns.org"
as
below:
Fill in
the
DONS
user
name,
password
and
host
name
1
Anooyaous
iAD
onyaous
bon,..
au•
Deao
Deao
SltLMI. lt:.lr.
'-'••Y
DliS
S.r.-v
Mup
tort
u,n
tuntri
!r
'()t
II!!::
1&8
1 I
192
1&8
I 1
I
18i01
l
f•dlun
Jl
_.!.-.r~
3.
Change
the
camera's
port.
The
default
port
of
camera is "80'.' please
change
"80"
to
any
other
one
you like, such as "81
·;
"100','
"8090"
etc
Click
"OK';
the
camera
will
reboot,
for
about
30
seconds.
Make
sure
the
"Subnet
Mask';
"Gateway·;
"DNS
Server"
1s
the
same
as
your
router.
4.
Set
Port Forward1ng
1n
the
router
.
BECAUSE THERE ARE SO
MANY
DIFFERENT ROUTERS IN USE
AROUND
THE
WOLRD,
HERE ARE A
FEW
OF
THE
MOST
POPULAR
BRANDS
AND
HOWTO
PUSH
FORWARD
ONTHEM:
TP-LINK:
l Login
Router
. .
2
Choose
"Forwarding','
then
select
"Virtual
Servers"
·
3 Click
on
Add
or
Modify
I
4
The
address
should
be
same
as
camera
5.
The
port
number
should
be
any
but
80
Add
or
Modify
a VIrtual
Server
Entry
I'
Address:
Prlllocot
jALL
::::J
Status:
r::1
E-o<lbc-:-le-:d--::J-,
•
POLAROID
IP200
Quick
Installation
Guide
5
 Loading...