EasyManua.ls Logo

Polisport Koolah User Manual

Polisport Koolah
36 pages
To Next Page IconTo Next Page
Page #1 background imageLoading...
Page #1 background image
Rear-Mounted Bicycle Child Carrier
INSTRUCTION MANUAL FOR ASSEMBLING A REAR-MOUNTED CARRIER
FOR BICYCLE ON A RACK MOUNTING SYSTEM
EN. REAR-MOUNTED BICYCLE CHILD CARRIER - RACK MOUNTING SYSTEM
ES. SILLA INFANTIL PARA BICICLETA - MONTAJE EN PORTAEQUIPAJES TRASERO
FR. SIÈGE ARRIÈRE DE VÉLO POUR ENFANT - SYSTÈME SUR PORTE-BAGAGE
EN. COMPLIES WITH ASTM F1625 | CPSIA 2008 | MAXIMUM CHILD WEIGHT 40lbs-18kg
ES. EN CUMPLIMIENTO DE ASTM F1625 | CPSIA 2008 | PESO MÁXIMO DEL NIÑO 40lbs-18kg
FR. CONFORME AUX NORMES ASTM F1625 | CPSIA 2008 | POIDS MAXIMAL DE L’ENFANT 40 lb -18 kg
HARNESS TO BICYCLE FRAME
ADJUSTABLE CARRIER ACCORDING
TO ANY RACK SIZE
EN. PLEASE READ THIS MANUAL. THE INFORMATION PROVIDED IS FUNDAMENTAL TO YOUR SAFETY AND THE SAFETY OF YOUR CHILD.
IT IS RECOMMENDED A PROFESSIONAL BICYCLE SHOP TO ASSEMBLE AND INSTALL YOUR CARRIER TO THE BICYCLE
ES. LEA ATENTAMENTE ESTE MANUAL. ESTA INFORMACIÓN ES FUNDAMENTAL PARA SU SEGURIDAD Y LA SEGURIDAD DEL NIÑO.
LE RECOMENDAMOS QUE ENCARGUE EL MONTAJE Y LA INSTALACIÓN DE LA SILLA A UN ESTABLECIMIENTO ESPECIALIZADO EN BICICLETAS
FR. VEUILLEZ LIRE CE MODE D’EMPLOI. CES INFORMATIONS SONT IMPORTANTES POUR VOTRE SÉCURITÉ ET CELLE DE VOTRE ENFANT.
IL EST CONSEILLÉ DE DEMANDER À UN MAGASIN SPÉCIALISÉ EN VÉLOS DE FAIRE LE MONTAGE ET D’INSTALLER LE SIÈGE SUR VOTRE VÉLO
RACK HOLDS AT LEAST
59,5lbs ( 27 KG ) LOAD
IN ACCORDANCE WITH
ISO11243
3-POINT ADJUSTABLE SAFETY HARNESS
QUICK RELEASE BUTTON
CHILDPROOF SAFETY BUCKLE
3
®
REGISTERED
26”/ 27,5
28” / 29"
E-BIKE
FITTING
REGISTERED
DESIGN
Question and Answer IconNeed help?

Do you have a question about the Polisport Koolah and is the answer not in the manual?

Polisport Koolah Specifications

General IconGeneral
BrandPolisport
ModelKoolah
CategoryBicycle Accessories
LanguageEnglish

Summary

Fitting the Carrier on the Bicycle

Prepare Attachment Brackets

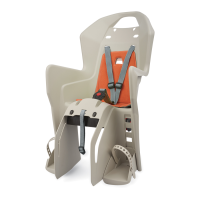
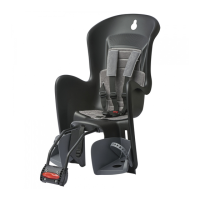
Unscrew QST knob, lift release button, and open attachment brackets wider than the rack.

Initial Securing on Rack

Place carrier on rack, fasten QST knob, and check attachment bracket security.

Final Carrier Securing

Fully fasten QST knob and ensure release button is properly held for secure attachment.

Center of Gravity Positioning

Position carrier's center of gravity relative to rear wheel axle for safety.

Seating the Child on the Carrier

Child Harness Securing

Extend safety harness, adjust straps, open buckle, and secure child snugly.

Footrest Height Adjustment

Release and lift footrest to adjust height for child's comfort and fit.

Footrest Reattachment

Reattach footrests by engaging top pin and pushing down to lock clips into slots.

Footrest Strap Adjustment

Adjust footrest straps to secure child's feet safely without causing discomfort.

How to Remove Your Carrier

Detach Harness to Frame

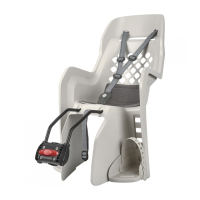
Unfasten the harness connecting the carrier to the bicycle frame.

Unfasten Rack Attachment

Unfasten QST knob and lift release button to open attachment brackets.

Carrier Removal

Pull the carrier to safely remove it from the bicycle rack.

Caution Notes

Bicycle and Rider Suitability

Ensure bicycle is in good working order, properly sized, and appropriate for the load.

Child Safety and Weight Limits

Check child's age, sitting ability, and weight against carrier limits.

Riding and Environmental Precautions

Avoid hazardous conditions, ensure proper lighting, and check for interference.

Instructions for Use

Legal and Age Requirements

Comply with local laws, rider must be at least 16 years old.

Child Securing and Monitoring

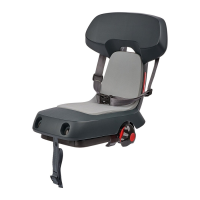
Secure child firmly with belts, check tightness, and do not allow loose items.

Rider and Child Safety Gear

Ensure both rider and child wear approved bicycle helmets.

Care and Maintenance

Regular Component Checks

Check mounting system and all components regularly for damage or wear.

Damage and Replacement

Do not use if damaged; contact dealer for correct replacement parts.

Cleaning Instructions

Clean with mild soap and water; avoid abrasive, corrosive, or toxic products.

Warranty Information

Limited Warranty Coverage

Three-year warranty against defects in material and workmanship from original purchase.

Warranty Exclusions

Excludes damage from misuse, accidents, improper assembly, or unauthorized modifications.

Warranty Claim Process

Requires original sales receipt; claims voided by crash, abuse, or modification.

Related product manuals