Audio
Audio setup menu consist of : DOWNMIX, SPDIF OUTPUT, DRC, EQ SETUP, REVERB MODE and MIC SETUP.
Downmix
1. LT/RT : When the disc is played with DOLBY DIGITAL PRO LOGIC stereo
effect, signal decoder will produces 2 channel L (left) and R (right) simulation
effect.
2. STEREO : When playing 5.1 channel disc, the output signal will become
stereo signal through L (left) and R (right).
SPDIF Output
1. OFF : To turn Digital Audio Output OFF.
2. RAW : Select this if connected to Digital Amplifier with Digital Input (COAXIAL or OPTICAL). When playing
disc that has been recorded with Audio DOLBY DIGITAL / DTS format, so Digital signal will out without
modulation process.
3. PCM : Select this if connected to 2 channel Digital Amplifier. When playing the disc that has been
recorded with audio DOLBY DIGITAL format, so Digital signal will be modulated into PCM 2 channel signal
that out from DIGITAL AUDIO Output.
Note : Audio DTS Format can be out in Audio Digital out only if SPDIF OUTPUT is adjusted to RAW.
DRC : Used to adjust the differences between low and high level on audio output. Press navigator “ ” or “ /
” button to enter to DRC option and press navigator “ / ” button to select OFF, 1/4, 2/4, 3/4, FULL, then
press “ / ” button to activate.
EQ Setup : To select frequency response, you can select ROCK, POP, LIVE, DANCE, TECHNO, CLASSIC or
SOFT equalizer. Select NONE, jika anda memilih untuk tidak menggunakan Equalizer. Default/kondisi awal
pilihan Equalizer dari pabrik adalah NONE.
Reverb Mode : To adds different surround effect, you may set the Reverb Mode to the CONCERT, ROOM,
HALL, BATHROOM, CAVE, ARENA or CHURCH surround effect. Select OFF, if you are prefer not use Reverb
Mode effect. OFF is the default manufacture set of the Reverb Mode.
MIC Setup
1. MIC : Used to set MIC terminal option (active or not) of the unit. If you are select OFF, MIC terminal will
disable although you are connecting a Microphone to the MIC terminal. Select ON to activate MIC terminal.
Select OFF to disable it.
2. MIC Volume : Used to set the Microphone Volume. MIC Volume can be set from 0 until 10.
3. Echo Level : Used to set the Echo effect. Echo level can be set from 0 until 10.
Video
Video setup menu consist of : COMPONENT, TV MODE, SHARPNESS, BRIGHTNESS and CONTRAST.
Component
1. S-VIDEO : Produces S-VIDEO signal for S-VIDEO TV input.
2. YPbPr : Produces YPbPr video component signal for YPbPr TV input.
TV Mode : If you using TV with 2x horizontal scanning system, you can choose
P-SCAN to get more smooth picture.
Sharpness : To set the pictures sharpness level. Generally, excessive sharpness
adding will reduce the picture detail. There are 3 Sharpness option setting :
HIGH, MEDIUM and LOW.
Brightness : To set the pictures brightness level. You can set brightness level from -20 until +20.
Contrast : To set the pictures contrast level (differences between black and white color). You can set contrast
level from -16 until +16.
Screen Saver : When the player without activity or does not receive signal for 4 minutes, Screen Saver will
appear. This facility is used to prevent the damage of the display screen. If Screen Saver has comes out for
more than 6 minutes, the player will automatically set to standby condition. Select ON to activate SCREEN
SAVER. And select OFF to disable it.
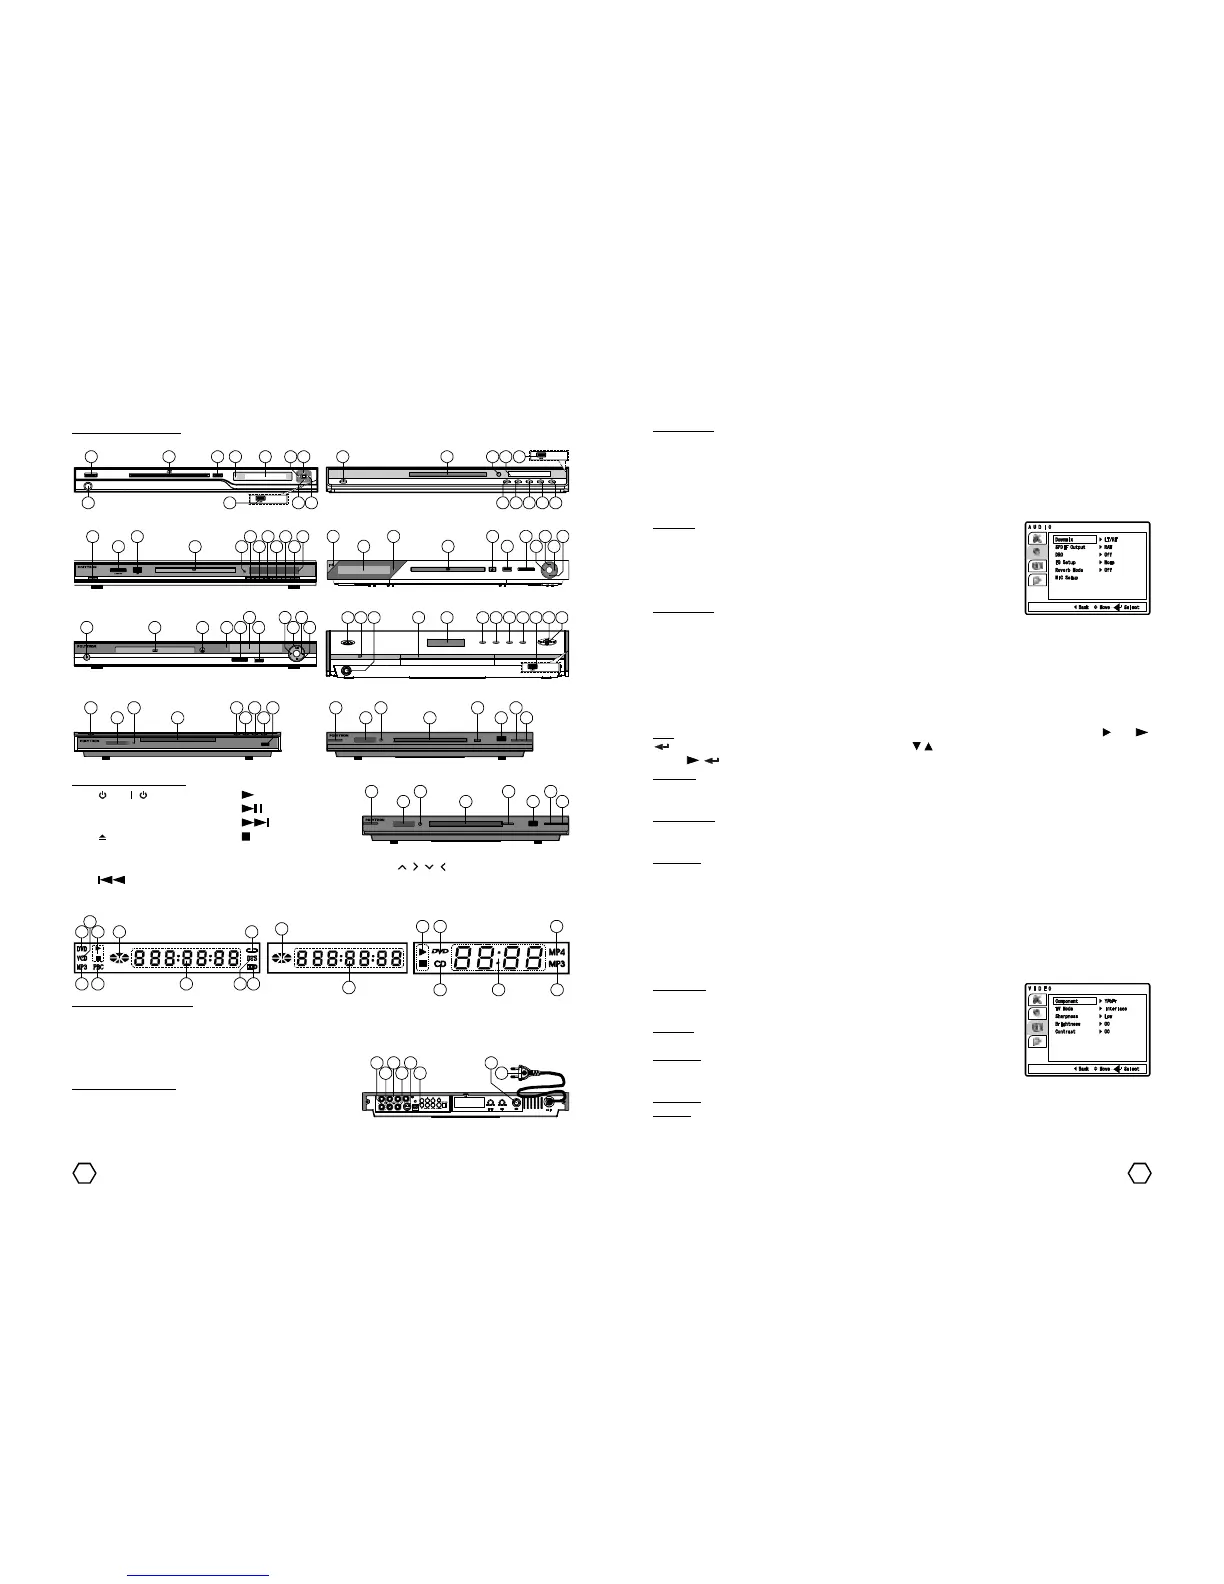
Front Panel Model 3 Front Panel Model 4
Front Panel Model 5 Front Panel Model 6
LED indicator description :
1. DVD 3. Play/Pause 5. REPEAT 7. DTS 9. PBC 11. MP4
2. VCD/CD 4. Disc Play 6. DOLBY DIGITAL 8. Track/Chapter/Time 10. MP3 12. CD
1 3 4
 Loading...