EasyManua.ls Logo

Porter-Cable OMNIJIG 5116 - User Manual

Porter-Cable OMNIJIG 5116
28 pages
Print Icon
To Next Page IconTo Next Page
Loading...
ESPANOL:
PAGINA
29
FRANQAISE
:
PAGE
57
Instruction
manual
OMNIJIG®
Dovetail
Machines
ACCESSORY
TEMPLETS:
~
For
'
: "Hand Dovetails
/f)!„'LS
16"
(PINS) Templet
1
1
0
16"
(TAILS)
Templet
"i
IS
24"
(PINS) Templet
.'Mb-) 24
1
(TAILS) Templet
MODELS
120
16"
Templet
:20
24"
Templet
•< !
2'
lb" Templet
'121 2-i"
Templet
ikuS
:>12?
16"
lemplet
71
22
24'
Templet
For,
Half-Blind
Dovetails
For '
.'"
Tapered
Sliding Dovetails
For V and
*"
Adjustable Through
Dovetails
MODEL
5116
16"
OMNIJIG*
includes
5117
Va"
Half-Blind
Dovetail
Templet
MODEL 71 16
24"
OMNIJIG® includes
7117
1
/
2
"
Half-Blind
Dovetail
Templet
S3
For Box
Joints
MODELS
si
23
16'
Templet
712.3
24"
Templet
fo
iearn
more
about Porter-Cable
visit our
website at:
http://www.porter-cable.com
PROFESSIONAL POWER TOOLS
IMPORTANT
Please
make certain
that the
person
who
is
to
use
this
equipment
carefully reads
and
understands
these
instructions
before
starting
operations.
The Model
and Serial No. plate
is located
on the main
housing of
the
tool.
Record these
numbers in
the
spaces
below
and
retain for future
reference.
Model No.
Type.
Serial No.
Part No.
888381-794
Question and Answer IconNeed help?

Do you have a question about the Porter-Cable OMNIJIG 5116 and is the answer not in the manual?

Summary

IMPORTANT SAFETY INSTRUCTIONS

GENERAL OPERATIONAL SAFETY

Covers work area, environment, attire, alertness, and tool handling.

PERSONAL PROTECTIVE EQUIPMENT

Emphasizes wearing safety glasses and ear protection.

TOOL HANDLING AND STORAGE

Covers cord care, securing work, tool maintenance, and proper storage.

OPERATIONAL HAZARDS

Addresses electric shock, unintentional starting, and damaged parts.

ADDITIONAL SAFETY RULES

SECURE WORK AND EQUIPMENT

Ensure the OMNIJIG® and workpiece are securely anchored to prevent movement.

ROUTER OPERATION SAFETY

Covers cord safety, keeping hands clear, firm grip, and motor stopping.

TEMPLET AND MATERIAL SAFETY

Emphasizes secure templets and caution with treated wood.

REPLACEMENT PARTS

USE IDENTICAL REPLACEMENT PARTS

When servicing, always use identical replacement parts for safety and performance.

FOREWORD

OMNIJIG APPLICATIONS AND CAPABILITIES

Describes the OMNIJIG®'s use for creating various dovetail and sliding joints.

PREPARING OMNIJIG

SECURE BENCH OR STAND MOUNTING

Mount the OMNIJIG® securely to a sturdy bench or stand to prevent movement.

ADJUSTING CLAMPS FOR WORKPIECES

Adjust clamps by turning nuts to secure boards for dovetailing.

ADJUSTING TEMPLET POSITION

Position templets using spacers and rod nuts for precise alignment.

1;2 HALF-BLIND DOVETAILS

ACCESSORIES FOR 1;2 HALF-BLIND DOVETAILS

Lists the specific templets, bits, and guides needed for 1/2" half-blind dovetails.

OMNIJIG SETUP FOR 1;2 HALF-BLIND DOVETAILS

Steps to set up the OMNIJIG® for cutting 1/2" half-blind dovetails.

ROUTER SETUP FOR 1;2 HALF-BLIND DOVETAILS

Instructions for preparing the router, including bit and templet guide installation.

IDENTIFYING DRAWER PARTS

USING SCRAP LUMBER FOR INITIAL CUTS

Recommends using scrap lumber for initial cuts to check adjustments and fits.

CLAMPING DRAWER PARTS

CLAMPING DRAWER SIDE PIECES

Instructions for temporarily clamping the drawer side piece.

CLAMPING DRAWER FRONT PIECES

Instructions for placing and clamping the drawer front piece.

POSITIONING THE DOVETAIL TEMPLET

Guides on positioning the templet for accurate dovetail cuts.

ROUTING DOVETAILS

SPECIFIC FIRST CUT DIRECTION

Specifies the direction for the first cut to prevent edge chipping.

ROUTING AROUND TEMPLET OUTLINE

Describes the process of moving the router around the templet and slots.

ADJUSTING DOVETAIL JOINT FIT

ADJUSTING CUT DEPTH FOR LOOSE JOINTS

How to increase cut depth for loose joints.

ADJUSTING CUT DEPTH FOR TIGHT JOINTS

How to decrease cut depth for tight joints.

CHECKING AND ADJUSTING DRAWER FRONT;SIDE RELATIONSHIP

Steps to check and adjust the fit between drawer front and side.

ROUTING FOR SYMMETRICAL PIN PLACEMENT

Instructions for routing the opposite end for symmetrical pin placement.

1;4 HALF-BLIND DOVETAILS

ACCESSORIES FOR 1;4 HALF-BLIND DOVETAILS

Lists the specific templets, bits, and guides needed for 1/4" half-blind dovetails.

OMNIJIG AND ROUTER SETUP FOR 1;4 HALF-BLIND DOVETAILS

Setup instructions for OMNIJIG® and router for 1/4" half-blind dovetails.

CLAMPING AND ROUTING 1;4 HALF-BLIND DOVETAILS

Guidance on clamping parts and performing the routing for 1/4" half-blind dovetails.

1;2 AND 1;4 HALF-BLIND RABBETED DOVETAILS

ACCESSORIES FOR RABBETED DOVETAILS

Lists accessories needed for rabbeted dovetails, depending on size.

OMNIJIG AND ROUTER SETUP FOR RABBETED DOVETAILS

Setup procedures for OMNIJIG® and router for rabbeted dovetails.

PREPARING DRAWER FRONT FOR RABBETED DOVETAILS

Instructions for preparing the drawer front with a rabbet cut.

CLAMPING AND ROUTING RABBETED DOVETAILS

Steps for clamping parts and routing rabbeted dovetails.

1;2 HAND DOVETAILS (2 SPACING)

ACCESSORIES FOR 1;2 HAND DOVETAILS

Lists templets, bits, and guides for 1/2" hand dovetails with 2" spacing.

OMNIJIG AND ROUTER SETUP FOR HAND DOVETAILS

Setup for OMNIJIG® and router, using separate templets for pins and tails.

MATERIAL WIDTH GUIDELINES FOR HAND DOVETAILS

Discusses ideal material widths and adjustments for centering dovetails.

ROUTING TAIL BOARDS FOR HAND DOVETAILS

Detailed steps for routing the tail boards for hand dovetails.

ROUTING PIN BOARDS FOR HAND DOVETAILS

USING SCRAP MATERIAL AS BACKUP FOR PINS

Instructions on using scrap material to prevent tear-out when routing pin boards.

POSITIONING AND CLAMPING PIN BOARDS

Steps for positioning and securing the pin board for routing.

ROUTING THE PINS

How to perform the routing operation for the pins.

HANDLING PARTIAL PINS ON NON-IDEAL WIDTHS

Procedures for dealing with partial pins on non-ideal material widths.

ADJUSTABLE THROUGH DOVETAILS

ACCESSORIES FOR ADJUSTABLE THROUGH DOVETAILS

Lists necessary accessories for cutting adjustable through dovetails.

OMNIJIG SETUP FOR TAIL BOARD

Steps to prepare the OMNIJIG® for cutting the tail board (female dovetails).

SPACER AND NUT POSITIONING FOR TAIL BOARD

Guide on positioning spacers and rod nuts for templet alignment.

CUTTING TAIL BOARD (FEMALE DOVETAIL)

PLACING AND SECURING THROUGH DOVETAIL TEMPLET

Instructions for placing and securing the through dovetail templet.

CLAMPING THE TAIL BOARD FOR CUTTING

Steps for clamping the tail board in position for routing.

SETTING TEMPLET FORKS FOR SPACING

How to loosen, slide, and tighten templet forks for desired spacing.

ROUTING THE TAILS

USING GUIDE SLOTS FOR TAIL ROUTING

Instructions on how to carefully rout tails using the guide slots in each fork.

ADJUSTING DEPTH OF CUT FOR TAILS

How to set the depth of cut for the dovetail cutter.

PREPARING OMNIJIG FOR PIN BOARD

REPOSITIONING TEMPLET FOR MALE DOVETAILS

Steps to reposition the templet for cutting male dovetails (pins).

ADJUSTING STOP BAR FOR MALE DOVETAILS

How to adjust the left stop bar for pin board setup.

CUTTING PIN BOARD (MALE DOVETAIL)

PLACING AND CLAMPING PIN BOARD FOR CUTTING

Steps for placing and securing the pin board for routing.

CHANGING ROUTER BITS FOR MALE DOVETAILS

Instructions on changing bits for cutting male dovetails.

ADJUSTING DEPTH OF CUT FOR MALE DOVETAILS

How to set the router bit depth for cutting male dovetails (pins).

INSPECTING FIT OF PIN AND TAIL BOARDS

ADJUSTING PINS FOR A TIGHTER FIT

How to make pins smaller by turning bracket rod nuts clockwise.

ADJUSTING PINS FOR A LOOSER FIT

How to make pins larger by turning bracket rod nuts counterclockwise.

REVISING PIN BOARDS UNTIL DESIRED FIT IS OBTAINED

Advice to cut new pin boards until the desired fit is achieved.

1;2 BOX (FINGER) JOINTS

ACCESSORIES FOR 1;2 BOX JOINTS

Lists the specific templets, bits, and guides for 1/2" box joints.

OMNIJIG SETUP FOR BOX JOINTS

Setup instructions for the OMNIJIG® for cutting box joints.

POSITIONING THE BOX JOINT TEMPLET

Steps to position the box templet accurately on the jig.

CUTTING BOX JOINTS

MARKING BOARD CENTER FOR BOX JOINTS

How to mark the center of the board for alignment with the templet.

ROUTING THE BOX JOINTS

Detailed instructions for carefully routing the box joints.

ROUTING THE OTHER END OF THE BOARD

Steps to route the opposite end of the board for complete box joints.

TAPERED SLIDING DOVETAIL

ACCESSORIES FOR TAPERED SLIDING DOVETAILS

Lists the templets, bits, and guides for tapered sliding dovetails.

ROUTER SETUP FOR TAPERED SLIDING DOVETAILS

Instructions for router setup, including depth adjustment.

TAPERED SLIDING TEMPLET SAFETY

Notes on the two-slot tapered sliding templet and safety precautions.

OMNIJIG SETUP FOR MALE DOVETAIL

Steps to prepare the OMNIJIG® for cutting male dovetails.

CUTTING MALE DOVETAIL

ROUTING THE MALE DOVETAIL

Instructions for routing the male dovetail using the templet guide.

PREPARING OMNIJIG FOR FEMALE DOVETAIL

Steps to prepare the OMNIJIG® for cutting female dovetails.

CUTTING FEMALE DOVETAIL

ROUTING THE FEMALE DOVETAIL

How to perform the routing operation for female dovetails.

INSPECT FIT OF MALE AND FEMALE DOVETAILS

ADJUSTING DEPTH FOR TIGHT MALE FIT

Reduce router bit depth if male board tightens before full seating.

ADJUSTING DEPTH FOR LOOSE MALE FIT

Increase router bit depth if male board is too loose.

IF MALE DOVETAIL IS OFF CENTER

CENTERING THE MALE BOARD WITH TEMPLET

Adjust templet using rod nuts to center the male board between slots.

TOOL CLEANING AND MAINTENANCE

CLEANING PLASTIC AND STEEL PARTS

Clean plastic parts with soft cloth; coat steel parts with wax.

OBTAINING TECHNICAL SUPPORT

Advice on information needed when contacting for technical questions.

ACCESSORIES LIST

RECOMMENDED ACCESSORIES FOR OMNIJIG

Lists accessories tested and recommended for use with the OMNIJIG®.

PORTER-CABLE LIMITED ONE YEAR WARRANTY

WARRANTY COVERAGE, REPAIR, AND EXCLUSIONS

Details the one-year warranty, repair/replacement process, and exclusions.

DURATION OF IMPLIED WARRANTIES

Duration of implied warranties of merchantability and fitness.

WARRANTY SERVICE INFORMATION

Contact information for warranty performance inquiries.

Overview

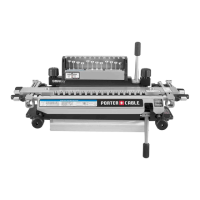
The Porter-Cable OMNIJIG® is a professional power tool designed for creating various types of woodworking joints, primarily dovetails and box joints. It is used in conjunction with a Porter-Cable router, templet guides, and router bits to produce precise and strong corner joints for drawers and boxes, as well as sliding joints for shelves.

Function Description

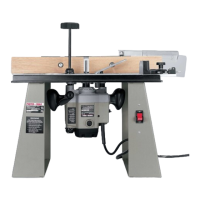
The OMNIJIG® facilitates the routing of different joint types by providing a stable clamping system for workpieces and a templet guide for the router. The user secures the wood pieces in the jig, positions the appropriate templet, and then guides a router with a specific bit along the templet's contours to cut the desired joint. This process ensures consistent and accurate cuts, making it suitable for both hobbyists and professional woodworkers.

Important Technical Specifications

The OMNIJIG® comes in two main models:

  • Model 5116 (16"): Accommodates stock up to 16" wide and 5/16" to 1" thick.
  • Model 7116 (24"): Accommodates stock up to 24" wide and 5/16" to 1" thick.

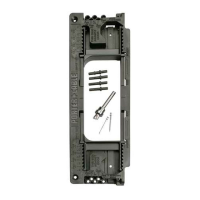
Accessory Templets and Bits: The manual lists several accessory templets and corresponding router bits for different joint types:

  • 1/2" Half-Blind Dovetails:

    • Templets: Model 5117 (16"), Model 7117 (24")
    • Dovetail Bit: 43640 (High Speed Steel) or 43705 (Carbide Tipped)
    • Templet Guide: 42046 (5/8")
    • Lock Nut: 42237
  • 1/4" Half-Blind Dovetails:

    • Templets: Model 5120 (16"), Model 7120 (24")
    • Dovetail Bit: 43639 (High Speed Steel)
    • Templet Guide: 42054 (5/16")
    • Lock Nut: 42237
  • 1/2" Hand Dovetails (2" Spacing):

    • PINS Templets: Model 5118 (16"), Model 7118 (24")
    • TAILS Templets: Model 5119 (16"), Model 7119 (24")
    • Dovetail Bit: 43640 (High Speed Steel) or 43705 (Carbide Tipped)
    • Templet Guide: 42046 (5/8")
    • Lock Nut: 42237
  • Adjustable Through Dovetails:

    • Templets: Model 5122 (16"), Model 7122 (24")
    • For 3/4" Dovetails (stock up to 13/16" thick):
      • Dovetail Bit: 43775 (Carbide Tipped, 1/2" Shank) or 43774 (Carbide Tipped, 1/4" Shank)
      • Straight Bit: 43303 (High Speed Steel) or 43300 (Carbide Tipped)
      • Templet Guide: 42046 (5/8")
      • Lock Nut: 42237
    • For 1/2" Dovetails (stock up to 1/2" thick):
      • Dovetail Bit: 43640 (High Speed Steel) or 43705 (Carbide Tipped)
      • Straight Bit: 43328 (Carbide Tipped, 9/16" with 1/2" O.D. Bearing)
      • Templet Guide: 42046 (5/8")
      • Lock Nut: 42237
  • 1/2" Box Joints:

    • Templets: Model 5123 (16"), Model 7123 (24")
    • Straight Bit: 43321 (High Speed Steel) or 43318 (Carbide Tipped)
    • Templet Guide: 42046 (5/8")
    • Lock Nut: 42237
  • Tapered Sliding Dovetails:

    • Templets: Model 5121 (16"), Model 7121 (24")
    • Dovetail Bit: 43640 (High Speed Steel) or 43705 (Carbide Tipped)
    • Templet Guide: 42046 (5/8")
    • Lock Nut: 42237

The OMNIJIG® base includes two clearance holes for 3/8" dia. bolts for secure mounting to a workbench or stand.

Usage Features

The OMNIJIG® is designed for versatility and precision in woodworking joinery. Key usage features include:

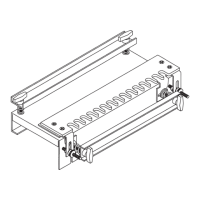
  • Secure Clamping System: The jig features front and top clamps (items 2 and 3 in Fig. 2) with clamp nuts (item 11) and clamping levers & knobs (item 13) to securely hold workpieces. The clamp nuts can be adjusted to maintain uniform clamping pressure.

  • Adjustable Templet Location: The front-to-back positioning of the templets (item 4) is adjustable using spacers (item 14) and rod nuts (item 15), allowing for fine-tuning of the templet position for different joint requirements.

  • Stop Bars: The jig incorporates top and front stop bars (items 6, 7, 8, 9) with locking screws (item 10) to accurately position workpieces for routing.

  • Router Setup: The manual provides detailed instructions for setting up the router, including inserting the correct templet guide and dovetail bit, and adjusting the bit projection for specific joint types (e.g., 19/32" for 1/2" half-blind dovetails, 5/8" for 1/4" half-blind dovetails).

  • Joint Types: The OMNIJIG® supports a wide range of joint types:

    • Half-Blind Dovetails (1/2" and 1/4"): Primarily used for attaching drawer fronts to sides, where the dovetails are not visible from the front. The process involves clamping drawer side (pin board) and front (tail board) pieces, positioning the templet, and routing. Adjustments for joint tightness (loose or tight) are made by increasing or decreasing the depth of cut, and for overhang by adjusting the templet position.
    • Half-Blind Rabbeted Dovetails (1/2" and 1/4"): Used when the drawer front overlaps the sides. This requires a pre-cut rabbet on the drawer front and separate routing of the front and sides.
    • Hand Dovetails (1/2", 2" Spacing): Designed to produce widely spaced half-blind dovetails and exposed joinery, mimicking traditional hand-cut joints. This involves separate templets for pins and tails, and careful consideration of material width to ensure centered dovetails or to manage partial pins.
    • Adjustable Through Dovetails: Replicates the hand-cut version found on antique furniture. This process involves cutting female dovetails (tails) first, then male dovetails (pins). It requires specific spacer configurations and careful router bit selection (dovetail bit and straight bit). Adjustments for fit are made by turning bracket rod nuts.
    • Box (Finger) Joints (1/2"): Used for strong corner joints in boxes, eliminating the need for nails or screws. This involves using a straight bit and a box joint templet, with careful centering of the board and routing both ends of the material.
    • Tapered Sliding Dovetails: A method for joining shelf boards to sides, common in bookcases and cabinets. The taper allows the male dovetail to slide freely and tighten when seated. This templet has two slots (male and female) requiring careful router operation. The depth of cut controls the tightness of the joint.
  • Safety Precautions: The manual emphasizes several safety rules, including securing the work, keeping hands clear of cutters, maintaining a firm grip on the router, ensuring the motor has stopped before adjustments, and using safety glasses and ear protection. It also warns about toxic preservatives in some wood and the importance of reading all instructions.

Maintenance Features

The OMNIJIG® requires minimal but consistent maintenance to ensure longevity and proper function:

  • Cleaning: All plastic parts should be cleaned with a soft cloth. Solvents should be avoided as they can damage the material.
  • Rust Prevention: Steel parts of the clamp assemblies should be periodically coated with wax to protect against rust.
  • Part Replacement: When servicing, only identical replacement parts should be used.
  • Cord Inspection: Power cords and strain relievers should be inspected periodically and replaced if damaged or worn.
  • Tool Inspection: Tools should be kept sharp and clean. All worn, broken, or lost parts should be replaced immediately. Handles should be kept dry, clean, and free from oil and grease.
  • Warranty: Porter-Cable offers a one-year limited warranty covering defects in workmanship or material. For warranty service, tools should be returned to an authorized service center. The warranty does not cover misuse, abuse, normal wear and tear, or repairs attempted by unauthorized personnel.

The OMNIJIG® is a robust and versatile tool designed to simplify complex woodworking joinery, offering precision and repeatability for a variety of projects.

Porter-Cable OMNIJIG 5116 Specifications

General IconGeneral
BrandPorter-Cable
ModelOMNIJIG 5116
CategoryTools
LanguageEnglish

Related product manuals