EasyManua.ls Logo

POWATEC Expert II - User Manual

POWATEC Expert II
39 pages
Print Icon
To Next Page IconTo Next Page
Loading...
POWATEC GmbH • Rothusstr. 5a • 6331 Hünenberg • Switzerland
www.powatec.com info@powatec.com
Expert II
User manual
M Expert II_V02.04_EN MDS 2020-08

Table of Contents

Question and Answer IconNeed help?

Do you have a question about the POWATEC Expert II and is the answer not in the manual?

Summary

1 Introduction

2 Installation

2.1 Unpacking and Set-up

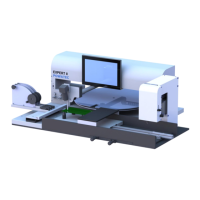
How to unpack and set up the device, check for damage.

2.1.1 Space Requirements

Details on the space needed for the base unit and working area.

2.2 Connections on the Back of the Device

2.3 PCB Fixtures

3 Pressure Settings

3.1 Front of the Device

Instructions for adjusting pressure regulators on the front of the device.

3.2 Back of the Device

Instructions for adjusting the throttle on the back of the device.

4 Ports on the Back of the Device

5 Working Without Software

5.1 Manual Placement

Guide to performing component placement manually using the device controls.

5.1.1 Finepitch Placement

Specific techniques for placing fine-pitch components manually.

5.2 Placement with MPL (Microplacer)

5.2.1 Calibration of the MPL II

Procedure for calibrating the MPL II micro placer system for precise placement.

5.2.2 Settings on the MPL

5.3 Dispenser

5.3.1 Mounting the Dispenser

6 Software-led Project

6.1 Processing Data

Requirements for preparing placement data (list, image) on a PC for import.

6.1.1 Assembly List PCB Reference List

Format and content requirements for the assembly list TXT file.

6.1.2 Circuit Board Picture PCB Image

6.2 Feeder Inventory

6.2.1 Create New Feeders

Steps to create new feeders by selecting templates and defining parameters.

6.2.2 Edit Feeder

How to modify parameters of existing feeders.

6.2.3 Registering Components

6.2.4 Deleting Feeders

6.2.5 Adjusting the Turntable Pick Position

6.3 Creating a New Project on the Expert

6.3.1 Assembly List Import Reference Import

Importing the prepared assembly list from a USB stick.

6.3.2 Reference List

6.3.3 Import Image from PCB PCB Image

6.3.4 Defining the Reference Dots PCB Ref-Dot 1&2

6.3.5 Checking Imported Data PCB Confirmation

6.3.6 Defining Components Component Stock

6.4 Placement

6.4.1 Assigning Mounted Feeders

Selecting and enabling feeders for the placement process.

6.4.2 Placement Sequence

Defining the order of component placement (by parts list or feeders).

6.4.3 Initializing Axes

Reinitializing the placement head axes upon starting the device.

6.4.4 Reading in the Reference Dots 1 & 2

6.4.5 Placement Process

6.4.6 Feeder Change

6.4.7 Placement Completed

7 Network Access

7.1 Acces the Expert II by PC

How to access the Expert II device from a PC over the network.

7.2 Access a Network Resource from the Expert II

8 Accessories

8.1 Turntable

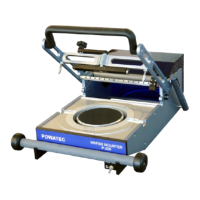
Description of turntable options, operation, and features.

8.2 Traytables

8.3 Feeder Base Plates

8.4 Tape Feeder

8.4.1 Mounting the Tapes

8.5 Tape Strip Feeders

8.6 Glass Prism for Parallax Error Free Placements

8.7 Externer Monitor

9 Mechanical Settings

9.1 Parallelism Adjustments

Procedures for ensuring parallel alignment of components and PCB, including arm guide alignment.

9.2 Smooth Running of the Pantograph Arm

Adjusting rollers for smooth movement of the pantograph arm, including Y-axis adjustment.

9.2.2 Adjusting the X-axis

9.3 Camera Setting

9.3.1 Settings Without a Prism

How to set up the camera without using a prism.

9.3.2 Settings With a Prism

How to set up the camera when using a prism.

9.3.3 Camera Settings MPL

Specific camera settings for the MPL system.

10 Maintenance

10.1 Firmware Update

Instructions for updating the device firmware via USB or network.

10.2 Placer Application Update

Steps to update the placer application software.

11 Troubleshooting

11.1 No Vacuum at the Placement Needle

Steps to diagnose and resolve issues with no vacuum at the placement needle.

11.2 Error Message Waiting for Controller Connection

Procedure to resolve the "Waiting for controller connection" error message.

12 Possible Options and Extensions

A Spare Parts Expert II

B Pick Up Needles for EXPERT, MPL, EXPERT II and MPL II

C Spare Parts Micro Placer MPL-II

D Block Diagram Expert II

E Block Diagram MPL II

F Pneumatic Scheme

G General Information Regarding Dispensing

H Country Specific System Settings (Language, Keyboard)

POWATEC Expert II Specifications

General IconGeneral
BrandPOWATEC
ModelExpert II
CategoryIndustrial Equipment
LanguageEnglish

Related product manuals