Do you have a question about the POWATEC P-200 and is the answer not in the manual?
Plug in machine, verify green light for proper roller function.
Position frame using alignment screws, note 6" adapter if needed.
Place wafer on vacuum chuck (grind side down), activate vacuum, adjust height.
Apply UV tape across wafer and frame, roll to ensure adhesion.
Cut tape periphery and top part, then remove excess tape from the frame.
Turn off vacuum, retrieve frame for grinding. Chip mounting alternative described.
Open lid, adjust workpiece speed for optimal UV tape curing.
Place frame (sticky side up), start machine via green button, let workpiece travel.
Stop machine, remove frame, release workpieces. Tape is no longer usable.
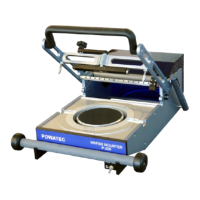
The POWATEC P-200 is a manual wafer mounter designed for mounting wafers or chips onto UV-sensitive tape without bubbles. It features dedicated frames, cutter devices, and a pad roller to ensure a smooth mounting process.
To begin, ensure the machine is plugged in. A green square light visible through the lid indicates that the motor-driven UV-tape rollers are functioning correctly.
Place a frame onto the system, adjusting its position using the four alignment screws. Small magnets are integrated to secure steel frames firmly. If using 6-inch frames, a size adapter must be placed first. Note that 6-inch frames are not compatible with the grinder.
For wafer mounting, place the wafer on the vacuum chuck with the side to be ground facing down. Activate the vacuum to secure the wafer. Adjust the height of the wafer using the screw nut located below the chuck until it is level with the frame. A manual rolling pad can be used for visual verification of the height.
For mounting chips, lower the chuck height as much as possible. Chips are placed manually on the tape after the tape has been fully stuck to the frames and cut.
Using both hands, pull the UV tape from its roll until it extends over the entire frame and can be stuck to the opposite end of the system, typically a black bar.
Use the manual rolling pad to firmly stick the tape to both the wafer and the frame. A single pass is usually sufficient. Continue rolling until you reach the tape roll. If the wafer is higher than the frame, manual adjustment of the tape sticking may be necessary.
Lower the cutting system. First, cut the top part of the tape by gently pressing down the blade and moving it back and forth along the track. Then, use the circular cutting blade to cut the entire periphery of the frame.
Lift the cutting system back up. Hold the frame steady with one hand and use the other to remove the cut part of the tape.
Turn off the vacuum and retrieve the frame, which is now ready for grinding.
For chips mounting, manually stick the chips onto the tape with the side to be ground facing up. Any available area on the tape can be used.
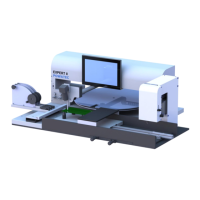
The POWATEC U-200 is a manual UV irradiation system designed for curing UV-tape, facilitating the easy and safe removal of thin workpieces. It is equipped with 31 LEDs (310mW @ 365nm) to ensure thorough curing.
Open the cover lid of the U-200. Adjust the speed at which workpieces will pass through the UV irradiation area. For very thin workpieces, a slower speed is recommended to ensure complete curing of the tape.
Place the frame on the left side of the machine, ensuring the sticky part of the tape is facing up (with the wafer on top). Close the lid and start the system by pressing the green button. Wait for the frame to travel to the right end of the system.
Stop the machine by pressing the green button again. Retrieve the frame and close the lid. First, release the frame, then remove the workpieces. After UV irradiation, the tape is no longer usable.
The manual does not explicitly detail maintenance features beyond ensuring the machine is plugged in for correct functioning of the motor-driven UV-tape rollers. Regular cleaning of the system, especially the cutting blades and rollers, would likely be beneficial for optimal performance, though not explicitly stated.
| Category | Industrial Equipment |
|---|---|
| Power Output | 200 W |
| Frequency | 50/60 Hz |
| Protection Class | IP20 |
| Efficiency | 85% |